
If you are struggling to understand how to post photos from Lightroom to Instagram, you need to read this article. I will show you my favorite approaches to use Lightroom in combination with your desktop computer or a laptop to post photos to Instagram.

As a photographer, I went through a couple of cycles of social media photo publishing platforms.
First, it was Flickr, which showed us a glimpse of how photographers can use the internet to communicate with each other and also to promote their businesses.
Next, it was 500px, which I loved a lot and had high hopes for it. But it faded away after a couple of years of explosive growth.
The biggest disrupter in the photography community was Google Plus. It looked for a while as a perfect platform not only for sharing and communication but also as a business stage for creatives. It did not last long; it was abruptly shut down.
And now we found ourselves with the only viable platform with unlimited potential, Instagram.
Mobile Centric Approach
From the very beginning, Instagram was a purely mobile platform. And it was built that way by design. Publishing photos from anything but a mobile device was always an issue.
Even now, 10 years later, the desktop browser version of Instagram does not have image publishing functionality.

It always caused the problem for us photographers. We do not use mobile devices to edit our RAW photos; we use desktops and laptops, and get our phots to Instagram never was easy and straightforward.
But now, a decade later, I believe we finally have a couple of different ways to connect Instagram with pretty much any device we use in our photography workflow.
Let me show you a couple of ways I approach Instagram publishing.
1. Post Photos to Instagram from Lightroom with LR Instagram Plugin
After Adobe implemented Plugin Manager in Lightroom years ago, many 3rd party developers started creating plugins for Lightroom extending its functionality.
One of such plugin was LR/Instagram.
The plugin allows you to publish photos directly from Lightroom Classic from LR/Instagram publishing module.

The plugin is a very popular solution among the photographers, but I never implemented it into my workflow because of some significant limitations. Such as:
- You can’t publish multiple image posts
- There is no scheduling
- There is no cropping functionality on export/publishing
If all you need is to post photos from Lightroom to Instagram occasionally, you might check the LR/Instagram plugin.
Please note, at the moment of writing this article (Summer of 2020), the LR/Instagram plugin is broken because Instagram changes some protocols with the latest update. But, I am sure that as soon as Instagram publishes new documentation, the plugin will be fixed.
Since the LR/Instagram never addressed my needs, let me show you the workflow I use often.
2. Lightroom to Instagram Mobile Workflow
I consider Lightroom Mobile to be the most critical photography-related application created by Adobe in the last 10 years.
I believe that Lightroom Mobile is the best mobile camera application that allows you to capture RAW format photos. Plus, it is the best mobile editing solution.
Since Adobe conformed all their photo applications to its standard RAW Engine, the lightroom Mobile became an extension of Lightroom Classic and Photoshop, where you can synchronize photos, edits, and even presets across different applications and platforms.
In my Lightroom / Instagram publishing workflow, I use Lightroom Classic to edit and crop photos intended for Instagram, and I use Lightroom Mobile for publishing.
Step 1 Setting up Synchronization
Before you start transferring the images between Lightroom Classic and Lightroom Mobile, you need to enable synchronization function.
Create a Collection in Lightroom where you will keep your images intended for sharing on Instagram and select the Synch with Lightroom checkbox.
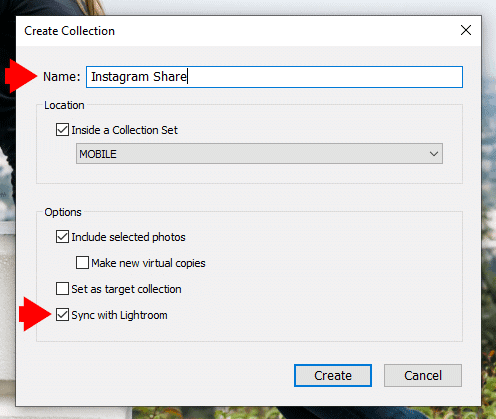
What the feature does, it tells Lightroom to upload every image available in Instagram Share collection to Adobe Creative Cloud and make it available to every mobile device connected to your account.
Step 2 Editing and Setting the Right Aspect Ratio
The second step is a straight forward process. You edit your photos intended for Instagram publishing, as you usually do with any images.
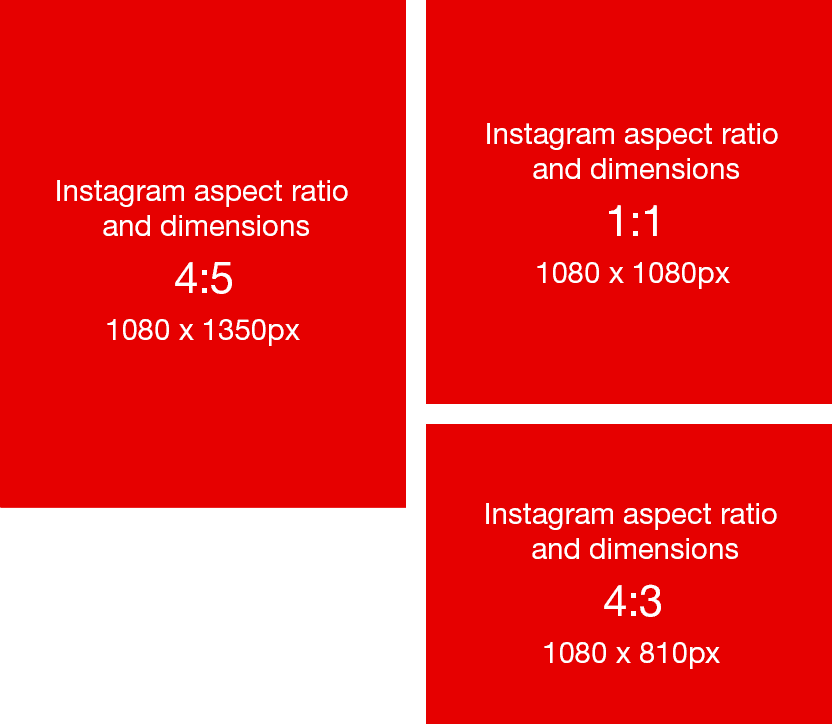
The only difference here is to conform your photos to the right aspect ratio. Instagram is very clear about supported ratios you can use.
For Instagram to preserve the original aspect ratio, the shared photo needs to have an aspect ratio between 1.91 x 1 and 4 x 5.
Here are the aspect ratios I use and recommend:
1 : 1 square ratio is still the king of Instagram
4 : 5 is the best ratio for images in portrait orientation
4 : 3 is the optimal ratio for images in landscape orientation
Step 3 – Synchronizing to Lightroom Mobile
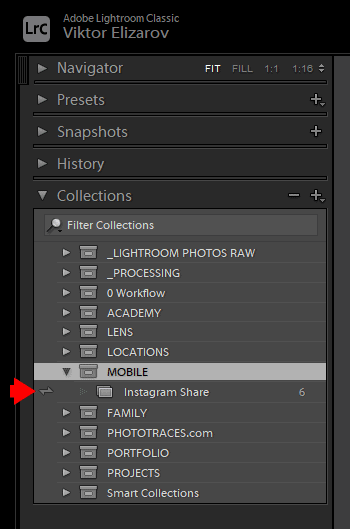
When you are happy with your photo’s final look, all you have to do is drag photo(s) to the Collection you created in step 1. In my case, the name of the Collection is Instagram Share.
Make sure Instagram supports the aspect ratio of the photo(s).
After you added photos to synchronized Collection, Lightroom will start immediately uploading the images to the cloud. And only if a few seconds, the images will be available on your mobile device.
Step 4 – Publish Synchronized photos to Instagram.
When you open Lightroom Mobile on your mobile device, you will see a new collection with the same name as a collection you created in Lightroom Classic in step 1. Inside, you will find all the photos prepared for Instagram publishing.

All you have to do now is to open the collection, select the photo, and click the Share icon.

Here you have 2 options:
Use Share to …
and from the list of shared options, select the Instagram Feed.
The Instagram app will be activated, and you can publish photos to Instagram as you usually do on your phone.
Use Save to Device
Now your saved photo(s) is available to be used by any app.
Open Instagram and create a new post using one or multiple photos from the device.
The Shortcomings of Lightroom Mobile Sharing
- There is nо scheduling
- If you want to resize a photo to a specific dimension, you need to export it first from Lightroom Classic, reimport it and only after you can synchроnize it with Lightroom Mobile and publish it.
How to Post Photos on Instagram from a Desktop Computer or Laptop
And now, I want to share with you 2 different ways of posting photos to Instagram from a Computer or Laptop that offers the most flexibility.
It is always a two-step process:
First, I use Lightroom Cassic to prepare images for publishing. I want to make sure the photos have the right dimensions, aspect ratio supported by Instagram, the right color space, and image compression settings.

The goal is to create an image that the Instagram algorithm does not have to resize or crop so you can publish it at the best possible quality.
Please read my detailed article here: Lightroom Export Settings for Instagram, where I outlined the best practices for preparing photos for publishing on Instagram.
I export images using Lightroom export preset intended specifically for Instagram images.
At this point, the Lightroom part of Instagram publishing is over. I move to step two.
In the second step, I use one of the web applications I listed below to schedule and post my photos to Instagram.
1. Using Web Application Later.com
There are plenty of web applications that offer Instagram sharing. But, I find that Later.com provides the most generous free plan.
With the free plan, you can schedule up to 30 Instagram posts to one social profile.
It offers a very visual and intuitive interface, it takes 5 min to learn.

But, there is one major shortcoming in the free plan. You can not post multiple photos to the same post. You need a paid plan for that.
But, I would say for the majority of photographers, Later.com free plan will more than enough.
2. Facebook Creator Studio
Facebook Creator Studio is the most flexible way of sharing photos to Instagram, and it is free. But not many people aware that Facebook Creator Studio has Instargam module built-in.
I guess that at some point, the Instagram dedicated Studio will be released, but for now, it shares the roof with Facebook.

I am not an advanced Instagram user, and all I need is to be able to schedule 5-6 posts once per week. And second, I need to post multiple photos in the same post, so I can demonstrate Before & After states of published photos.
Final thoughts
As you can see, even today, the process of publishing our phots to Instagram is not straight forward or streamlined. But, at least we have a couple of different means of connecting our editing environment with the Instagram platform.