
If you want to learn how you can create and use Lightroom copyright presets, you’ve come to the right place.

Lightroom gives us a couple of ways to protect our photos from theft and misuse.
Although I question the effectiveness of any means of digital image protection, I consider it to be very important for my business.
Let me explain.
I truly believe that, at the present time, there is no bulletproof way to protect our images. As a person with over 20 years’ experience in digital imaging, I understand that if someone wants to steal your images that you cannot do much about it. The good news is that most people are honest and legitimate theft is a rare occurrence. In most cases, the supposed theft is unintentional misuse resulting from people who do not understand how copyright works in the digital arena.
Related: How to Create and Use Lightroom Import Presets
But, there is another reason for adding copyright information to all your images; a reason that I consider to be more important than protection. It is for discovery purposes.
When someone comes across a photo and is willing to pay money to license it, it is not always easy to track the author because of the nature of uncontrolled image sharing on the web. The embedded copyright information helps the buyer locate and contact the author. This has happened to me on numerous occasions.
I highly recommend and even challenge you to develop the habit of adding copyright information to all your photos during the import process.
The good news is that Lightroom makes this process really simple and almost automated.
Copyright Presets in Lightroom
All you have to do is create a Copyright Preset (learn more about different types of Lightroom presets). It is easy to add the copyright information to both your new photos and all your previously imported photos in the Lightroom catalog.
Creating a Copyright Preset
In the Library Module of Lightroom, locate and open the Metadata Panel on the right side.
From the preset drop-down menu, select the Edit Presets option.

The Edit Metadata Presets dialog box will open. I know, it looks intimidating. But, there is no need to worry—you do not have to fill in all 14 sections.

Close all the sections, leaving only the IPTC Creator and the IPTC Copyright open.
Use my preset as a guide to fill in the fields with your information.
The most critical fields are the Copyright Status and the Rights Usage Terms. Change the Copyright Status from Unknown to Copyrighted or Public Domain and specify the right Usage Terms.
Related: Free Lightroom Presets for Travel Photography
In the IPTC section, input your personal information. This section is critical for discovery purposes.
In my case, I did not specify my address because I wanted to protect my privacy since my office is in my personal residence. My email address is enough for me.
When you finish filling in both sections, click the DONE button, choose the Save As… option, and name your new Copyright Preset.

In case you are updating an existing Copyright Preset, the steps are similar but, instead of saving a new preset, you simply update the existing one.
Ways to Apply the Copyright Preset to Images
Applying a Copyright Preset During the Import Process
The most convenient way to apply the Copyright Preset is during the import process.
While in the Import Module, open the Apply During Import Panel. From the Metadata drop-down menu, select the preset you created.
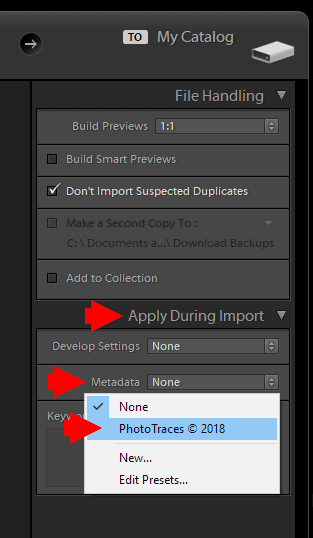
Now, when you import multiple images to your catalog, the copyright metadata will be added to each image.
The next time you want to import a series of new photos, Lightroom will use the Copyright preset you used the first time as a default. You do not have to do anything else.
Applying a Copyright Preset to Existing Photos
In Library mode, hit the G shortcut to switch to Grid View.
Select multiple photos in the grid. From the preset drop-down menu of the Metadata Panel, select the Copyright Preset. You are done! All the selected photos will have copyright data applied to them.