

Do your images show signs of chromatic aberration, also known as color fringing or purple fringing?
It’s a common
problem. And it can easily reduce the quality of your images.
Fortunately, there
are a few simple ways to deal with chromatic aberration so that your images are
free from color fringing.
In this article, I’m
going to explain how chromatic aberration occurs. And then I’m going to show
you several easy ways to get rid of it.
Let’s dive right in.
What Is Chromatic Aberration?
What Is Chromatic Aberration? Chromatic aberration is color fringing that occurs in high-contrast areas of your photos. You’ve probably noticed it as purple fringes in your images (though it can also be red, green, blue, and more).
Look at the landscape photo:

Do you see the purple and green fringing along the edges of the trees?
Let’s zoom in:
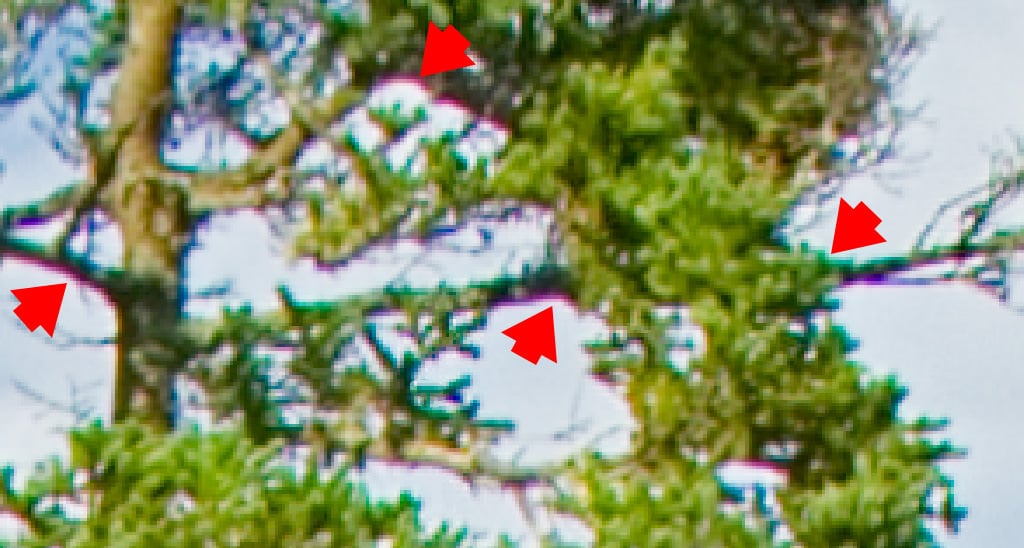
That’s chromatic aberration.
What Causes Chromatic Aberration?
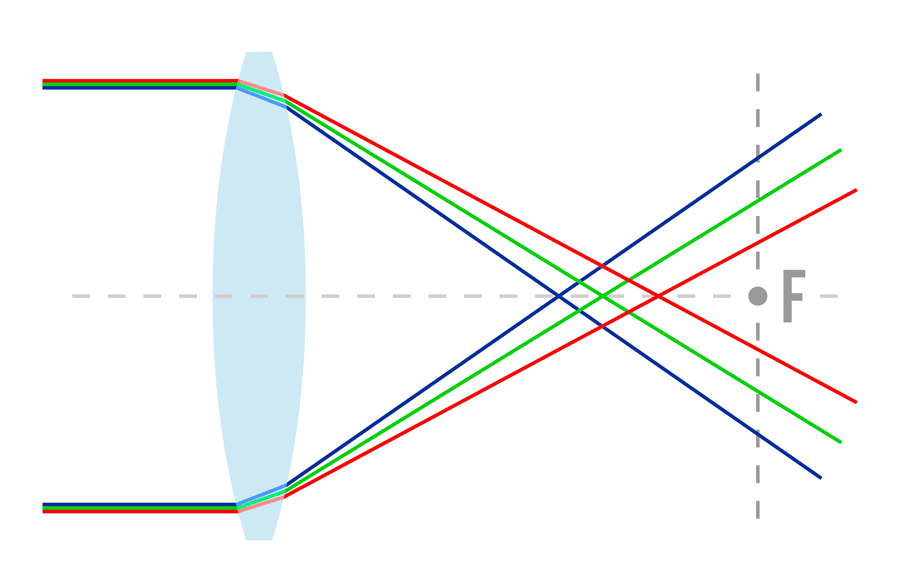
Chromatic aberration occurs when light passing through your lens bends at different angles. You see, some wavelengths of light bend more than others when they pass through the lens. And this causes certain colors (especially purple, red, green, and blue) to appear in unwanted places.
Chromatic aberration is a problem caused by your lenses, and basically every lens displays chromatic aberration to some extent.
But you don’t need to
be afraid of chromatic aberration. Because there are methods of minimizing it
while shooting–and, if it becomes a serious problem, you can remove it easily
in programs such as Lightroom or Photoshop.
How to Avoid Chromatic Aberration?
1. Use High-Quality Lenses
The first way to minimize chromatic aberration is to buy high-quality lenses. The better the glass, the less chromatic aberration will be an issue. This is because the best lenses (Canon 17-40mm for example) are made to limit the separation of light when it passes through the glass elements. Look for lenses with low-dispersion elements. These are designed to significantly reduce color fringing.
But what if you can’t afford these expensive lenses? What then?
2. Avoid High Contrast Scenes
First of all, you can
avoid situations that result in a lot of color fringing. The fact is that many
scenes don’t trigger much chromatic
aberration at all. The key is to keep things low-contrast.
Related: Wide Angle Lenses: The Ultimate Guide
So if you’re shooting a dark subject on a white background, change the background. Try to shoot your subject on a background that’s similar to its main colors. Instead of shooting a purple flower against a bright white background, shoot against a green background. And chromatic aberration will instantly become less of an issue.
3. Increase the Aperture Value
Another way that everyone can minimize chromatic aberration is by stopping down. That is, use an aperture a stop or two beyond your lens’s maximum. If you’re working with an f/2.8 lens, stop down to f/4 or f/5.6. A lot of the color fringing will disappear.
4. Keep Your Subject Close to the Center
You can also try placing your subject toward the center of the frame. One type of color fringing (lateral chromatic aberration) only occurs at the edges of the frame. By positioning your main subject at the center of the image, you reduce the effect that CA has on your photo.
But sometimes,
chromatic aberration gets out of hand, and there’s nothing you can do about it
in the field.
That’s where
post-processing comes in.
How Do You Fix Chromatic Aberration With Post-Processing?
When editing out
chromatic aberration, I like to use Lightroom or Photoshop, and I suggest you
do the same. Both of these programs offer powerful tools to rid your images of
chromatic aberration–without
significantly damaging image quality.
If you prefer to use
Lightroom (which is my go-to image editing program), then read on.
How to Remove Chromatic Aberration in Adobe Lightroom
There are two simple
ways of getting rid of chromatic aberration in Lightroom.
Both require the
Lightroom Lens Corrections panel.
- Step 1: Open Lightroom, then click on the Develop module.
- Step 2: Scroll down on the right-hand side until you see the Lens Corrections heading. Click to open the panel.
- Step 3: Simply check the Remove Chromatic Aberration box.
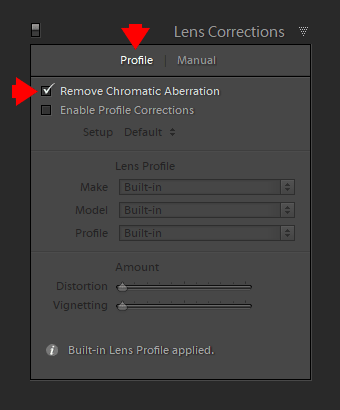
This generally does a good job of removing fringing
However, if you’re
not satisfied with this method, you can remove chromatic aberration manually:
- Step 4: Click on the Color option in the Lens Corrections panel.
- Step 5: Then click on the eye-dropper tool.
- Step 6: Place the eye-dropper tool along the fringing and simply click – and watch as the fringing is removed (see image below).

You’re also free to adjust the removal levels manually via the sliders in the Lens Corrections panel. For instance, you can increase the purple fringing removed by pushing up the Amount slider.
See also: High Quality Fujifilm Lenses Today
You can even change
the fringing hue with the Purple Hue and
the Green Hue sliders. Just drag the
sliders to alter the color you want to remove.
How to Remove Color Fringing in Photoshop
Based on my experience, the Lightroom chromatic aberration removal methods cover 99% of situations. And only in severe cases, I need to use Photoshop.
Go ahead and watch this video, which takes you through the color fringing removal process in Photoshop:
Conclusion
Now you know exactly
what chromatic aberration is–and that it’s nothing to be worried about.
Because it’s easy to
minimize by shooting with high-quality lenses, or by stopping down your lens.
And if you end up with an image full of unsightly chromatic aberration, you can always remove it with a couple of quick clicks in Lightroom!
At the same time, it is much better to choose the lens wich produces minimal chromatic aberration.