
When an aspiring photographer asks me the best way to improve a landscape photograph, I always give the same photography tip without any hesitation: “Make sure the horizon is always straight in your landscape photographs.”
The easiest way to keep the horizon straight in a photograph is to have a Bubble Level attached to your camera or using the Gridlines on your camera’s LCD screen. Ultimately, you can straighten the horizon in Lightroom during post-processing with the help of the Crop Overlay tool.

The Horizon and Landscape Photography
There are a number of different ways to improve your landscape photos, but a straight horizon works on a more basic level and goes beyond logic and artistic expression.
From the moment we are born and throughout our lives, all our experiences confirm the fundamental rule that the horizon is always horizontal in nature. This fact is imprinted in our brains.
When we see a photograph with a horizon that is crooked even slightly by a few degrees, the brain simply rejects it. If a viewer is not photography savvy, he or she won’t be able to explain why they do not like the photo—the rejection works on a subconscious level.
This is the reason that the first and most fundamental rule of landscape photography is to keep the horizon straight.

How Can You Keep the Horizon Straight in a Photograph
Let’s see how we can achieve this.
There are two main approaches for dealing with straight horizons.
- First, make sure to keep your camera straight when taking photos.
- Second, you can address any crooked horizon later during post-processing.
It is always preferable to get it right in the camera, but with the advances of editing programs, we now have plenty of tools to address unlevel horizons in Lightroom and other editing programs.
In my case, I use a combination of both approaches. I always try to keep my horizons as straight as possible when taking the shot but, at the same time, I do some finetuning in Lightroom with almost all my landscape photos.

Keeping the Horizon Straight When Shooting
1. Bubble Level
Before the new electronic helpers were introduced in digital cameras, the Bubble Level was the most popular and simplest way to make sure we kept our cameras straight while taking photos.

A Bubble Level costs only a few dollars and can be attached to the hot shoe of any camera. The air bubble inside the device serves as an accurate indicator of how straight your camera is. When you see the air bubble in the dead center, you know you are ready to take the shot.
The Air Bubble method is effective and accurate when shooting on a tripod, but it is not very useful when shooting handheld.
I still have a Bubble Level laying around, but I hardly use it since we have much better options available these days.
2. LCD Gridlines
With the introduction of LCD screens in DSLR cameras, we now have the option to overlay gridlines on the rear LCD. This was the very first electronic helper in photography.
When I shot with a Canon DSLR, I hardly used the gridlines at all because I always used the Optical Viewfinder to compose the shots even when using a tripod. I found that the rear LCD screen was too reflective and did not allow me to properly assess the scene.
3. LCD Electronic Level
The next introduction was the electronic level that you could activate on the rear LCD. The straight lines serve as a leveling indicator that changes color—normally from red to green—when your camera is perfectly level.
I know many DSLR photographers who use the LCD Electronic Level all the time when composing landscape shots but, once again, I never used it because of my exclusive use of viewfinders.
4. EVF Gridlines
With the introduction of mirrorless cameras, it became possible to display all kinds of visual aids inside the EVF including gridlines.

When I started shooting with the mirrorless Sony, I took full advantage of the gridlines. They were constantly activated on my Sony a6000 and I used them as the main guide for my composition and for keeping the camera straight.
5. EVF Electronic Level
When shooting with Sony, I did not have the Electronic Level feature available, so I was not accustomed to it. When I started shooting with the Fujifilm X-T2, which had the EVF Electronic Level, I simply rejected it and treated it as an unnecessary gimmick.
I only later realized how effective it is. Now, I have it activated all the time so that I can assess the horizon level when composing my shots whether I am using a tripod or shooting handheld.
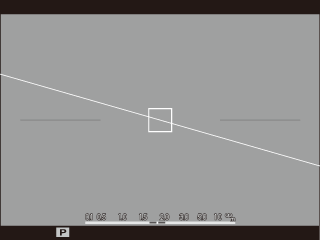
From Fujifilm manual: Selecting ELECTRONIC LEVEL displays a virtual horizon. The camera is level when the two lines overlap.
With my new habit of using the Electronic Level in the EVF, I find that my need for tweaking the horizon level during editing is minimal.
Fixing an Uneven Horizon in Post Processing
We all know that it is better to level the horizon when taking the shot but, honestly, this is not always possible. When we fail, Lightroom comes to the rescue.
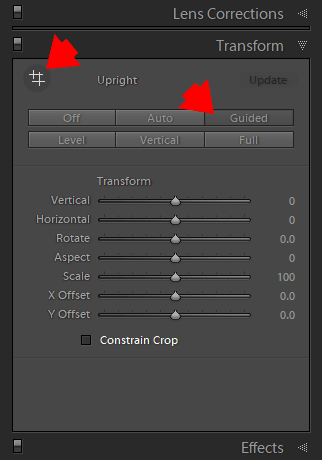
7. The Crop Overlay
In the Crop Overlay panel, there are a few options for adjusting the horizons.
You always begin with the AUTO option. In this option, Lightroom tries to assess the image and fix it automatically. This works pretty well when you have open, unobstructed horizon lines. I suggest always starting with the AUTO option and, if it does not work, move to other options.

Next, you can simply grab any corner of the Crop Boundaries and rotate it. Optionally, you can use the Angle Slider to adjust the level numerically.

The most effective and fastest way to adjust the horizon is to use the Straighten Tool. You simply drag the straight line along the horizon in your photo and the program automatically adjusts it. For me, this visual method is the most fun way to straighten the horizon in a landscape photo.


8. Lens Corrections
In some cases, even if you do everything right during shooting, you can still end up with an uneven horizon. If your lens has a strong barrel distortion, the curvature of the straight lines (including the horizon line) can be prominent.

This often happens when shooting with lower quality ultra-wide-angle lenses.
To correct the issue, you need to use the Lens Correction Panel.
By selecting the Enable Profile Correction option, you will fix the barrel distortion 99% of the time.
Related: How to Photograph and Edit Winter Landscapes
Each camera manufacturer knows the level of distortion of their lenses at each focal length and it is easy for them to create the profile for each model. By giving Lightroom instructions saved in the profile, it can correct the distortion with ease.

But in case Lightroom does not have the right profile for your lens, you can always manually adjust the distortion.
Jump to the Manual tab of the Lines Correction Panel and use the Distortion Amount Slider to visually adjust the curvature.

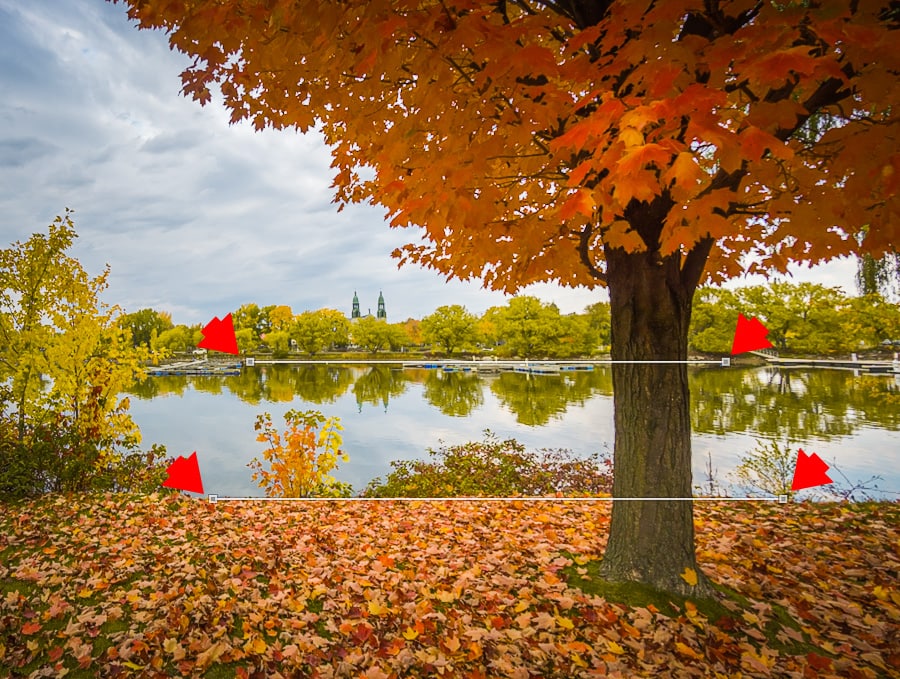
9. Guided Upright Tool
Finally, the most advanced tool of them all is the Guided Upright Tool.
You use the Guided Upright Tool when you need to straighten more than one line in your photos.
For example, your landscape photograph features a horizon in the background and a river in the middlground. You took a shot of the scenes from an angle and neither the horizon nor the river is perfectly parallel. Even though there is nothing wrong with the perspective, the river and the horizon are supposed to converge based on your position. It does not look quite right in the photograph.

Because the viewer does not see the entire scene (only what is included in the frame) and does not know the position of the photographer relative to the scene, the photo looks crooked.
In such cases, the Guided Upright Tool is the perfect solution. You can drag one guide along the horizon and another along the river bank, which tells Lightroom to align them by distorting the image.
Final Thoughts
As you can see, we have plenty of tools available today to make sure the horizon in our photographs is always straight. It is up to you to choose one tool or a combination of tools to use in your workflow.
Use the comment section below and let me know how you deal with straightening the horizon in your photography.