
Do you know what two factors are vital in establishing your style in photography?
Time and consistency.
Let me introduce my photo editing system that not only saved me an enormous amount of time editing, it also made my photography more consistent.
Essentially, this system helped me develop and establish my personal style.
I know it can help you as well.

You Will Learn:
- How the evolution of the photography affected the way I edit my photos
- How two levels of Lightroom preset editing helped me develop the Rapid Editing System
- How to apply the Rapid Editing System in a real life scenario with detailed demonstration
USSR and the Darkroom
I first started with photography in high school by shooting with a plastic rangefinder. It was manufactured at one of the USSR military industrial complexes and was a terrible camera.
I was obsessed with photography.
I even built a tiny darkroom in the bathroom.
My uncle was an event photographer at the time. He saw my obsession and was kind enough to invite me to be his apprentice for the duration of the summer to learn the trade.
After high school graduation, I spent three months learning the ins and outs of professional photography.
I learned a lot, but something was unexpected. I discovered that professional photographers spend about 60% of their time processing photos in the darkroom.
I was disappointed. I was not ready to commit half of my life to claustrophobic confinement.
I quit photography and moved on with my life.
Digital Reality
Years later, after moving to Canada and becoming a graphic designer, I had a revelation. It suddenly struck me that I could completely bypass the confinements of the darkroom with a digital workflow. I could dedicate more time to the fun part of photography – taking pictures.
I was back and Photoshop became my darkroom.
But, the fun did not last long.
I became more serious about photography and started taking more pictures. I was back to the 40%-60% ratio. Now, instead of a darkroom, I was spending 60% of my time in front of a computer.
I was not alone.
Thousands of photographers were in similar situations, drowning in the ocean of digital images.
Savior from Adobe
This is when Adobe saved us all with Lightroom.
It was like a breath of fresh air. It was a completely new and revolutionary approach to the normal photography workflow.
Lightroom not only offered photo editing but a complete digital photography workflow as well.
It was lightning fast.
As an early adopter, I managed to cut my photo processing time in half with Lightroom.
Over the following years, Lightroom became more sophisticated and versatile. At the same time, its complexity skyrocketed.
One day, I returned from a driving trip to California. I had 5,000 brand new photos. After two days of Lightroom editing, I was not even close to completion.
This is when I realized that the editing system I used for years finally became obsolete.
I needed a new system with organizational procedures and automation.
In Search of a Solution
I spent the next 18 months optimizing my workflow.
When I started analyzing the way I take and edit photos, I noticed certain patterns. I recognized that the way I take pictures directly affects the way I process photos in Lightroom.
For example, when shooting landscapes and cityscapes, I always set the exposure for the highlights (sky) that results in underexposed foreground shadow areas. Then, as I begin editing, I start by:
- opening up the shadows,
- recovering details in the highlights,
- adding a graduated filter to the sky area,
- boosting contrast and clarity,
- increase the saturation and vibrance.
- the increase in vibrance usually results in an oversaturated sky so I only desaturate the blue hues,
- I also ensure that the vegetation in my photos is not electric green by shifting the green hues toward the yellow spectrum,
- in the final steps, I add vignetting, increase sharpening and reduce noise.
Though these steps soon became second nature, it also meant that I performed anywhere from 20 to 30 identical adjustments to every edited photo. I realized that 80% of my editing steps were identical for every photo. Only 20% of my efforts were spent on what really mattered: making every photo unique.
I also recognized that if I could automate that 80%, then I could drastically reduce the time I spent in front of the computer.
I dug deep into my photo archives and selected the photos that best reflected my personal style.
The next step was to leverage one of the most useful and interesting functionalities of Lightroom – the preset creation. I created my own Lightroom presets based on the selected photos.
Initially, I completed the Landscape Collection by creating and polishing 20 Lightroom Presets. Every preset covered different scenarios of the way I edit landscape photos that also reflected my personal style.
But, there was still a problem in paradise.
Presets do not work out of the box.
You probably noticed that it is rare that you apply one of the presets to a photo and are happy with the final results. You still have to dive deep into the Lightroom editing tools. You still have to compensate for the level of exposure, lighting conditions, shadows and the dynamic range of the scene.
I was determined to eliminate, or at least minimize, fiddling around with endless Lightroom editing tools.
This is when the idea of two levels of presets was born.
The Breakthrough
I separated my Lightroom presets into two categories:
Style Presets. The presets that define the “LOOK” and style of the photograph. For example: cool or warm, cross processed or natural, contrasted or soft.

Adjustment Presets. The presets that allow fine-tuning of a photo without altering the style and without the use of Lightroom editing tools. I named them the ToolKit.

This is how my workflow looked after I implemented the two level preset system:
First, I applied one of the Style Presets. Then, I used the Adjustment Presets from the ToolKit to fine tune the image.
Simple, effective and automated.
The Lightroom Rapid Editing System was ready for prime time.
Now, it is time for the demonstration.
Lightroom Rapid Editing Workflow in Action
For today’s demonstration, I selected the photo of Niagara Falls (American and Bridal Veil Falls). I took it in the early evening from Skylon Tower.
The scene was somewhat challenging. The water of the falls was much brighter than the rest of the scene. I intentionally set exposure for the brightest areas making sure I preserve enough details in the water. It resulted in underexposed capture making it more challenging to edit.

Let’s start from the top.
First, I apply one of my favorite presets from the Landscape Collection – Natural.
What Natural preset does is it opens up the shadows, increases the contrast, amplifies the colors in general and specifically boosts the blue color (sky, water).
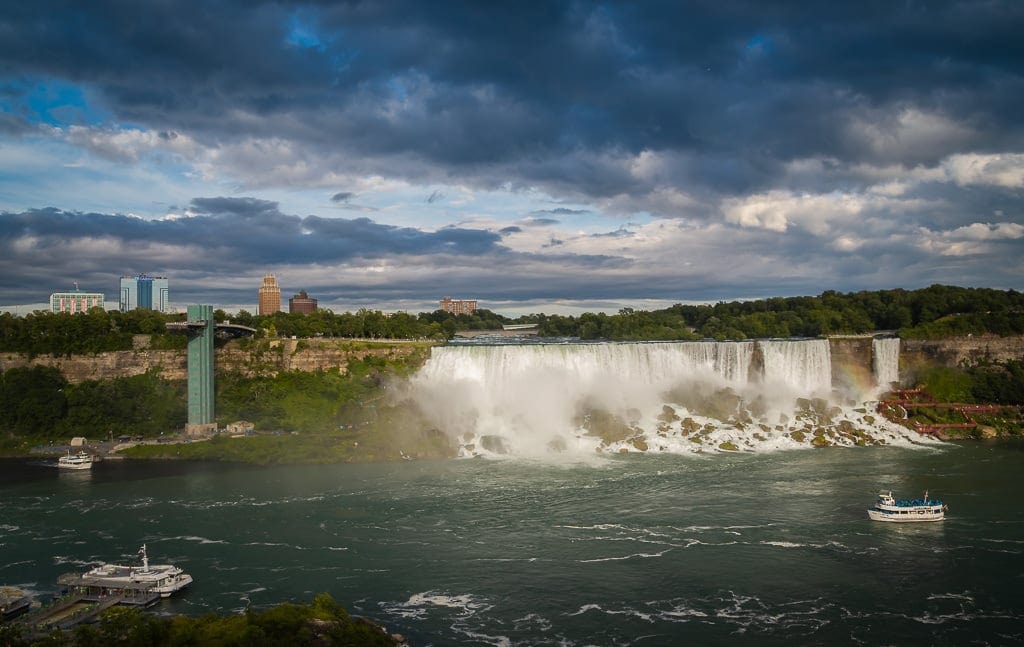
In general, I like what I see but since the original photo was underexposed, the result is too dark and I need help of TOOLKIT presets to fix it.
What I need to adjust is to make the image brighter, paying extra attention to the shadows .
Below is the final result of two levels of preset editing.
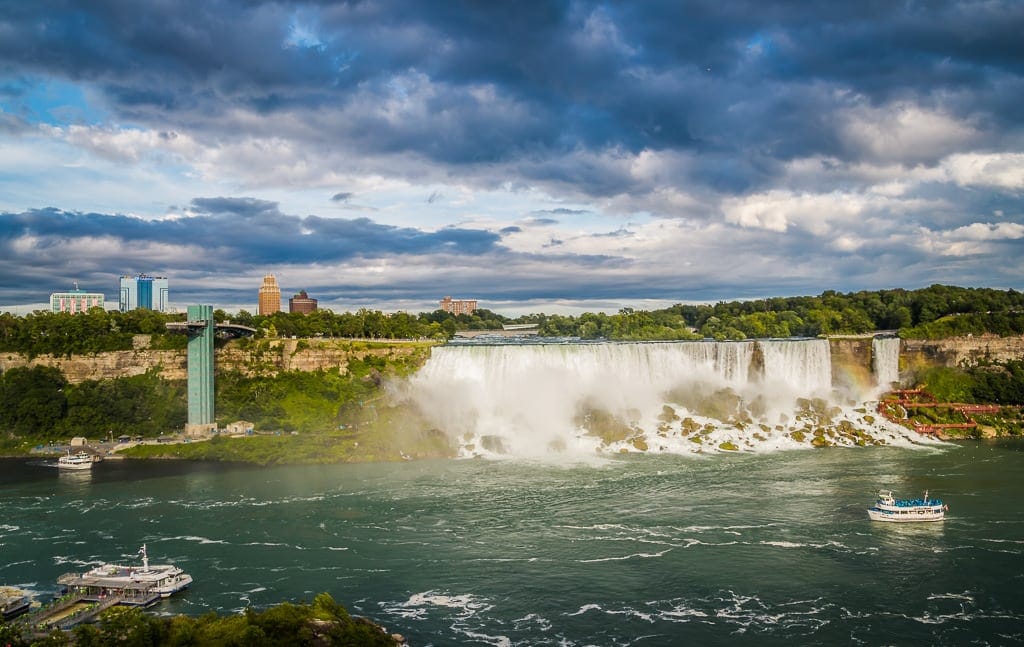
Here are the exact editing steps I used to achieve the final look:
- Natural preset
- 01 Exposure +
- 08 Open Shadows ++
- 17 Clarity ++
- 31 Vignetting +
When I am happy with the final result, I use the Snapshot functionality of Lightroom and save my editing steps as a new Snapshot. For the name, I use Lightroom Editing Formula.

Lightroom Editing Formula
The Lightroom Editing Formula is the essential part of the Lightroom Rapid Editing System. The formula helps me to systematize the editing process and also let me share the editing steps with ease.
The Lightroom Editing Formula for the photo I just finished editing is Natural (01, 08, 17, 31). It starts with the name of the preset and follows with the numbers inside the brackets.
Each number inside the brackets represents a specific ADJUSTMENT preset from the TOOLKIT collection.
The Lightroom Editing Formula tells us what 5 editing steps (clicks) it takes to get from the original, straight from the camera photo to the final version.
Natural (01, 08, 17, 31)

I move forward by applying various presets from Landscape Collection
Preset: Tropical Morning
Editing Formula: Tropical Morning (8, 16, 21, 31)

Preset: High Pressure
Editing Formula: High Pressure (8, 18, 31, 34)

Preset: End of Summer
Editing Formula: End Of Summer (8, 31, 34)

Preset: Drought
Editing Formula: Drought (7, 31, 34)

Preset: Broken Clouds
Editing Formula: Broken Clouds (8, 17, 30, 38)

Preset: Clock Tower
Editing Formula: Clock Tower (12, 17, 30, 34)

Preset: Point Lobos
Editing Formula: Point Lobos (8, 32, 34)

Next, I start applying presets from my Cityscape Collection.

Preset: Morro Rock
Editing Formula: Morro Rock (14, 17, 22, 23, 32)

Preset: Montreal
Editing Formula: Montreal (8, 16, 31, 34)

When I am done with the editing, I have the Snapshot Panel of Lightroom filled with 10 editing versions for this particular photo.

I created 10 different versions of the same photo without touching Lightroom right panel where all editing tools reside.
The last step of Lightroom Rapid Editing is to select the editing version of the image I like the best and publish it.
Sometimes, if I like more than one editing version, I can use one for my portfolio and another for Instagram or Facebook.
Please note, in the real-life scenarios I normally do not create 10 editing version of the same image. I did it with the purpose to better demonstrate the power of my new system. Normally, I create 2 or 3 versions before I am ready to make a selection.
Also, in most of the cases, I still use Photoshop to do the final touches. For me, the use of Photoshop is more a habit than a necessity and it can be bypassed altogether.
Conclusion
Originally I created Rapid Editing System for my personal needs. The main goal was to simplify my entire photography workflow and free myself as much time as possible.
After I shared new system with my readers and followers, I realized that different photographers use it with the different goals. For example:
- The beginners use it as the tool to learn Lightroom. They apply my presets and then reverse engineer them. They dive into Lightroom editing tools and learn how the effects were archived.
- More experienced photographers use Rapid Editing System to accelerate the process of developing a personal style. They use my presets as the launching pad for creating their own looks and styles. Ultimately they build libraries of their own presets which reflect their personal styles.
- For advanced photographers, the main benefit is the simplicity and speed which results in substantial time saving.
I am sure you can find my system beneficial for your photography by tailoring it to your specific needs.