
Do you want to know all about ND filters? Are
you struggling to understand what neutral density filters can do for your
photography?
You’ve come to the right place.
Because in this article, I’m going to give you
everything you need to become an ND filter expert–so that by the time you’ve
finished, you’ll be able to confidently select neutral density filters for your
photography.
You see, neutral density filters are the most
popular photo filters out there, even compared to common options such as clear protection
filters, polarizing filters, and more.
Which is why every photographer should
understand what ND filters are and why they matter.
Let’s get started.
What is an ND Filter?
All photo filters are designed to modify light
before it reaches the camera sensor.
For instance, warming filters will make the
light appear warmer by filtering out colder colors.
UV filters will reduce the sensor’s exposure
to ultraviolet light by filtering it out in advance.
So neutral density filters have one function: To reduce the intensity of the light.
Slap an ND filter in front of your lens, and
your viewfinder will immediately become darker–though the level of darkness,
and the extent to which the entire viewfinder is made dark, depends on the
neutral density filter.
Then, when you take a photo, the shot will be
drastically underexposed, unless you make necessary changes to your exposure
after adding the ND filter.
Make sense?
Now, you may be wondering:
What’s the point of adding an ND filter in
front of the lens? Won’t this just make it more difficult to expose properly
for scenes?
In fact, there are a number of reasons why you
might want to use a neutral density filter, as I explain in the next section:
What Does a Neutral Density
Filter Do?
If you’re an experienced photographer, you
know that there are three main camera controls you can use to control the
exposure of your images:
- Aperture
- Shutter speed
- And ISO
Now, it’s your job as a photographer to find
the right balance between these settings in order to create a perfect exposure.
But sometimes…
Sometimes you want to use unconventional
settings for creative effects.
1. ND Filters Help to Control Motion in Our Photos
For instance, a longer shutter speed will
increase the motion blur in your photos. You can go from a shot with frozen
subjects–frozen people, frozen waterfalls, frozen rain, snow, and clouds–to a
shot with blurred subjects, which can give you interesting artistic effects.

You see, with a neutral density filter, you
reduce the amount of light hitting the sensor–which allows for you to use a
slower shutter speed in order to compensate for the lost light. This allows you
to creatively blur water, moving people, and more.
2. ND Filters Help to Control Depth of Field
And a wider aperture will allow you to create
stunning depth of field effects, where the background becomes blurry and helps
your subject to stand out. While an aperture of f/11 or so will generally keep
your entire photo sharp, an aperture of f/2.8 is going to ensure that only a
sliver of your image is in focus.
A neutral density filter can also allow you to
widen your aperture in order to get an artistic shallow depth of field effect.
When the light is strong, you’ll normally be forced to shoot at a narrow
aperture to create a perfect exposure–but with a neutral density filter, the
strength of the light will be reduced, allowing you to dial in a wide aperture.
This is why an ND filter is so useful.
Note that a wide aperture isn’t just useful
for creative depth of field effects.
3. ND FIlters Help to Improve Image Quality
A wide aperture also increases image quality,
because it prevents something called diffraction.
Diffraction is an optical phenomenon that occurs when you use a narrow aperture;
it’s a consequence of the light waves moving through a very small slit, which
causes the waves to spread out and interfere with one another.
Put simply, diffraction causes blurring in
your images.
And a wide aperture prevents diffraction.
Hence, a neutral density filter can also be
used to mitigate the presence of diffraction in your images–in order to keep
things nice and crisp.
One last thing:
ND filters aren’t just useful for still photographers. Videographers use ND filters, too – in order to control the frame rate when shooting in bright light, which creates a smoother recording.
Understanding the Strength of ND
Filters
Different neutral density filters offer
different levels of light reduction.
Some ND filters reduce light very slightly–whereas
others reduce light an extensive amount.
But how are these differences in filter
strength measured?
The most basic measurement used for neutral density filters is stops – that is, a reduction of the light by half.
So a reduction of one stop halves the amount of light that hits the sensor.
A reduction of two stops reduces the light that hits the sensor by 3/4ths.
A reduction of three stops reduces the light that hits the sensor by 7/8ths.
And so on and so forth.
This should help clear up a common
misconception:
That a 6-stop ND filter reduces the light down to 1/6th of its original strength, and a ten stop ND filter reduces the light down to 1/10th of its original strength.
This is incorrect.
Because each time you lose a stop of light, you’re reducing the light by half.
So a 6-stop ND filter cuts the light down to 1/64th of its original strength. And a 10 stop ND filter cuts the light down to 1/1024 of the original.
Note that neutral density filters will often
list their strength in stops:
1 stop, 2 stop, 3 stop, 6 stop, 10 stop, etc.

So if you grab a 3 stop ND filter, you know
that it’ll reduce the light by three stops, also known as 7/8ths (because it’ll
halve the light three times, giving you 1/8th of the unfiltered light).
You’ll sometimes also see ND filters labeled with an optical density measurement, such as 0.3, 0.6, 0.9 or ND2, ND8. Note that an optical density of 0.3 corresponds to a single stop of light, so an ND filter with a 0.3 label will be a one-stop ND.
But generally speaking, the f-stop measurement
is the most useful, because you can easily use it to determine the correct
exposure for your filter. Simply select the exposure you’d need before adding
the ND filter–then drop the shutter speed or widen the aperture to compensate
for the number of stops the ND filter has reduced.
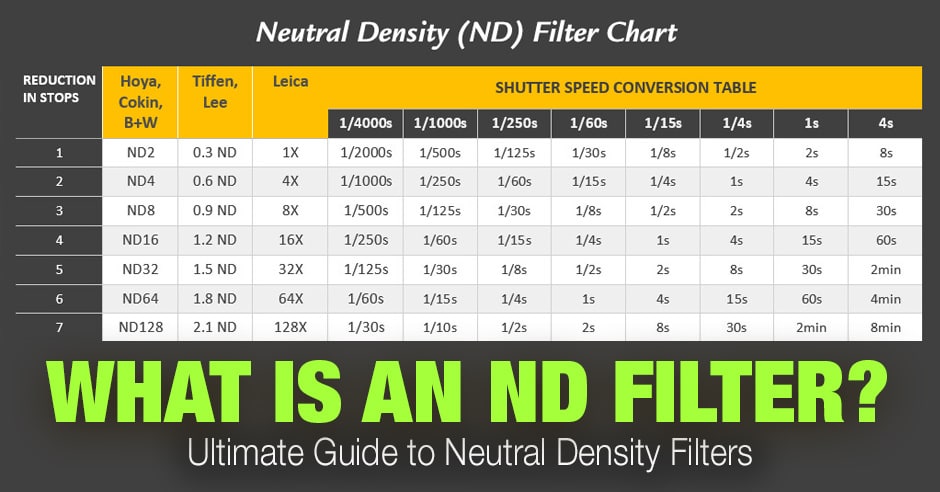
Neutral Density (ND) Filter Chart
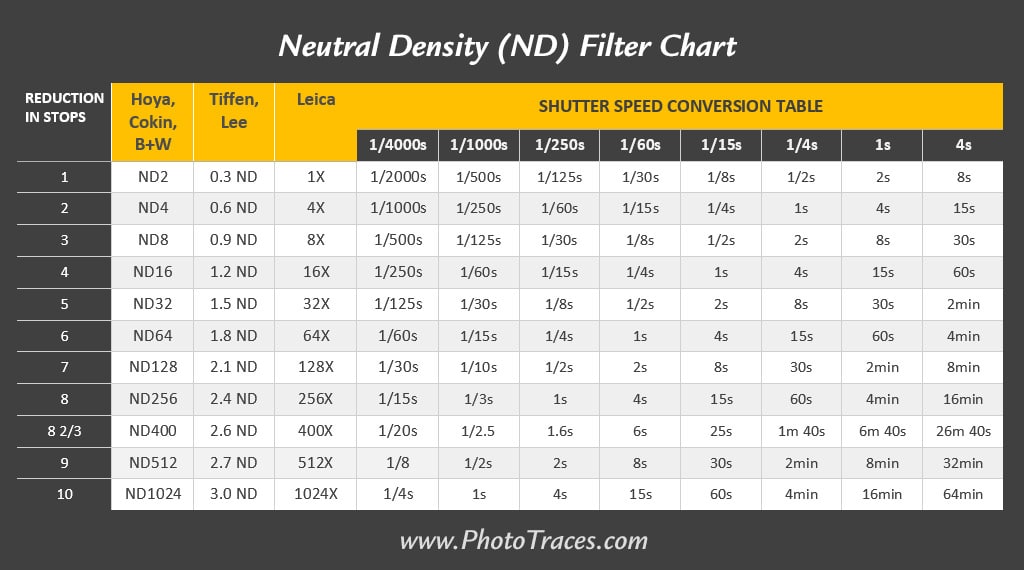
How to Use the ND Filter Chart
For example, if you see the following making on your ND filter ND64 or 1.8ND, according to the chart you have a 6-stop ND filter.
Next, if you’re shooting with a shutter speed of 1/250s, but you then add a 6-stop ND filter (ND64), you’ll need to drop the shutter speed down six stops:
from 1/250s to 1/125s (one stop), 1/60s (two stops), 1/30s (three stops), 1/15s (four stops), 1/8s (five stops), where you’ll land at 1/4s (six stops).
Simply identify your exposure prior to using
the filter, then select the necessary exposure after slapping on your ND
filter, and you’re good to go.
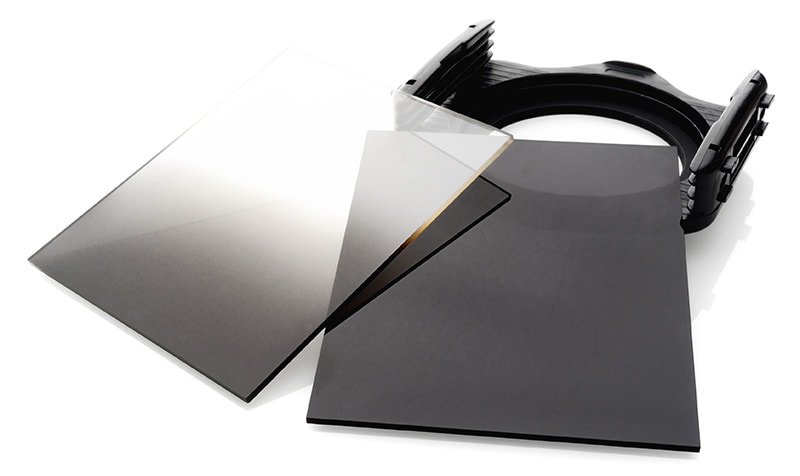
Graduated ND Filters Versus Solid
ND Filters
Throughout this article, I’ve been primarily
talking in terms of solid ND filters:
Filters that are dedicated to reducing the
light by a certain number of stops across the entire scene.
But there is also another type of ND filter:
A GND, or a graduated neutral density filter,
which reduces the light in only part of the scene, leaving the other part of
the scene to be fully exposed.
This is extremely useful for landscape
photographers, who often photograph scenes with bright backgrounds (e.g.,
sunsets) but dark foregrounds (e.g., rivers and mountains). Because cameras
offer limited dynamic range capabilities compared to the human eye, an
unfiltered exposure of a dark foreground and a bright background will result in
a blown-out background or a drastically underexposed foreground–hence the need
for a graduated ND filter, which reduces the brightness of the sky to a
manageable level.

Note, however, that advances in
post-processing software have made neutral density filters unnecessary. It’s
now possible to take several exposures of the same scene and blend them
together using a program such as Lightroom, Photoshop, or Aurora HDR.
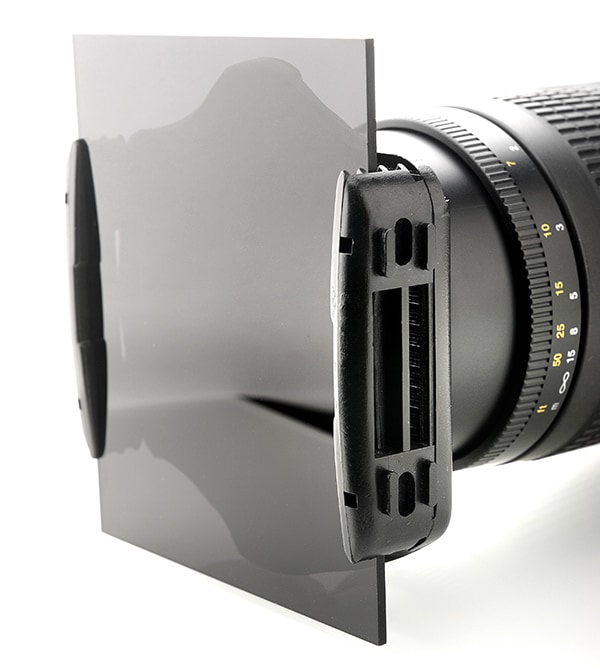
Screw On ND Filters Versus Filter
Holder Type
Neutral density filters come in two styles:
Screw-on ND filters and square ND filters.
What’s the difference?
A screw-on ND filter screws directly onto the
front of your lens, whereas a square ND filter mounts via a lens holder.

Now, if you use screw-on ND filters, you’ll
need to buy an ND filter for every lens you plan to use it on, assuming the
lenses all have different diameters (and they often will).
Whereas you can purchase a single square ND
filter, then mount it to multiple lenses via the lens holder plus a few holder
adapters.
Because high-quality ND filters are so expensive,
the square filter route often allows you to save a significant amount of money,
assuming you’re looking for a professional-quality kit. This is especially true
if you’re planning on using GND filters, as well–the circular GND selection is
pretty limited, which means that high-quality GNDs are much easier to find as
square options.
On the other hand, square filter kits often
cost more up-front, so if you just want to use an ND filter for one of your
lenses, then a circular filter is probably the way to go.
Variable Density ND Filter Versus
Constant Density ND Filter
When it comes to purchasing a screw – on ND filter, you have two options:
A constant ND filter, which reduces the light
a single, predetermined amount.
And a variable ND filter, which allows you to
adjust the strength of the ND filter as you use it. It works by using two
filter elements joined together, so that twisting the front element increases
or decreases the ND effect.
Constant ND filters are far more common and tend to be higher quality, but variable ND filters are much more convenient. After all, you can use a single variable ND filter to produce an ND effect from around 2 stops to 8 stops – without having to switch filters on the lens.
When to Use an ND Filter:
Practical Applications
ND filters are one of the most useful types of
filters in photography, and are handy in a number of different scenarios.
1. Landscape Photography
First, ND filters are commonly used when
shooting long exposure landscape images, especially in brighter light; the ND
effect allows you to maintain a slow shutter speed, in order to capture
beautifully blurred water, clouds, and more.
2. Portrait Photography
Portrait photography can also benefit from an
ND filter–if you’re aiming for a shallow depth of field effect, but it’s too
bright to pull this off, you can slap an ND filter onto your lens and widen the
aperture substantially.
3. Wedding & Event Photography
Event and wedding photographers use ND filters
for a similar purpose: To control the depth of field when shooting group
portraits outdoors.
4. Videography
Finally, videographers often use ND filters
when filming in broad daylight. This helps lower the frame rate in order to
produce a smoother video recording.
How to Use a Neutral Density
Filter
To use a neutral density filter, follow these
simple steps:
- First, determine your composition–without the ND filter. And carefully focus your lens so that your image has the perfect point of focus.
- Switch your lens over to manual focusing (if you weren’t using that already) in order to prevent the lens from shifting the point of focus when you take the shot.
- Set your exposure the way you normally would.
- Add the ND filter to your lens.
- Recalculate the exposure based on the strength of the ND filter; you can do this by counting stops on your camera, using a chart, or a handy app.
- Then take a shot. If your image uses a long exposure, make sure to cover your viewfinder with a piece of fabric, or even your hand, to prevent light leaks.
(Note that light leaks are only a problem with DSLRs, so if you shoot mirrorless you can ignore this advice!)
And that’s it! If you’ve followed these
instructions, you’ll end up with a beautiful image.
Which ND Filter Should You Buy?
The ND filter you use depends on the type of
photography you do and your personal preferences.
You might start by purchasing a few screw-on
ND filters, especially if you’ll only be using them with one or two lenses.
But if you’re looking to do a lot of ND filter
work with many lenses, it might make more sense to grab a lens holder, some
square ND filters, and a few adapters. This will save you money in the long
run!
Note that you can stack ND filters to achieve
various filter equivalents; if you stack a 3 stop filter and a 6 stop filter,
you’ll end up wtih a 9 stop ND. This prevents you from having to purchase a
huge number of filters.
ND Filters and Image Quality
Not all ND filters are created equal.
While some ND filters offer fantastic
optics…
…others will significantly reduce image
quality. The worst ND filters will produce blurry images, introduce vignetting,
and add unwanted color shifts.
Note that color shifts are present even in
high-quality ND filters at higher strengths. This is something you can deal with
in post-processing–simply shoot in RAW, then adjust the white balance in
Photoshop or Lightroom.
But not all ND filters cause blurring or
vignettes. As with lenses, you get what you pay for–so don’t skimp on filter
quality and purchase cheap options off of eBay.
Instead, you should buy ND filters that fit
your expectations!
ND Filter Chart: Conclusion
Now that you’ve finished this article, you
know all about ND filters.
You know the difference between graduated
neutral density and neutral density filters.
You know how to use an ND filter for stunning
images.
And you know how to pick ND filters.
So grab some ND filters and start shooting.
You’ll love the results!