
Auto ISO is a camera feature that beginners tend to ignore–but this is a mistake.
Why?
Because Auto ISO is one of the most useful methods for exposing images correctly while also achieving photos that are tack-sharp.

In this article, I aim to explain everything you need to know about Auto ISO. By the time you’re finished, you’ll be able to use Auto ISO with ease, and you’ll know when it should be implemented for the best results.
Let’s get started.
Exposure Triangle and Shooting Modes
If you want to capture great photos, then you have to master exposure.
In other words:
You need to be able to produce photos with significant detail, without blown-out highlights and clipped shadows.
Exposure Components
Now, there are three main components of exposure:
Shutter speed.
Aperture.
And ISO.
Together, these three variables determine the brightness of your photo.
They’re represented in the exposure triangle, where adjusting any of the variables results in a shift in exposure:
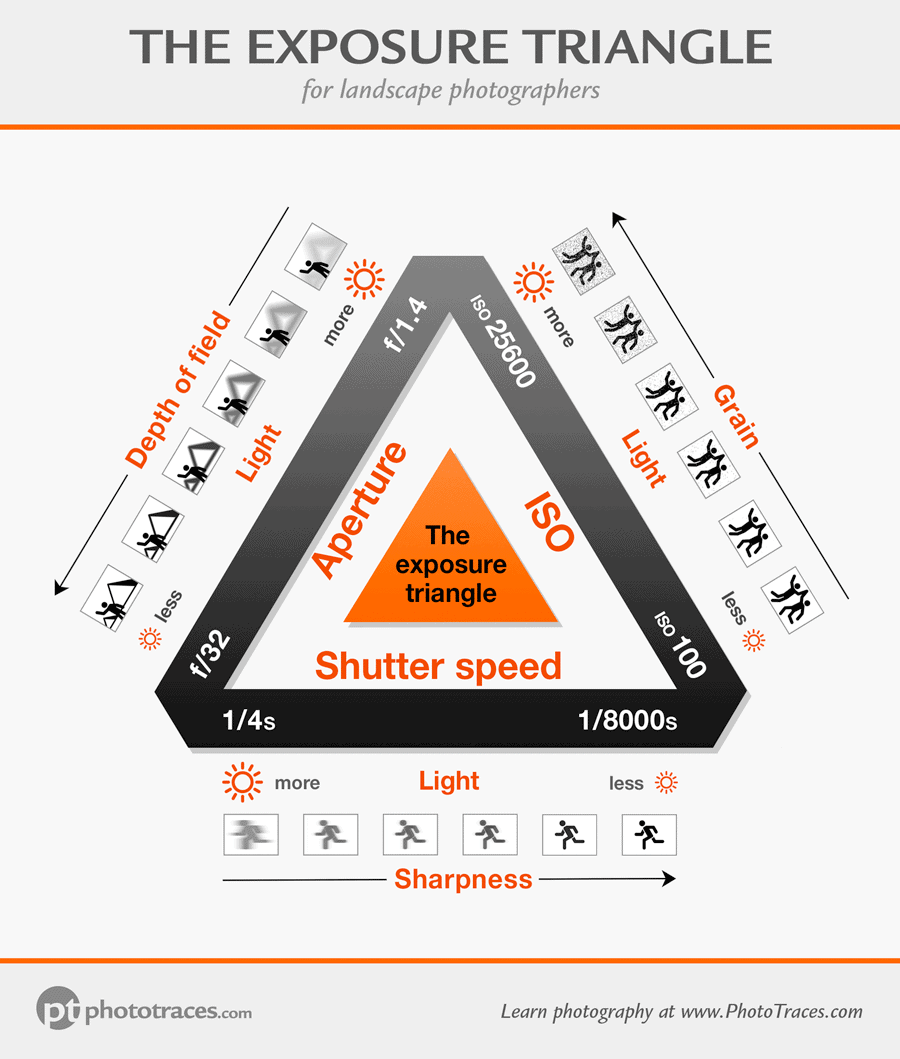
Shutter Speed and Exposure
Specifically, by speeding up your shutter speed, the camera captures less light, resulting in a darker photo; by slowing down your shutter speed, the camera captures more light, resulting in a brighter photo.
Aperture and Exposure
By widening your aperture, the camera captures more light, resulting in a brighter photo; by narrowing your aperture, the camera captures less light, resulting in a darker photo.
ISO and Exposure
And by raising your ISO, your photos become brighter; by dropping your ISO, your photos become darker.
As you can see, selecting the right aperture, shutter speed, and ISO involves taking into account all three variables and their effects on the overall photo.
So if you want a darker image, you can increase your shutter speed, drop the ISO, or narrow the aperture. And if you want a lighter image, you do the reverse.
Simple, right?
In some ways, it is. But here’s the problem:
Each of these exposure variables also affects other aspects of your photos, as is reflected in the three key shooting modes:
Aperture Priority
Aperture Priority mode allows you to set the aperture, while your camera selects a corresponding shutter speed (for a good exposure).
This is a useful mode, because the aperture controls the depth of field (i.e., the amount of the photo that’s sharp).
In fact, Aperture Priority is the most popular mode among photographers; it’s loved by landscape photographers, street photographers, and portrait photographers alike.
Shutter Priority
Shutter Priority mode allows you to set the shutter speed, while your camera selects the corresponding aperture.
Shutter Priority is less commonly used than Aperture Priority, but it can sometimes be valuable to choose your shutter speed in advance.
Why?
Because the shutter speed controls motion in your photos. You can freeze the motion with the fast shutter speed, or introduce motion blur when using longer shutter speeds.
That’s why Shutter Priority is useful in situations where you require a specific shutter speed to freeze a moving subject for example.

Manual Mode
Manual mode allows you to control both the aperture and the shutter speed.
So you set the aperture and you set the shutter speed.
Manual mode is great for situations where both the depth of field and the amount of motion in the photo are of great importance (e.g., when capturing a deep depth of field macro photo at high magnifications).
What About ISO Priority?
Technically speaking, ISO Priority mode does not exist. But some photographers refer to Program mode as ISO Priority because it allows you to input the ISO while the camera selects the aperture and shutter speed.
I find that the Program Mode is the least useful one because you lose control over both Shutter Speed and Aperture. I never use it in my photography.
What Is Auto ISO?
Auto ISO is a feature that allows you to increase your flexibility when shooting.
Auto ISO is a camera function that lets you select a range of ISO values, and then–when shooting in the field–your camera will pick the lowest acceptable ISO value for well-exposed images.
So with Auto ISO, you set a maximum and a minimum ISO value, based on your personal preferences and your camera’s noise performance.
Then you set the minimum acceptable shutter speed, based on the type of photos you’re shooting and the equipment you’re shooting with.
What Is the Minimum Acceptable Shutter Speed?
The minimum acceptable shutter speed depends on two factors:
The speed of your subject.
And the length of your lens.
The faster your subject, the higher the shutter speed will need to be to prevent motion blur.
And the longer your lens, the higher the shutter speed will need to be to prevent camera shake.
On some cameras, you’ll need to manually select your minimum shutter speed, based–at the very least–on a simple reciprocal guideline, where you choose a minimum shutter speed that’s the reciprocal of your lens’s focal length.
(So if your lens is 100mm, you’ll want a minimum shutter speed of at least 1/100s.)
But some cameras will calculate a minimum shutter speed for you, based on this reciprocal guideline.
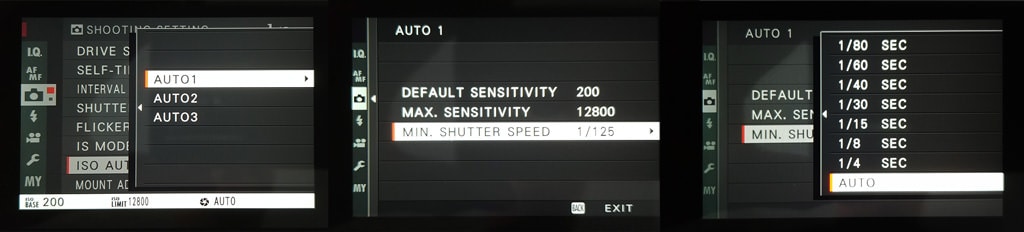
Fujifilm Auto ISO Menu Settings
Here are the Fujifilm cameras Auto ISO menu settings.
You have the option to specify the Minimum Sutter Speed. In my case, it is set to 1/125s. Or you can switch to the AUTO mode and let the camera calculate the minimum acceptable shutter speed based on any given focal length.
Auto ISO in Aperture Priority Mode
In Aperture Priority mode with Auto ISO, you select the aperture.
Your camera then selects the shutter speed for the correct exposure, while using your lowest indicated ISO as the ISO value.
Once the shutter speed is forced down to its minimum acceptable value (i.e., the value discussed in the previous sections), your camera will start to raise the ISO until it reaches the maximum ISO in your range.
Aperture Priority with Auto ISO is an extremely useful mode for situations where you have changing lighting and you don’t want to have to fiddle around with your ISO settings. Simply set the aperture you need and your minimum shutter speed. Then let your camera do the rest of the work, ensuring that you get sharp, well-exposed results with the lowest feasible ISO setting.
So if you’re doing handheld landscape photography and moving in and out of shade, you can set your aperture value based on your required depth of field, then let your camera determine the proper shutter speed and ISO for the best image quality.
Auto ISO in Shutter Priority Mode
In Shutter Priority mode with Auto ISO, you set the shutter speed and the range of acceptable ISO values, while your camera selects the ISO.
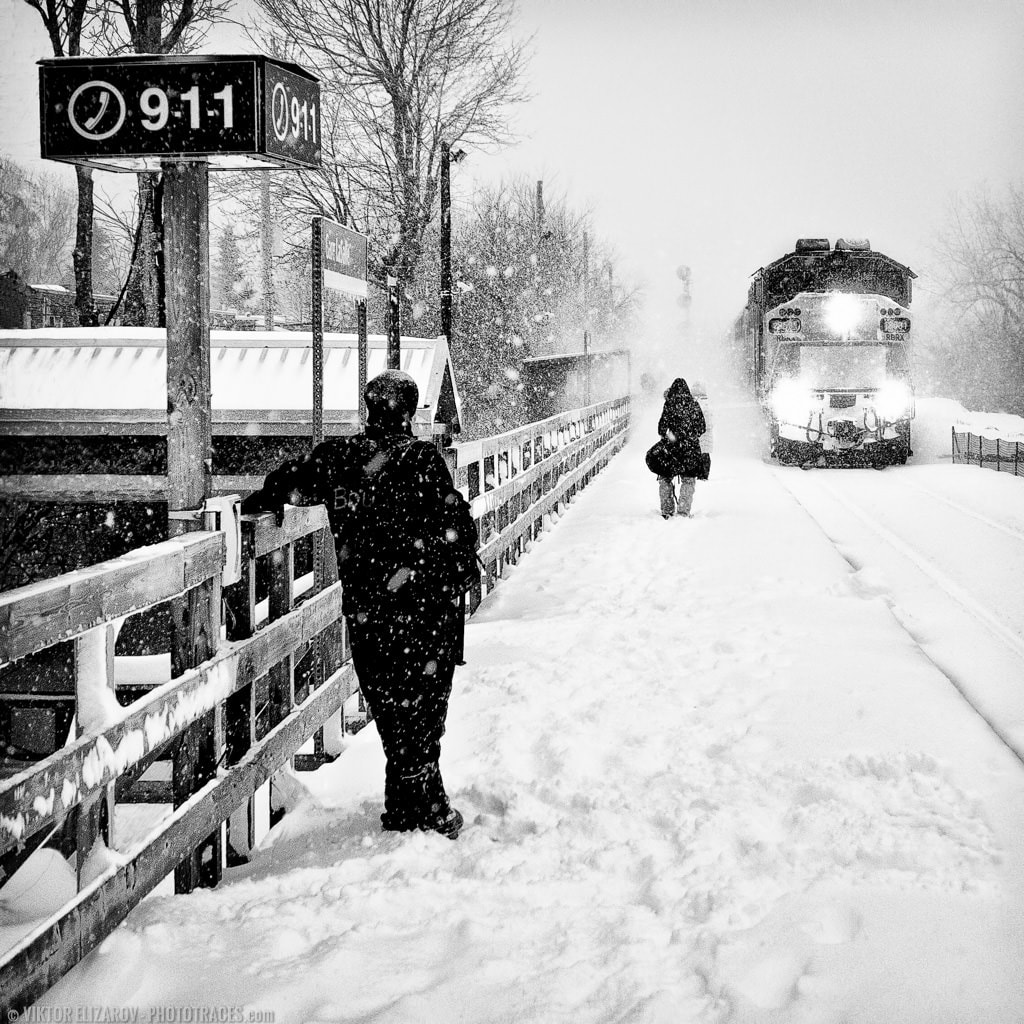
This is sometimes useful when dealing with fast-moving subjects (e.g., a foraging bird); you’ll set a shutter speed based on the speed of your subject, then let your camera choose the proper aperture and ISO.
(On most cameras, the ISO will remain at your selected minimum value until the aperture cannot go any lower.)
That way, you’ll always get sharp shots of the bird, without having to worry about your ISO setting.
Auto ISO in Manual Mode
Auto ISO in Manual mode allows you to select your aperture and shutter speed, while your camera sets the ISO based on your range of values.
This is one of my personal favorite options, because it allows you to control both the depth of field and the sharpness of your photos–but without having to worry about adjusting settings as the light changes.
So if you’re photographing a person walking in and out of the shadows, you can select your ideal aperture and shutter speed, without having to fiddle with the ISO button/dial.
Should You Use Auto ISO?
Absolutely, you should! As you have probably gathered, Auto ISO is a great feature that’s useful in situations where the light is changing rapidly or you don’t have time to adjust your settings in fast-paced situations.
In my case, my Fujifilm XT2 camera is set to Auto ISO most of the time.

When to Avoid Auto ISO
While Auto ISO is very useful, it can also be unnecessary. For instance, if you’re shooting on a tripod, you’re generally working very slowly and deliberately, and you want complete control over all settings. This is a situation when Auto ISO is best avoided.
You also may want to avoid Auto ISO in situations where your subject is in constant lighting, but the background is changing–such as when a bird is moving in front of grass, then sand, then sky, and back to grass. Here, depending on your metering mode and the size of your subject, your camera may adjust the exposure as the background shifts, but you may want to maintain a constant level of brightness.
That’s when you’ll want to turn off Auto ISO, and work with Manual mode instead.
Conclusion
Auto ISO is an extremely useful camera feature, and one that every photographer should try.
So switch your camera over to Auto ISO, and start practicing! See what type of shots you can get.