
Zion National Park is the busiest national park in Utah. Because of Las Vegas’s proximity, the park is always full of tourist busses, and on weekends, it is getting even busier because of individual travelers.
For a long time, I tried to avoid Zion during the busy summer season or at least on weekends.
But a few years back, I discovered a relatively distant area of the park, the Kolob Terrace. You access it through the Kolob Terrace Road, which goes around the park for 60km or so and allows you to access the park from a different side.
The beauty of the Kolob Terrace is it is vast, beautiful, and almost always empty. And it has plenty of hikes and even places for off-road driving.
On top of everything, it has the only free campground in Zion, Lava Point Campground.
The last time I visited Zion was in August, and I spent a few days at Kolob Terrace. Since it is located at a higher altitude than the park’s main area, I could enjoy more comfortable temperatures.
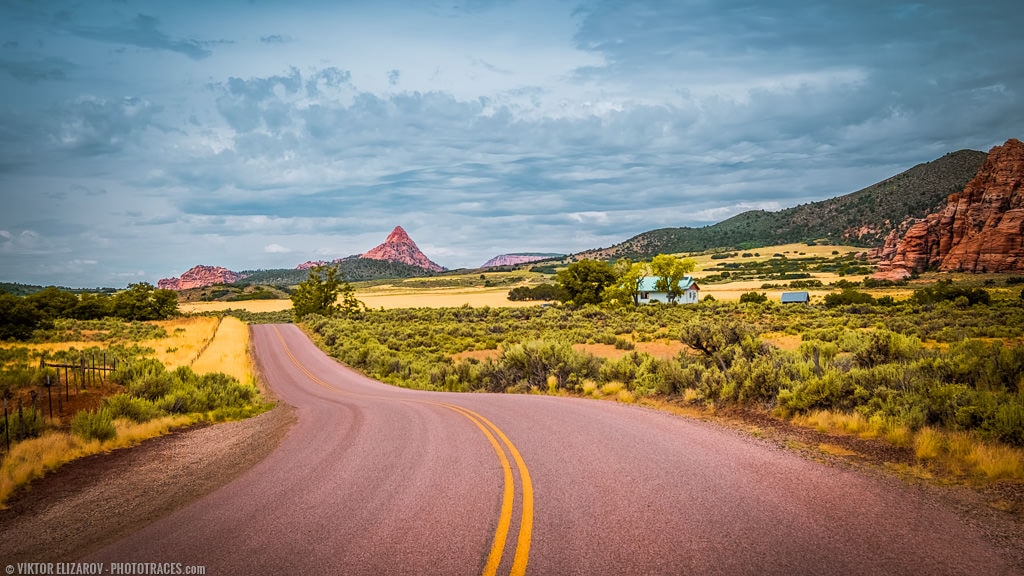
I took the featured photo at one of my favorite spots of the Kolob Terrace when you enter the valley for the first time after driving uphill for 10-15km.
I already have the photo in my portfolio I took from the exact same spot years ago.
Shooting
The shooting was easy and uncomplicated. I did not need a tripod because it was early evening. And the light was not dynamic because thick clouds defused the sunlight. And I was not worried about the passing cars because you see the cars on the Kolob Terrace road every half hour or so.
I probably could use a longer focal length but I was too lazy to change my favorite 10-24mm lens for 18-135mm and I kept shooting at 24mm.
Editing & Processing
Recently I rebuilt my most popular premium preset collection, the LANDSCAPES Lightroom Preset Collection. I completely changed its structure and added new components and functionalities.
Today, I want to show you how I use the new LANDSCAPES collection in my workflow.
If you previously purchased the LANDSCAPES preset collection, you can download the new version free of charge from the members’ area.
It was a single RAW image processing workflow.
Lightroom – 15min
Step #1 – Cropping
Since I was shooting a bit wider than I ideally wanted, I knew I would have to use the Crop Overlay tool more aggressively.

Step #2 – Lightroom Rapid Editing
Next, I moved to my standard preset based workflow I call Lightroom Rapid Editing.
I opened the LANDSCAPES Preset Collection and started to experiment with different looks, trying to find the most appealing one.
I decided to use one of my favorite preset, the Point Lobos. I create it when editing photos from Point Lobos State Natural Reserve in California.
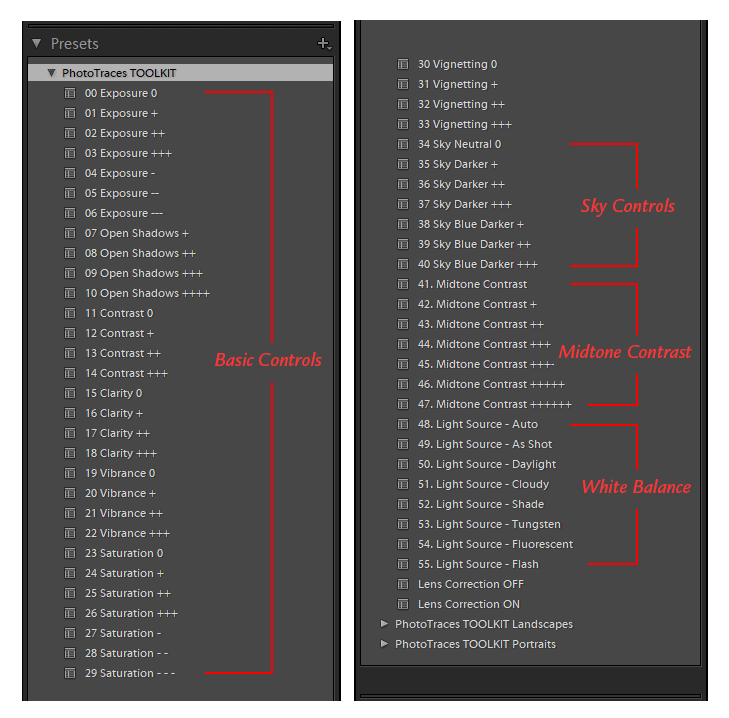
Below, you can find the screenshot of the new, updated structure of the LANDSCAPES preset collection.
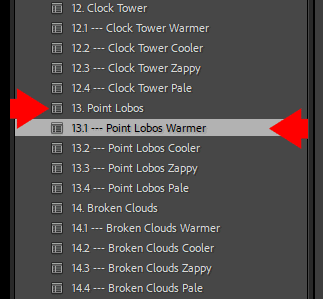
Now, each preset has 4 additional variations: Warmer, Cooler, Zappy, and Pale.
For example, I used the Point Lobos Warmer variation for my editing. When I selected the Point Lobos Warmer preset, I got an additional editing option inside the BASIC panel.
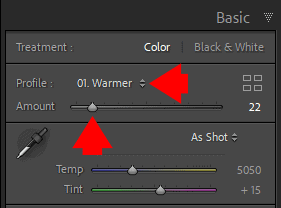
With the help of the AMOUNT slider, you can dial up or dial down the “warming” effect.
In my case, I used Point Lobos Warmer at 22%.
Besides producing artistic style, the Point Lobos preset helps you to balance the exposure.
Let me explain.
Below is the histogram of the featured unprocessed image:

As you can see the image does not fully uses the entire tonal range. You can see the “gaps” in midtones and in highlights.
And here is histogram after the Point Lobos preset was applied:
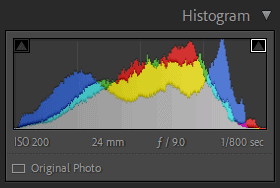
Now, the image uses the entire tonal range but without pure blacks and whites.
Step #3 – TOOLKIT Adjustments
Next, I opened the TOOLKIT v2 and applied the following adjustments:
04. Exposure –
10. Open Shadows++++
32. Vignetting ++
44. Midtone Contrast +++
Below is the result:

Step #4 – TOOLKIT for Landscapes
The TOOLKIT for Landscapes is the latest addition to the Lightroom Rapid Editing workflow.
The goal of the toolkit is to provide additional selective editing controls when processing landscape photos.
The standard TOOLKIT allows you to apply a series of adjustments (Exposure, Saturation, Clarity, Contrast…) to an entire image. But in the case of TOOLKIT for Landscapes, it gives you the ability to target different areas (sky, vegetation, and ground) of Landscape separately.
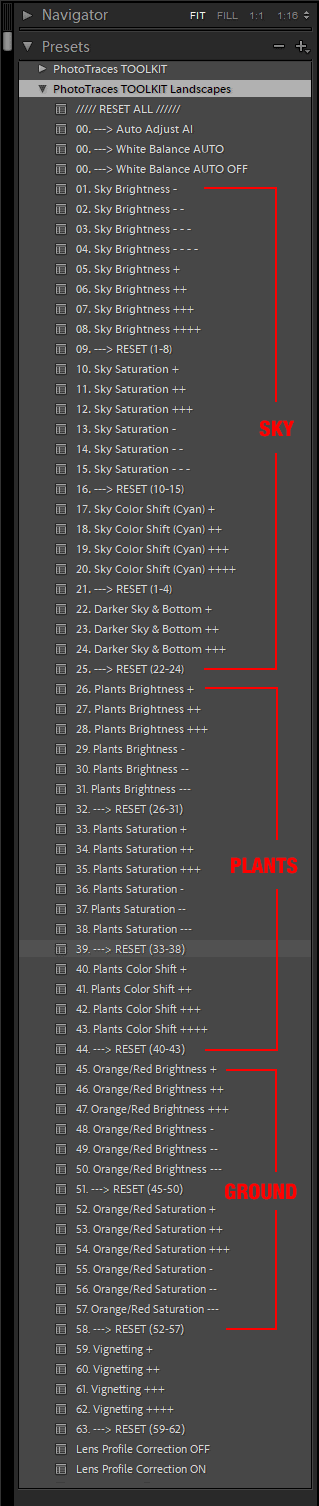
I applied the following adjustment presets:
Sky
05. Sky Brighter +
13. Sky Saturation –
17. Sky Color Shift (Cayen) +
I made the sky area a bit brighter, less saturated and shifted the colors toward a green hue.
Plants/Vegetation
27. Plants Brightness ++
36. Plants Saturation +++
43. Plants Color Shift +++
I increased the brightness of the vegetation and maximized the saturation. I also shifted the colors toward yellow.
Ground
55. Orange/Red Saturation –
Here, I only slightly reduced the saturation of the road.
And below is the final result I achieved in Lightroom before jumping to Photoshop.

Photoshop – 5min
Step #5 – Cleaning
I used the combination of the Clone Stamp and Spot Healing Brush tools to cover the distracting elements in the background and foreground.
I removed rocks and debris from the sides of the road and remainings of the old fence from the right side.
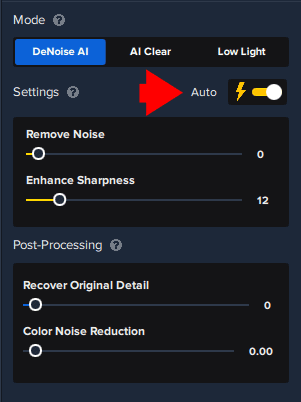
Step #6 – Noise Removal & Sharpening
Typically, you need 2 different tools to remove noise and another to increase sharpness, but with the release of a brand new Topaz DeNoise plugin, you can complete both tasks in one step. I used the AUTO settings, and the plugin reduced the noise and increased sharpness in one step. Priceless.
To learn more about how I use Topuz Plugins in my photography check here: Topaz Software Review – How I use Topaz Plugins