
The idea of switching from automatic camera settings to manual controls can seem overwhelming, but this ISO Chart guide will teach you to understand this fundamental camera setting.
But before we explain how to use your camera’s ISO setting to get the perfect exposure, let’s take a look at what ISO is and its role in digital photography.
ISO Chart for Digital Photography
What is ISO in Film and Digital Photography?
The term ISO (pronounced Eye-soh) can often seem confusing at first to many beginner photographers for several reasons. A primary reason is that, unlike shutter speed and aperture, the two additional settings are often considered part of the ‘exposure triangle,’ ISO is not precisely the same between film and digital photography.
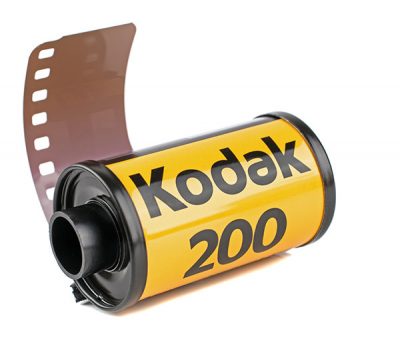
ISO in Film Photography
In film photography, the numbers on the ISO chart referred to the quantity, size, and density of the light-sensitive layers of silver halide crystals that cover the plastic emulsion of camera film.
Related: “Film Look” in Lightroom in Seconds
Films with lower ISO numbers had smaller, more tightly spaced silver halide crystals on their surface, which created a much smoother image but were less sensitive to light, and therefore less effective in low-light or high-speed conditions.
Higher ISO numbers meant the crystals were larger and as a result, more sensitive to light, making them more useful in low-light or fast-action conditions. However, these films tended to have more ‘grain’ due to the larger, less densely placed crystals.
ISO in Digital Photography
Digital cameras, on the other hand, don’t use chemical reactions to record light, so they rely on a completely different system based on the same ISO chart.
The camera sensors consist of small units known as pixels. Each pixel on the sensor acts as a type of switch which becomes activated in the presence of light. These switches are constantly sending digital signals telling the camera whether they are activated at any given moment by the light entering the camera. The more light these switches receive, the stronger the signals they send to the camera are, and the brighter that area will be in the resulting image.
The problem occurs when not enough light reaches the camera sensor, and the digital signal produced by the camera sensor is too weak.
This is when the ISO comes into play.
ISO in digital photography signifies the increase in the image’s brightness after capture. ISO does not reflect the sensitivity as in analog photography but instead “applied gain.”
For example, when you set the ISO to a value of 200, the camera still records the image at a base ISO of 100. When the image is recorded, the gain is applied to boost the brightness by a factor of two.
Relationship Between ISO and Digital Noise
Now, this might seem simple enough. You’re probably thinking: “With the power of the Digital ISO chart, I don’t need to balance aperture and shutter speed. I can just set the ISO higher, and voila! My exposure is perfect!”
But it’s not quite so simple.
With great ISO comes great responsibility digital noise.
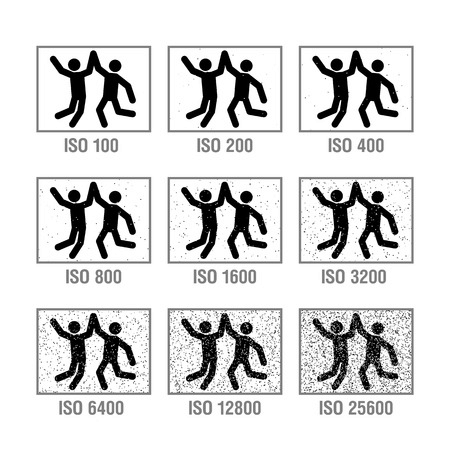
You may have noticed that as you bump up your camera’s ISO setting, your images seem to have a more grainy effect. As you reach the upper limits of your camera’s ISO range, the images begin to look like they have a rounded ‘pixelated’ look to them. This is thanks to our friend, Digital Noise.
The relationship between ISO and digital noise is straightforward. When you amplify the image brightness, you amplify digital noise as well. The higher the amplification (ISO), the more digital noise present in the image.
What are ISO Stops?
Another aspect of ISO that can often confuse novice photographers is the idea of ‘stops.’ If you look at the ISO chart, you are likely to notice the numbers 100, 200, 400, 800, 1600, 3200, 6400, and on and on. There may be other numbers between these, but these are the numbers that you are likely to find on every modern digital camera.
These specific numbers correspond to the full ‘stops.’ As we move from lower numbers to higher numbers, each time we double the number, we double the brightness of our image. Inversely, each time we cut the number in half, we also reduce image brightness by factor of two.
The Photography ISO Chart and How to Use it
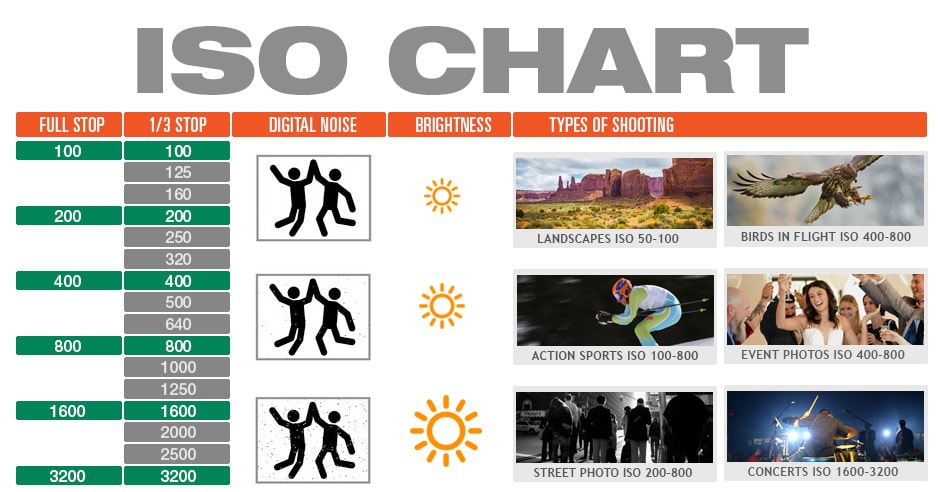
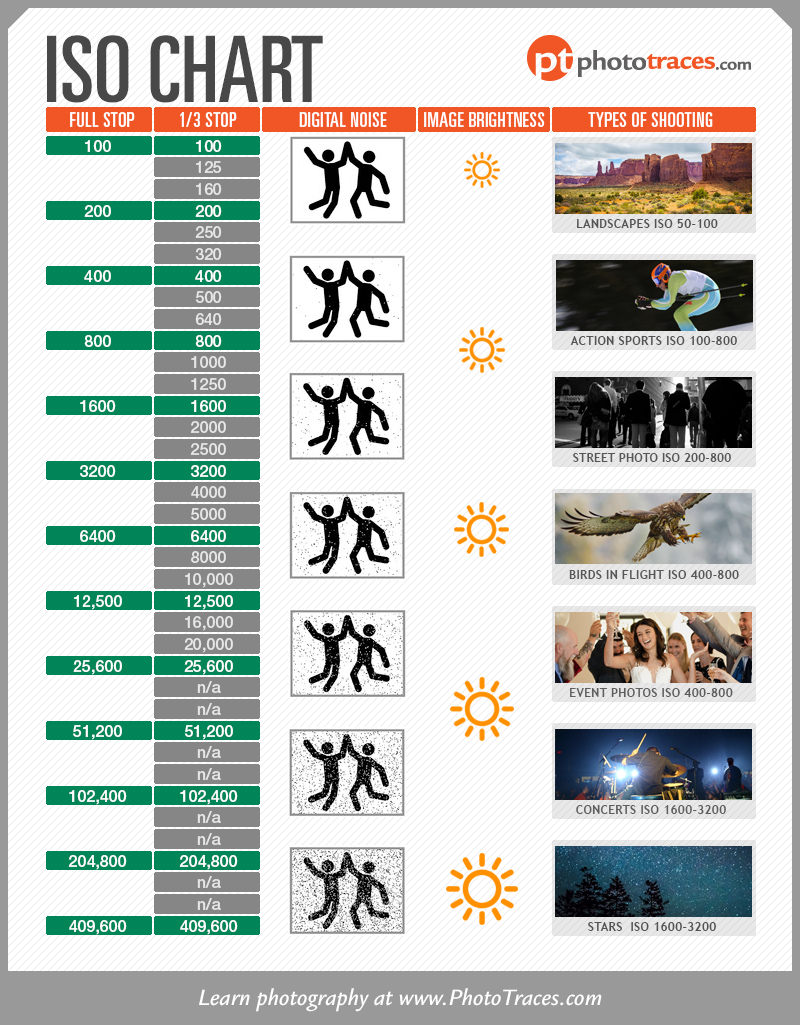
Let’s take a look at the ISO chart infographic. Notice that you can see the full stops mentioned above as well as 1/3 stops in between.
Now that we know how to use full stops, understanding this ISO chart shouldn’t be too difficult. We can see that each time we increase ISO by 100%, we increase the brightness of the image by 100% as well. The same goes for 1/3 stops. Increase ISO by 33%? Brightness goes up 33% as well.
What About Camera Sensor Sensitivity?
So, you’ve read the guide, you know how ISO works, and you’re ready to explain it to your beginner photography friends, right?
Higher ISO means the sensor is more sensitive; low ISO means it’s less sensitive. Easy Peasy.
Well, not quite.
It is one of the biggest misconceptions in digital photography that by changing the ISO value, we are changing the sensitivity of the camera’s sensor. But this just isn’t what is actually happening inside the camera. The level of photosensitivity of the sensor is constant. What changes is the increase in brightness (gain) after the image was recorded.
Let’s take a look at a few additional ISO characteristics:
What is Base ISO?
Base ISO is the inherent level of sensitivity of a camera’s sensor. This will typically be towards the lower end of the ISO chart, usually around 100 or 200, but it may be as low as 64 or below.
What is Native ISO?
Native ISO is the ISO range that a digital camera can achieve using the native sensor and hardware. This will range from the base ISO to the highest ISO that the camera can handle natively, without interpolation.
What is Extended ISO?
Extended ISO allows cameras to go beyond the limits of their native ISO range by using software to interpolate or estimate the result based on the signals from the camera.
What About Auto ISO?
Auto ISO is a camera function that lets you select a range of ISO values, and then–when shooting in the field–your camera will pick the lowest acceptable ISO value for well-exposed images.
While you may be wanting to go fully manual and are hesitant to use auto ISO, you may want to read this article on why it isn’t necessarily as bad as you think.
ISO Chart: Conclusion
Learning the fundamentals of photography can seem overwhelming, especially at the beginning. But if we take the time to understand how and why our camera’s settings affect the resulting images, it becomes much easier to understand how to use them in practice.
While ISO may be one of the most misunderstood aspects of digital photography, even among many advanced photographers, it can actually be one of the simplest to use in the real world.