
If you want to learn how to approach beach landscape photography, you’ve come to the right place. Because in this article, I share my top 21 beach landscape photography tips.

Don’t you hate it when you visit a beautiful beach filled with captivating colors but fail miserably when you try to capture the same atmosphere in your photos?
Do not be too hard on yourself; you are not alone.
If I had to guess, I would say that 90% of beach photographs look very similar and boring even when they are taken in some of the most beautiful destinations in the world.
Today, I want to share with you a few top beach landscape photography tips so that you can produce stunning photos during your next family vacation or even during a quick, weekend trip to the beach.
Beach Landscape Photography Tips
If I had to pinpoint the main challenges of beach photography in general, I would say they fall into two main categories: composition and exposure.
We need to better understand how to get the proper exposure in difficult lighting conditions and how to make our photos distinctive and unique.
Get Your Composition Right
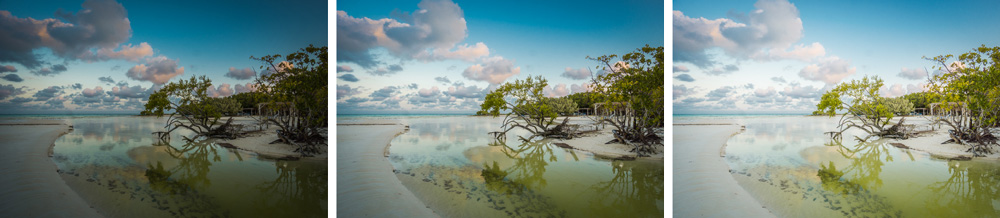
When we find ourselves in the beautiful surroundings of a tropical beach, what we do first is point the camera in the direction of the ocean and start snapping photos.
It’s no wonder why most beach photos look something like this:

But, we must always remember that no matter how beautiful your surroundings are, composition rules still apply and you should always put forth an effort to produce an interesting piece.
01. Keep Your Horizons Straight
This is probably one of the most fundamental rules of landscape photography but it is even more relevant for beach photography because the horizon is present in 90% of the photographs taken on the beach.
The concept of a straight horizon is unconditionally imprinted in our brains so even a slight deviation from that straight line evokes a rejection in our minds. It simply refuses to accept it (read How to Keep the Horizon Straight to learn more).
If you didn’t manage to get your horizon straight with the camera, don’t worry. It only takes five seconds to fix it in Lightroom.
02. Make the Focal Point Easy to Recognize
By identifying the focal point of the composition and making it a prominent element of the image helps us tell a story and evoke interest and curiosity from viewers.
The focal point can be anything—a beach chair, a bird, a sailboat, or a family member.

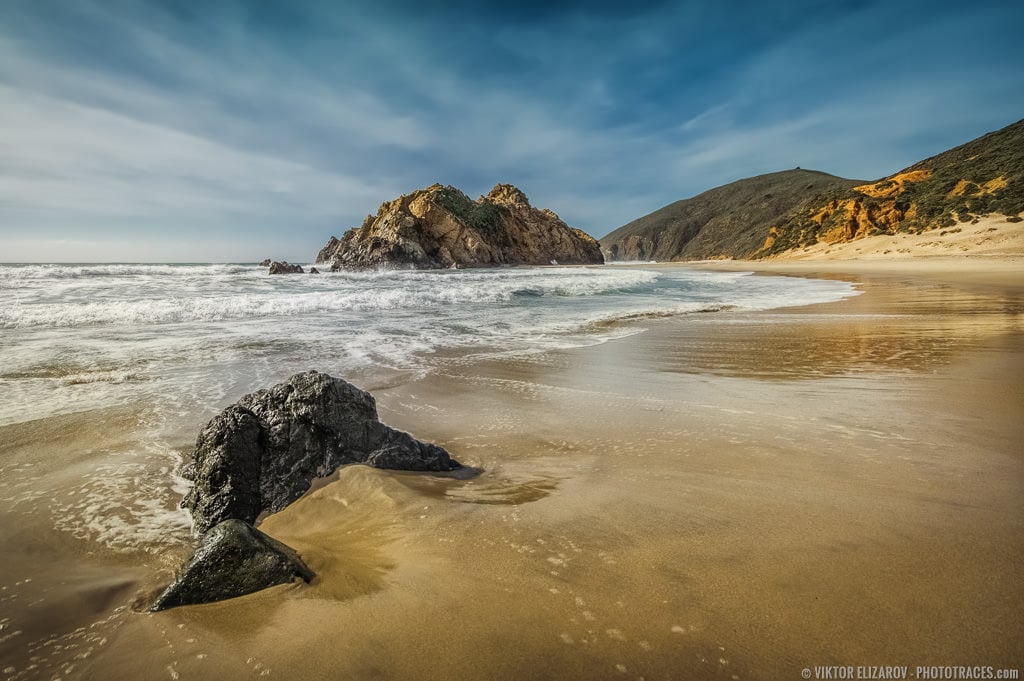
03. Find Foreground Interest
Not every beach photograph requires a prominent focal point. In many cases, finding a foreground interest in your composition is enough to add realistic depth to a scene in a flat, visual representation—a photo. The foreground elements become a conduit between the viewer and the background.
Related: What is EXIF Data? How to View it and How to Remove it
Here are a few ideas for foreground elements: rocks, sea shelves, sand, dunes, or any type of vegetation.

04. Use a Wide-Angle Lens
A 50mm focal length on a full frame sensor is the same perspective we experience with our eyes. All lenses with a focal length above or below 50mm distort the perspective to some degree.
Telephoto lenses with focal lengths above 50mm compress the perspective and make the elements in the distance appear closer than they really are.
Related: How to Photograph Snowy Landscapes
A wide-angle lens distorts the perspective by amplifying the size of the foreground elements. The shorter the focal length, the bigger the distortion.
Traditionally, wide-angle lenses have been the cornerstone of landscape photography. They allow us to capture big-scale scenes and, at the same time, emphasize the foreground elements by exaggerating them.
The use of wide-angle lenses in beach photography works best in conjunction with the two previous photography tips.

05. Take Full Advantage of Sunsets and Sunrises
Regardless of what type of photography you do, sunsets and sunrises are your best friends. Beach photography is not an exception.
The obvious benefits of sunsets and sunrises are the softness and warmth of the light they produce. The secondary benefit cannot but underestimated for beach photography—sunrises and sunsets keep tourists away from the beach, which is often the only opportunity to have an entire beach to yourself (read Sunset Photography Tips to learn more).

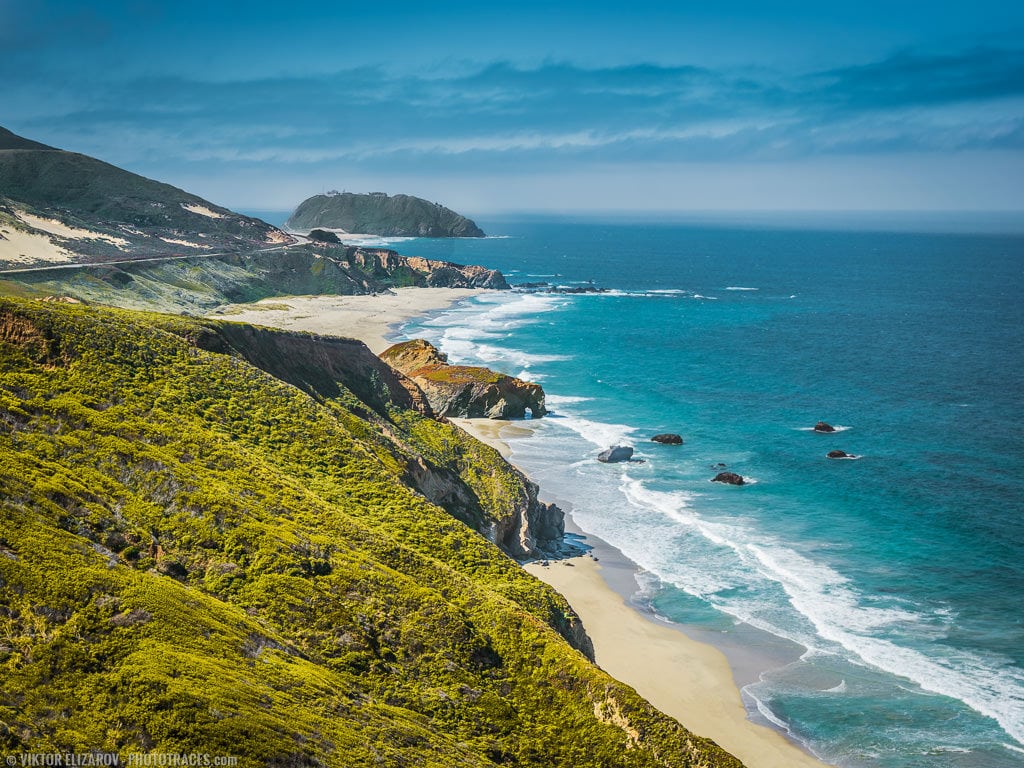
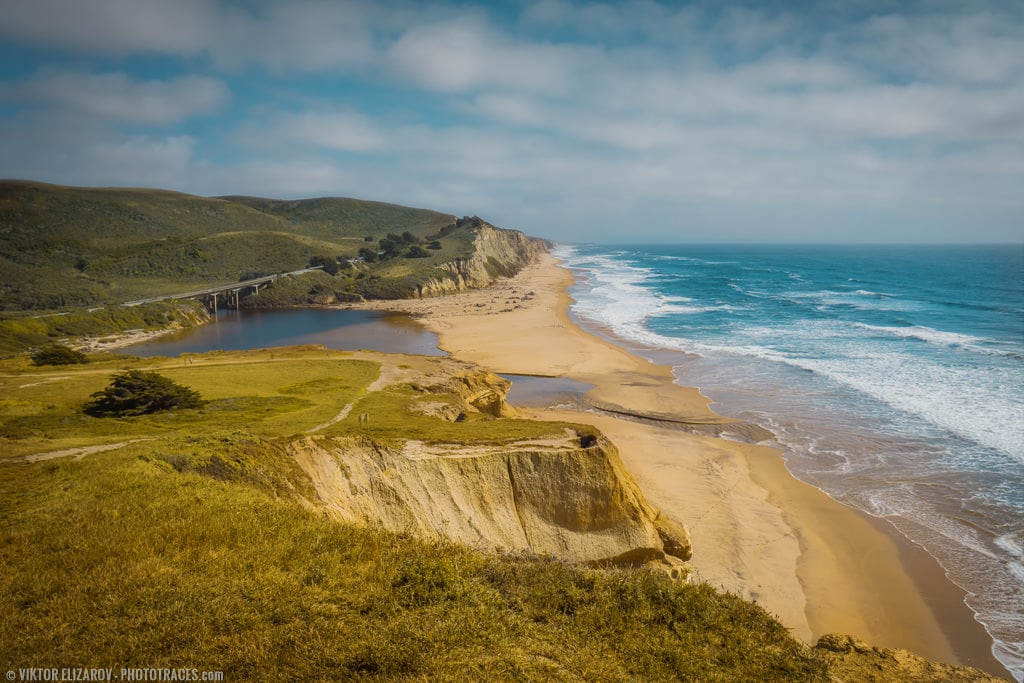
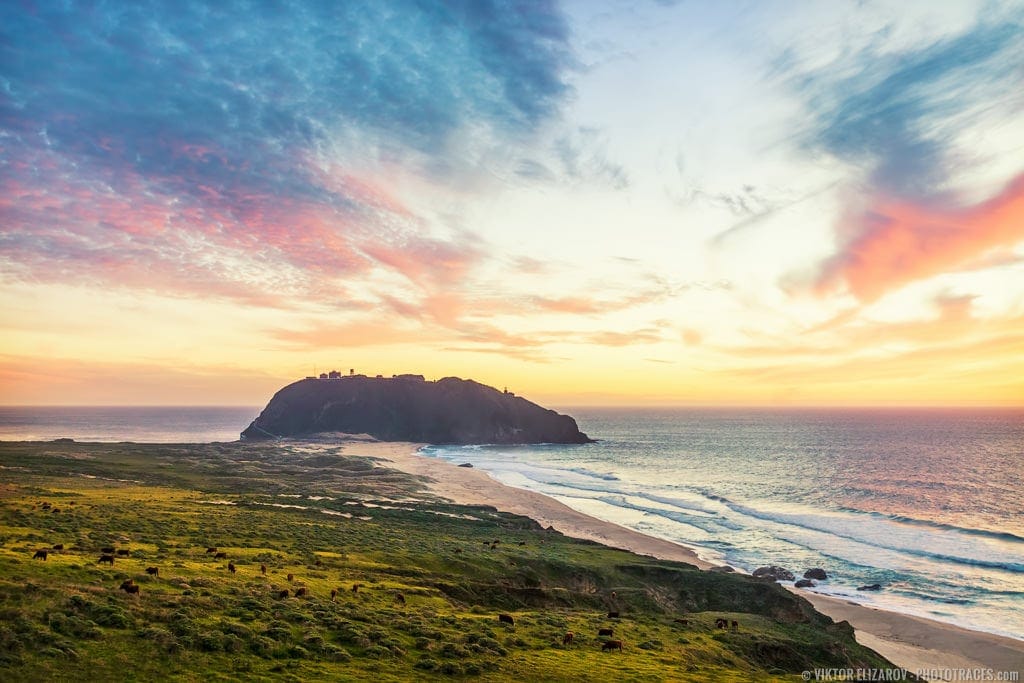
06. Explore High Vantage Points
Most beach photographs are taken from water level so, if you try to change the vantage point, you can often produce unique photos. Try to find a cliff or a big hill to change the perspective.
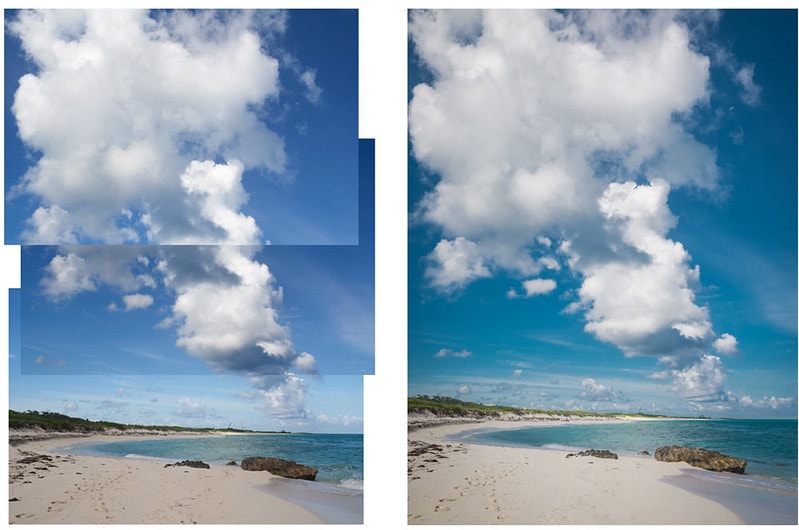
07. Use Vertical Panorama
When you are facing a wide-open scene with a dramatic sky, it is often too difficult to fit all the elements into a single composition even when you’re using a wide-angle lens.
In these cases, you can always use the vertical panorama technique. Take a series of shots from the bottom to the top and stitch them together in Lightroom using the Merge to Panorama tool.
08. Use Bright and Contrasting Clothes for Your Models
When shooting family members around the beach, make sure they are wearing clothes that contrast to the blues and turquoise hues of the water and sky. Orange, yellow or red clothing works extremely well.

09. Scout the Beach with Your Smartphone
What I have noticed is that there is a direct correlation between the amount of time I spend scouting a location and the quality of photos I produce. The more thorough I am in my scouting, the better the returns with higher quality photos.
Related: Most Effective Tips for Wildlife Photography
I understand that it is not always possible to find time to scout a location, especially during a family vacation. But, you can always take a few shots with your smartphone and analyze them for framing and composition later. It will help you find better angles when you shoot at sunrise or sunset.
10. Read the Tide Tables
Be aware of the timing of the tides. Because of extreme tide levels, beaches can look entirely unrecognizable in some areas during low and high tides.
11. Be Unconventional
Remember that your photograph does not have to be the traditional composition with the wide-open sky, the water, the horizon, and the sand. You can omit the beach altogether and only imply its existence with other elements.

Get Your Exposure Right
Getting proper exposure on the beach in broad daylight is tricky. Because of the abundance of light and the reflective nature of the water, the scene appears much brighter than it is and fools the camera meter every single time. This is much like photographing snowy scenes when relying only on your camera meter results in underexposed photos.
12. Use Exposure Compensation
The simple solution here is to use the Exposure Compensation functionality of your camera by dialing it up by one stop (+1EV).
We tell the camera to take the exposure reading from the scene and, before taking the shot, automatically increase the exposure by one stop for every shot we take.
13. Bracket Your Shots
When you are not convinced that you’ve gotten the right exposure in a beach environment, use exposure bracketing. This technique lets you automatically take multiple shots of the scene with different exposure values. It acts as insurance in case your exposure is wrong.
Another benefit of using exposure bracketing is to use the HDR photography technique in the event the dynamic range of the scene exceeds the dynamic range of the camera setting (read Bracketing in Photography for more details).
14. Use Shutter Speed as a Creative Tool
You probably understand that shutter speed is the essential component for controlling exposure. Together with aperture and ISO, it forms the Exposure Triangle.
Besides using the shutter speed to control exposure, you can also use it as a creative tool in your photography. By using different shutter speed values, we can achieve very interesting visual effects.
The most popular way to creatively use the shutter speed is the long exposure technique. By keeping the shutter open for a longer period, you can produce a smooth, silky effect in moving water (read Shutter Speed Chart for more details).
Here are a few ideas on how to use shutter speed to improve your beach photography:
- By using a shutter speed value of 1/500s or higher, you freeze the movement in the water and produce sharp looking waves.
- By reducing the shutter speed to around 1/6s, we introduce blurred motion but preserve the shapes of the waves.
- A shutter speed of 5s or longer creates a dream-like effect where the motion blur smooths all the details of the moving water.

15. Use Spot Metering
This technique is essential when shooting people in complex lighting conditions like beach photography in broad daylight. When the camera is set to its spot metering mode, it takes the exposure reading from the small point in the center of the frame.
When we point the center of the viewfinder to the person’s face, we tell the camera to set the exposure for the subject’s skin and not for the bright sky or the sand.
Many photographers use this technique in manual exposure mode but my use of spot metering in a beach environment is a bit different. I use it in combination with the Back Button Focus technique in Aperture Priority Mode.
First, I use a dedicated button on the back of my camera to lock the focus on a person’s eyes. Next, I point the center of my camera’s viewfinder to the model’s face to get the exposure reading from the skin. Then, I half-press the shutter button to lock the exposure. In the final step, I recompose to address the composition and then take the shot.
This technique allows me to combine the full control of the manual mode with the flexibility of Aperture Priority.
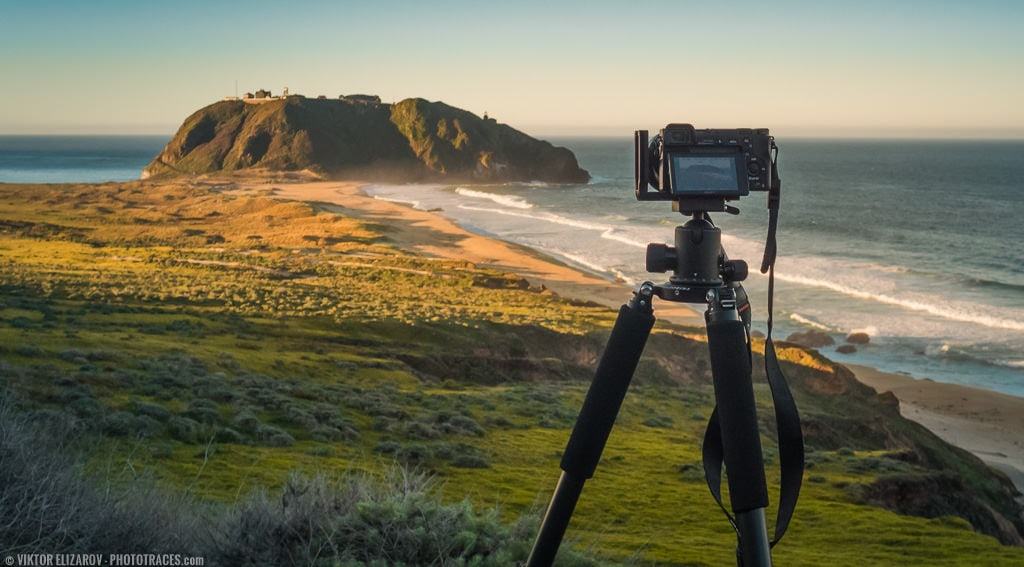
16. Use a Tripod
This is self-explanatory. You can get away with shooting handheld during the day with ease but, for sunsets and sunrises, you definitely need a tripod (read How to Choose Best Travel Tripods – A Practical Guide to learn more).
17. Shoot in RAW Format
When we shoot in a beach environment, we always deal with the extreme dynamic range of light. The RAW format has more potential and gives us more flexibility to balance the exposure and recover underexposed and overexposed areas of photos during the post-processing phase (read RAW vs JPEG – The Only Guide You Will Ever Need to learn more).
Take Care of Your Equipment
Keeping your photo equipment safe is an essential part of beach photography because we deal with a harsh environment where sand, salt, water, and, in some cases, extreme heat can quickly damage our photography equipment.
18. Keep Lens Cloths and Wipes Handy
This is something I learned during my first coastal drive from Los Angeles to San Francisco when I visited an endless number of beaches. Now, I always have a lens cloth and wipes handy in both my camera bag and in my pockets. I also check the front element of the lens for water drops or sand before taking every shot.

19. Keep a Big Air Blower in Your Camera Bag
The sand of some beaches is so small that it is not always possible to wipe your equipment with a cloth. This is when an air blower is the only solution. It only costs a few dollars and is extremely effective.

20. Use a Protective Filter for Your Lens
For a long period, I was completely against using any protective filters for my lenses. For me, it did not make much sense to buy a $1,000 lens just to put a cheap piece of glass in front of it.
After my first West Coast drive during the winter, I quickly changed my stance. Because of the never-ending winds and frequent storms, I noticed that my lenses were always covered with saltwater residue and sand, making it difficult to clean them without damaging the lenses.
Related: Understanding Variable ND Filters
I purchased UV protective filters for all my lenses after that trip. Although I do not use them on a daily basis, I attach them to all my lenses before heading to the beach.
21. Consider Water Resist Equipment
You might consider buying a water-resistant camera body and lens. These days, there are plenty of mid-range cameras that feature weather and environmental sealing. This is something I look forward to in my next camera.
Beach Landscape Photography Tips: Conclusion
Beach photography is often perceived as a glamorous and exotic photography genre. But, if you want to excel in beach photography, you must learn how to overcome some of the unique challenges that come with the genre especially in dealing with the harsh environment.
I hope that my top beach photography tips will help you take better photographs during your next family vacation or weekend getaway to the beach!