
In this article, I will share how to cull photos in Lightroom fast and in the most efficient way.

Digital photography equipment is not cheap. But there is almost no extra cost to take an additional photo in contrast with film photography. As a result, nearly all of us overshoot, taking more images than necessary. It costs us dearly in the time we spend culling and processing.
When I learned that, on average professional photographers spend between 10% and 14% of their time culling images in photo organizing programs, I was shocked. It also motivated me to streamline and optimize my culling process in Lightroom. With the new culling approach, I have more time for exploring and traveling and less time in front of a computer.
What is Culling in Photography?
Culling, also known as “trimming,” is the process of removing unwanted photos from your library and identifying ones you want to keep. The goal of culling is to reduce the number of images to the most appealing and technically sound ones with the potential for publishing or delivering to clients.
In digital photography, you perform culling using photo organization programs like Lightroom, Bridge, Photo Mechanic, etc.
How To Cull Photos In Lightroom Fast
To cull photos in Lightroom fast and effective, I repeat the following steps every time:
- Import all new photos into a single folder
- Rename all images during the import
- Reject unwanted photos by flagging them with the keyboard shortcut “X”
- Use the shortcut “P” to flag the photos you want to keep (keepers)
- Use the color labels to ented the “keepers” to the editing funnel
- Delete the rejected photos
Photo Organization on Hard Drive
Before you start culling your photo collection, make sure you have a comprehensive and logical folder structure on your computer’s hard drive.
Here are some guidelines I follow when managing my photo library:
Use the Fastest Drive for New Photos
When you manage larger photo libraries in Lightroom, its performance and responsiveness suffer. Make sure to choose the fastest hard drive for your photo library. Solid-state drives (SSD) are the best option. I use Samsung EVO SSD drives.

If the cost of SSDs is prohibitive to host huge libraries, you can try using my lifehack. I keep only recent image collections on my SSD drive, and when I am done with the culling and processing, I move them to my largest spinning hard drive, where my entire photo library resides.
Keep All Your Photos In One Place
The worst possible scenario for organizing your photos is is to store them in different places on your computer. It makes it difficult to find them, and the process of backing up your library becomes a nightmare.
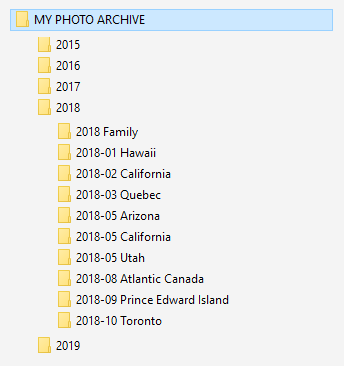
Here is the structure I use for my photo library:
I keep all my photos inside the master folder MY PHOTO ARCHIVE.
Inside the master folder, I organize the photos by year and by location.
Come Up With A Logical Naming Convention And Stick With It
Every year I create a new folder. For the folder name, I use the year only.
I use the naming convention inside the annual folder based on the year, month, and location.
Since I am a travel photographer and my trips last longer than one day, I do not use specific dates.
But, if you are an event photographer, including the precise date in the folder name can be helpful.
For all my photos, I use a naming convention where I indicate the exact date I took the photo, location, and the original file name generated by the camera at the time of the shooting.
I rename my photos during the import process using the file renaming template (see the next section).
Importing Photos to Lightroom
You can not cull or process your new photos until you import them to Lightroom.
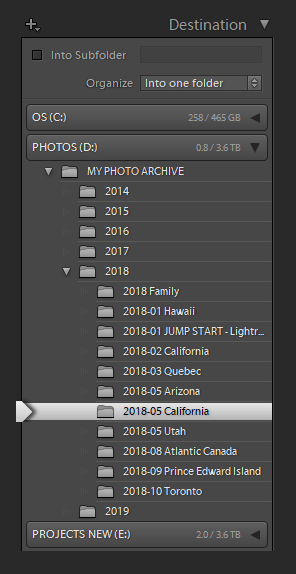
First, I create a new folder on a hard drive inside my master library under the corresponding year.
Next, I launch Lightroom and activate the Import module.
I specify where I want to import all my new photos, pointing to the newly created folder.

I also use the Name Renaming Template to rename all my RAW files during the import.
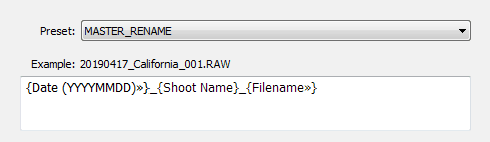
After renaming, all my photos have the following naming structure:
20190417_California_DSF0211.RAW
20190417_California_DSF0211.RAW
For more information, please check my dedicated tutorial here.
Since the import process is slow and it could take hours to import a large number of photos, I usually start the process before going to bed. When I wake up the following morning, all my images are imported, the previews are generated, and I am ready to start the culling process.
Rejecting Unwaten Photos
In the Lightroom Library module, I activate the Loop View by hitting the E shortcut or by clicking on the Loop View icon at the bottom left corner.
To mark a photo as REJECTED, use the shortcut X. The rejected photo will be greyed out, and the reject flag will be added.

By default, after rejecting any given photo, you need to use the arrow key to advance to the next image unless you activate the ADVANCE model.
You activate the AUTO ADVANCE mode by hitting the shortcut CAPS LOCK, which tells Lightroom to advance to the next photo after flagging any given image.
I always use the AUTO ADVANCE mode; it is a huge time saver.
When flagging the photos as rejected, I always look for obvious flows such as out-of-focus shots, accidental shots, photos with wrong exposure (blown highlights, clipping shadows). If you cull photos with people, the apparent flows can be a model with closed eyes or in an awkward pose.
I go through an entire collection of new photos in a matter of minutes, concentrating only on one task, flagging unwanted photos as rejected.
Flagging Keepers
Identifying the keepers is my favorite step of the culling process.
I use a routine similar to the previous step. But instead of rejecting photos, I flag the most exciting images as the keepers. I plan to process and publish them in the future and hopefully include the best ones in my portfolio.
I press shortcut E to enter the Loop View of the Library Module.
I also hit the CAPS LOCK key to activate the AUTO ADVANCE mode.
Next, I go through the entire folder of photos one by one, trying to spot the images I want to keep.
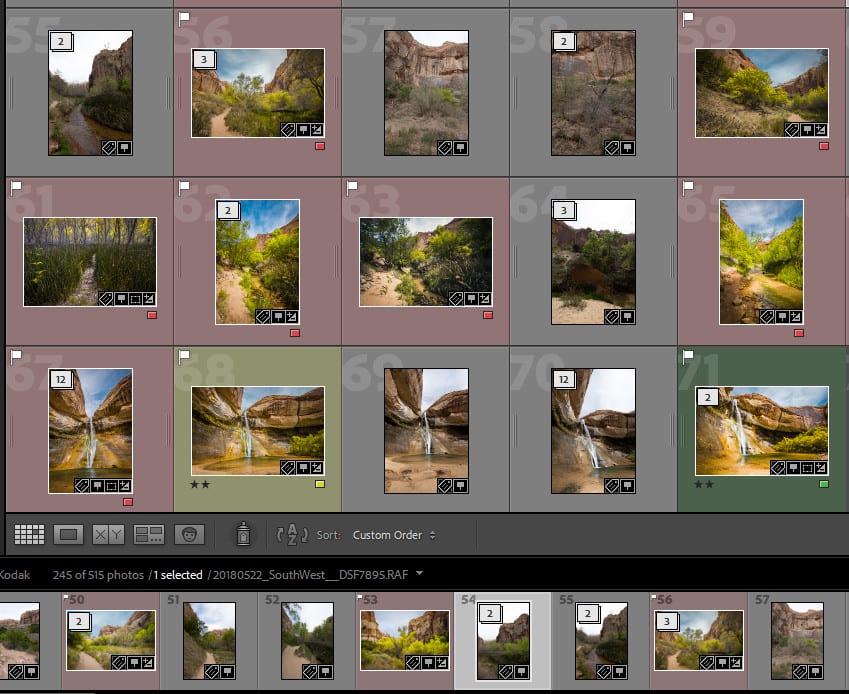
I use the shortcut F to flag the selected photo as a keeper. The Lightroom adds the flag icon to them.

The process of flagging the keepers takes longer compared to rejecting unwanted shots. It is a very subjective process, and sometimes it takes a judgment call to flag or not to flag a particular photo.
By the end of this step, I have three types of images: flagged (keepers), rejected, and photos without any flags.
What Happens to Images Without Flags?
I keep them. Photos without flags are not going to my processing funnel, but I do not delete them.
I have a routine to go through my unflagged photos once a year or so with the hope of finding initially missed jewels. And I often discover images with great potential.
At this point, the culling process is completed. I deleted unwanted images, and I identified photos ready to be processed.
Now I want to show you how my culling process logically transitions to the processing phase.
Deleting Rejected Photos
The final step is to delete rejected photos and forget about them.
Use the keyboard shortcut CMD + DELETE (Mac) or CTRL + BACKSPACE (Windows).
Use the top menu: Photo > Delete Rejected Files.
Smart Collections Editing Funnel
The next step is to move all my “keepers” (flagged photos) to my editing funnel to help me to track the progress.
I use 3 Smart Collections for my editing funnel: Candidates, Processing, Published.
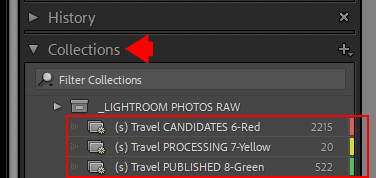
The Smart Collection in Lightroom is a dynamic selection of photos generated by Lightroom automatically based on predefined rules you specify.
In my case, I use Smart Collections based on the Color Labels.
For example, when I add the color label RED to any photo, Lightroom automatically adds it to the Candidate Smart Collection.


Moving Photos Through Processing Funnel
When I finish the culling process, I use the Lightroom filter to display flagged images only. Next, I select all of them (Ctrl+A).
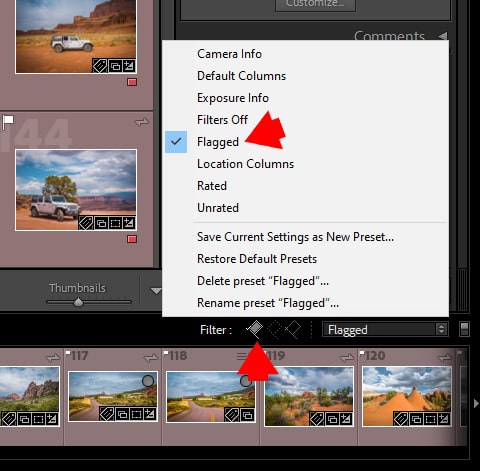
I press the 6 key to apply the RED color label to all selected photos. Lightroom adds the color label to the images and, at the same time, triggers the Smart Collection rule and adds all labeled photos to the CANDIDATES smart collection.
Now, I have “keepers” added to the editing funnel.
Depending on the project I am working on or the tutorial I am writing, I go to the CANDIDATES smart collection and look for the photos that help me illustrate my tutorial and articles.
When I find a suitable candidate, I press the 7 keyboard key to add a YELLOW color label to the selected photo. It also tells Lightroom to remove the image from the CANDIDATE smart collection and add it to PROCESSING smart collection.
The photo stays in the CANDIDATE collection until I finish processing and am ready to export the final version from Lightroom.
This is when I use keyboard key 8 to change the color label from YELLOW to GREEN. It also removes the photo from PROCESSING smart collection and moves it to the PUBLISHED smart collection.
The PUBLISHED smart collection is the final destination of my editing funnel.
Exporting Final Photos Using Export Presets
The final step is to export the processed photo from Lightroom for publishing or printing.
I use the Export Presets I developed over the years based on my needs, so I do not waste any time fiddling with the endless export options.
You can learn more about the Export Presets in the dedicated article, and feel free to download the Export Presets I use.

How to cull photos in Lightroom: Conclusion
As you can see, the culling in Lightroom is a multistep process that you can customize and take in any direction you want.
Articles Related to “How to Cull Photos in Lightroom Fast“
I hope my culling process will inspire you to develop the culling workflow that fits your style of photography and your editing.