
How important is exposure in photography? What are the components of exposure? What is the “Exposure Triangle”? These are the questions I will attempt to answer in this photography basics article about ISO, Aperture and Shutter Speed – the components of achieving a properly exposed photo.

No matter how sophisticated our camera is, it is nothing other than a dark box that creates images when light enters it. But just what amount of light is needed for it to take a “good” picture?
This is one of the most basic questions each starting photographer asks himself. And its answer is tightly related to understanding the core photographic concept of “exposure”.
What is Exposure in Photography?
You might have read or heard the photography term a “well-exposed photo”. This means a photo that was taken with just the right amount of light allowed to enter the camera. Analogically, an “underexposed photo” is one where an insufficient amount of light was allowed to hit the image sensor and an “overexposed photo” is one where too much light was let in.
In simple terms, exposure in photography is the amount of light, you as a photographer, allow to reach camera sensor or film. Exposure determines how bright or dark your photographs appear.
But what determines the right amount of light? Is it something we need to acquire a “sixth sense” for? Is it a skill that takes years to develop?
Fortunately, no. Unless your camera lacks a light meter, there’s no guesswork on your part. Your camera will signal to you whether you need to increase or decrease the amount of light that will enter the sensor. In fact, choose an Auto Mode and you will only need to point and shoot, without thinking about exposure.
Related: Best Way to Avoid Digital Noise in Your Photos
But you wouldn’t be here if Auto Mode satisfied you, right?
Knowing the components of exposure and how to manipulate them turns you from a “point-and-shooter” to a creator.
So let’s see what those components are.
Understanding the Exposure Triangle
There are three things that affect exposure. All of them are equal in importance and each is interrelated to the other two. That’s why photographers refer to them as the Exposure Triangle.
These components are called Aperture, Shutter Speed and ISO. Below, I will discuss each of the concepts in greater detail.
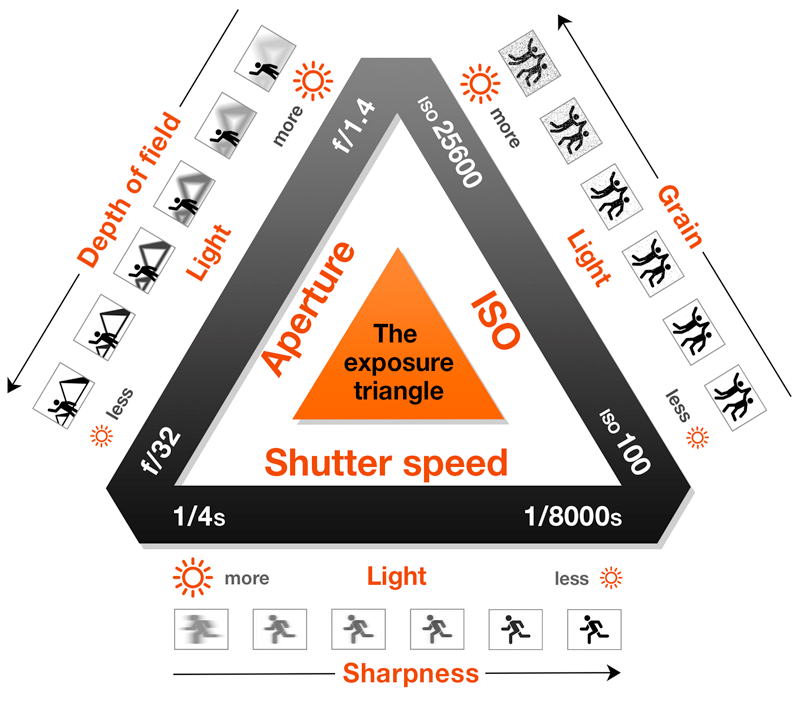
Aperture
By aperture, we mean the opening in your lens that allows light to enter the camera. The bigger the opening, the more light gets in. The smaller the opening, the less light will go in.
So in a darker scene, you would want a bigger aperture and in a brighter – a smaller. So far it seems pretty straightforward.
When we introduce the aperture values, though, it gets a bit confusing but only at first (I promise!). Those values are numbers called f-stops which your camera uses to define different degrees of openness of your aperture.
So, at f/1.4 your aperture is open wide (or it’s big) and at f/22 it’s barely open (or it’s small). You may ask, and it would be understandable: why a bigger number means a smaller aperture?
Well, the thing is f-stop numbers are not full numbers, they are fractions. If we think about f/22 as 1/22 and f/1.4 as ⅛, we’ll see why the former is actually a lower number than the latter.
The only thing left to know is that with each lower f-stop we reduce the amount of light twice. So at
Now that you are more comfortable with aperture values, let’s see what makes them so important for the final look of our photo.
Aperture and Depth of Field
I already said big apertures allow more light in and small ones limit the amount of light. But f-stops do much more than just that. They also affect directly the depth of field of your photograph – the area of your image that appears sharp.
You know those photographs of flowers with a very blurry background, right? Well, their depth of field is shallow and they’re taken at very big apertures such as f/1.4 or f/2. And how about a landscape scene where almost every object – from foreground to background – appears sharp? It must be taken at a small aperture such as f/11 or above.
As you can see now, mastering aperture lets you be in full control of the final look of your images. That’s why I often say
It may happen, though, that you want to choose a certain f-stop but the best corresponding shutter speed is too low and you can’t take a sharp picture due to handshake. There are two solutions – you either use a tripod or you take advantage of the exposure triangle and change the ISO instead. Select a higher ISO, make your camera more sensitive to light and you will now be able to make that photo sharp without a tripod.
That’s the beauty of the exposure triangle. That’s the beauty of the exposure triangle. But let’s take a look at its next component – the shutter speed.
Shutter Speed
The shutter is the component of your camera that you hear click or snap when you take a photo. As you press the shutter button, a curtain lifts in front of the sensor and allows the light to reach it.
Shutter Speed and Exposure
You can change the time this curtain stays lifted. That’s what we call “shutter speed”. The longer the sensor is exposed, the more light will get in. Choosing a higher shutter speed, we double the amount of light that gets to the sensor.
Now you know what “long exposure” means. It’s a shutter speed setting at which the sensor stays exposed for a long time. Long exposures are used when there is not enough light for example at sunset times or during the night.
Controlling Motion With Shutter Speed
But, just like with aperture, things are not that simple. Shutter speed doesn’t just influence the amount of light that hits the sensor. It also changes the way motion is captured.
Higher shutter speeds such as 1/500 and above allow us to freeze the object. A running person will appear perfectly sharp. But if we choose a low shutter speed, his movement will look blurred in the final photo.
Here we can’t really say which exposure was “correct”. Sports photographers do need to freeze the action (we want to see which football player kicked the ball, right?) but blurred motion is often used deliberately to create a sense of dynamics or to make the final image more compelling.
A very good example, traditionally exploited by landscape photographers, is blurring water. Water shot at low shutter speeds acquires a very soft, milky look that is especially eye-pleasing. At such low speeds, any movement of the camera will blur the object in focus so the use of a tripod is obligatory.
If you are interested in exploring the effects of different shutter speeds, choose Shutter Priority or Manual mode. In the former, you’ll choose the speed and your camera will match it with a proper f-stop. In the latter, you’ll choose both settings.
Manual mode makes you a bit slower but gives you ultimate control over the final look of your photo. For example, you might want to deliberately over- or underexpose your photo. There’s nothing wrong with that as long as the “mistake” serves some creative purpose.
ISO
ISO is a photographic concept that originated in film photography but was later translated to digital cameras too. However, ISO works in different ways in both types of photography.
ISO in Film Photography
In film photography, ISO is a number that defines how sensitive to light a particular roll of film is. Lower ISO numbers like 50 or 100 mean the film is not very sensitive to light. These types of film are perfect for shooting on a bright and sunny day outside. Analogically, higher ISO numbers mean films that are more sensitive to light. They are suitable for shooting indoors or in low-light conditions outside.
It’s a well-known fact that less sensitive films produce better quality photographs. This is due to their emulsion.
Related: Photography Abbreviations and Acronyms
As you know, the emulsion of a film consists of light-sensitive layers of silver halide crystals that capture light. The higher the ISO, the larger and coarser these crystals are. They need to be such in order to record light more quickly and allow for using faster shutter speeds. However, they also create more grain. Lower ISO films, on the other hand, have emulsion with a finer crystal structure so they produce smoother photographs.
ISO in Digital Photography
“Lower equals smoother” is a rule that you can follow even if you only shoot digital. In digital photography, the ISO value can be changed very easily from the menu (you do not need to change films which is what film photographers do to increase or decrease light sensitivity). Depending on the model of your digital camera, you may have a choice of ISO ranging from 50 up to 409,600.
On a bright day outside ISO 100 is usually a great choice. But as the day advances, you’ll need to increase it to 200 and then 400 or more. If you shoot indoors, you will usually have to choose an ISO up from 200-400.
It’s important to know, though, that you never make your sensor more or less sensitive to light by choosing higher or lower ISO. Your camera always captures light at ISO 100. Then, depending on the ISO value you’ve selected from the menu, it increases its brightness.
Related: How to Take a Photograph with a Blurred Background
For example, if you’ve selected ISO 200, it will increase the brightness of your photo twice. If you have selected ISO 400, you’ll increase it three times and so on. In digital photography, this is called “gain”.
Just like in films, lower ISO settings produce images of better quality. That’s because the more our camera increases the brightness of the photo to match the high ISO we’ve selected, the more noise it creates. Colors also suffer at high ISO settings. They don’t appear as saturated as at lower ISO settings.
There’s nothing to worry about at ISO up to 800 but after that, the quality of the image begins to gradually worsen. (This is strictly camera-specific, so some cameras can produce more noise at ISO 800 than others.)
So, if you can shoot with a lower ISO. But compared to Aperture and Shutter Speed, ISO is the least creative component of the triangle. It only affects the brightness and general quality of the image but it doesn’t change the way your object looks like dramatically.
A change in aperture or shutter speed, on the other hand, may produce a brand new picture.

The exposure triangle is your way out of Auto Mode
Now that you know different combinations of ISO, aperture and shutter speed make for a different final look, you can’t be satisfied with Auto Mode anymore. There are so many other versions of the photo your camera will automatically shoot, the exposure being right in all of them.
So a photograph taken at ISO 100, f/1.4 and 1/500 will have rendered the incoming light as accurately as ISO 200, f/2 and 1/500 but its background will be just a bit blurrier. And it will have just a tiny bit less noise.
Any little change in any of the components makes for a slightly different but equally well-exposed image. You can play around with all of them to get the exact image you want – something Auto Mode will never allow you.
Add a deeper understanding of composition and the knowledge of the exposure triangle makes you a true photographer – someone who can materialize his ideas into final images.
If you want a more detailed discussion about ISO, shutter speed and aperture, you can find them in the following articles:
Or, if you want quick answers, you can always leave a comment.