
Last week, I returned from an exciting photography trip that was dedicated to exploring Utah’s backcountry.
I spent 10 days driving dirt roads deep inside the deserts and mountains of Utah. I drove along some iconic dirt roads like Bull Trail, Hole in the Rock, and Cottonwood Road, all of which have deep roots in Utah’s rich history.
To accomplish such a trip, I needed two things: a high clearance car and dry weather. Most of the dirt roads in Utah are composed of clay and are unpassable when they are wet regardless of what car you are driving.
I originally intended to take this trip last spring, but I had to change all my off-road plans on the fly because of the rainy weather that occurred in the third week of May.
This time, everything went according to plan. I secured a Jeep Wrangler for 10 days and the weather was perfect, hot, and dry.
Loc: 38.402230, -111.208023
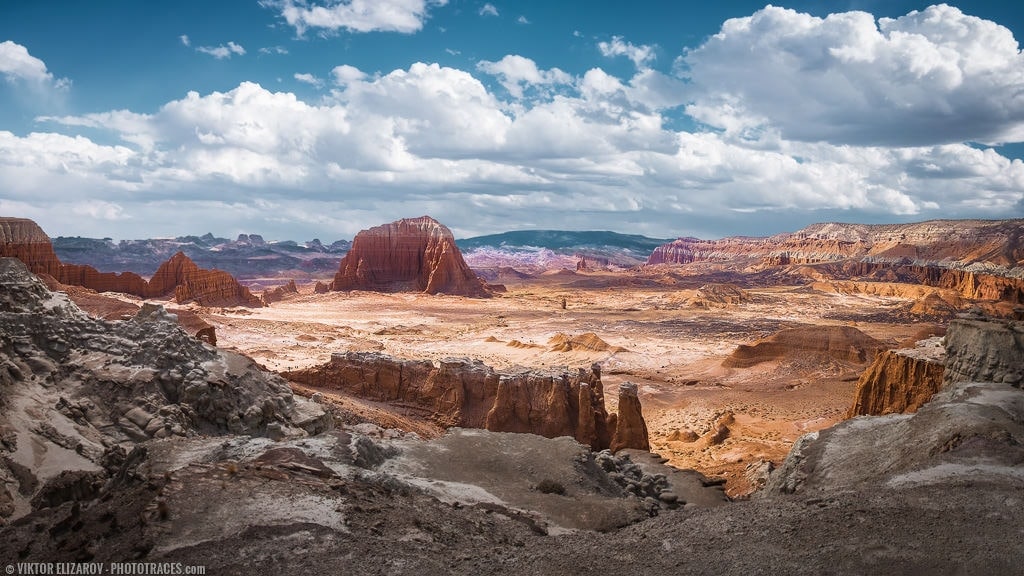
I took the featured photo during the spectacular but very rough and bumpy 100km Cathedral Valley Drive in Capitol Reef National Park.
I was on my way to the Cathedral Valley Campground, which is a unique place on its own. It is located at an altitude of 2,400m and offers an unobstructed and open view of Cathedral Valley. The campground has only five spots and works on a first come first serve basis. I wanted to secure a spot for the night as early as possible.
This is when I stumbled on the Lower South Desert Overlook. I did not know about its existence and had not seen any photos of it as I planned the trip. When I witnessed the view from the overlook, I was completely overwhelmed by the enormity and beauty of the scene. I remember I had a similar feeling when I visited the Grand Canyon for the first time.
Unfortunately, the photo does not convey the scale of the scene or its vastness.
Shooting
When I was ready to photograph the Desert Outlook, I realized that I faced two challenges.
First, the scene was too vast to capture it in one shot even if I used the widest focal length of 10mm. I solved the problem by shooting six vertical shots at a focal length of 18mm with the goal of combining the images into a wide panorama during editing.
The second challenge was the harsh lighting. Even though the afternoon sun was partly shielded by the clouds, the sky was still too contrasted for my taste. But, since I was pressed for time and could not afford to hike down to the valley for a better vantage point, I took a series of panoramas and was soon on my way to the Cathedral Valley.
Editing & Processing
Back home when I combined five shots into a panorama, I realized that I really did not like how the white clouds appeared against the blue sky. I wasted a long time in Photoshop trying to improve it, but I still did not like the results.

To salvage the shot, I knew I had to cheat. I needed to replace the sky.
In general, I try to avoid using the sky replacement technique. I do not do this very often. I believe there is only one photo in my portfolio where I used this technique. But, in this case, I really, really, liked the location and wanted a decent photo.
I selected a series of shots I took two hours later in Cathedral Valley. I combined them into a panorama in Lightroom and replaced the sky in the original photo in Photoshop using the Transparency Mask.

Lightroom (50%)
I used the Panorama Photo Merge module of Lightroom to combine 5 original RAW images. Next, I used another set of RAW images to create the second panorama for the purpose of sky replacement.
I used the Crop Overlay tool to change aspect ratio to a 16 x 9 ratio.
Finally, I used the Napa preset from my brand new product Travel Kit Pro.
Then I used the TOOLKIT to boost the Contrast.
The Lightroom Preset Editing Formula: Napa (1, 9, 13, 40)
Photoshop (50%)
IIn Photoshop I replaced the sky in the original shot by placing 2 panoramic shots in 2 separate layers and I used the Transparency masks to blend them together.
The rest was a simple boost of details and noise reduction.
Plugins: DeNoise (noise reduction), Topaz Detail (local contrast boost).
Total time: 35min