
Shutter speed is part of the exposure triangle along with aperture and ISO. Shutter speed doesn’t only control the exposure but also lets the creative photographer to innovate and experiment with the motion. When understood to the core, shutter speed is not a technical but a creative tool.
The Shutter as an Essential Part of the Camera
The shutter is the part of the camera that remains closed to prevent light from entering and reaching (exposing) the sensor. When the shutter button is pressed, the shutter curtain opens to let light reach the sensor. The sensor records the intensity of light while the shutter is open; this is how the
Without the shutter mechanism, the sensor stays exposed and there is no way to eliminate the light other than manually blocking it with your hand or a card, which was a common practice in early photography.
Definition of Shutter Speed
Shutter speed is defined as the time duration between the opening and closing of the camera shutter. It is the time that the sensor or film records the light and, hence, creates a photograph.
How Shutter Speed is Measured
In most cases, shutter speed is measured in fractions of seconds. However, some long exposure images require a shutter speed of up to 30 seconds or longer.
Shutter speed is usually measured as follows:
1/2000s, 1/1000s, 1/500s, 1/250s, 1/125s, 1/60s, 1/30s, and so on.
Each stop down the line (from 1/60s to 1/30s, for example) increases the duration of time the shutter stays open by a factor of two and, as a result, doubles the amount of light that reaches the camera sensor.
The Shake Blur
Often times, shake blur happens due to shake or movement in the camera while the shutter is still open. It can be avoided by using a tripod with a remote shutter release/timer or the minimum shutter speed rule. If you ever wondered why your photos appear blurry or soft, it is because of those slight movements while the shutter was open.
The Minimum Shutter Speed Rule for Shake-Free Photos
When not using a tripod or another type of support, photos tend to have ‘shake blur’ if the shutter speed falls below a particular number. This has been calculated and is given as:
1/focal length or 1/100, whichever is faster
Therefore, if you are using a full-frame camera with an 85mm lens, the minimum shutter speed you need to keep is 1/100 (because 1/100 is faster than 1/85). However, if you are using the same camera with a 300mm lens, the minimum shutter speed is 1/300.
On a crop frame sensor, multiply it with the crop factor. For example, an APS-C sensor camera with the same 85mm requires that you use a minimum shutter speed of 1/(85 x 1.5) = 1/127.5. Here, you will use 1/150 and not 1/125 to avoid any chance of shake.
If your lens has an image stabilization feature, you can reduce it by that many stops from the minimum shutter speed. For example, if you have to use a minimum shutter speed of 1/125, but your lens has a 1 stop IS, you can use a shutter speed of 1/60.

Freeze the Moment or Faster Shutter Speeds
Faster shutter speeds tend to freeze the moment, which is commonly used for wildlife photography and water splash photography among many others. A bird in flight may require you to shoot at 1/2000 or faster. Freezing the motion of water may require you to shoot at 1/1000 or faster depending on the flow of water. This technique is also used in action shots.
For example, freezing the motion during racing events can produce tack sharp pictures with tiny bits of dirt frozen mid-air as they splatter across the tires.
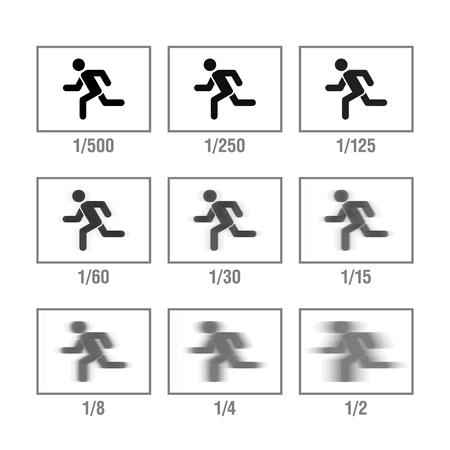
Creative Motion Blur or Slower Shutter Speeds
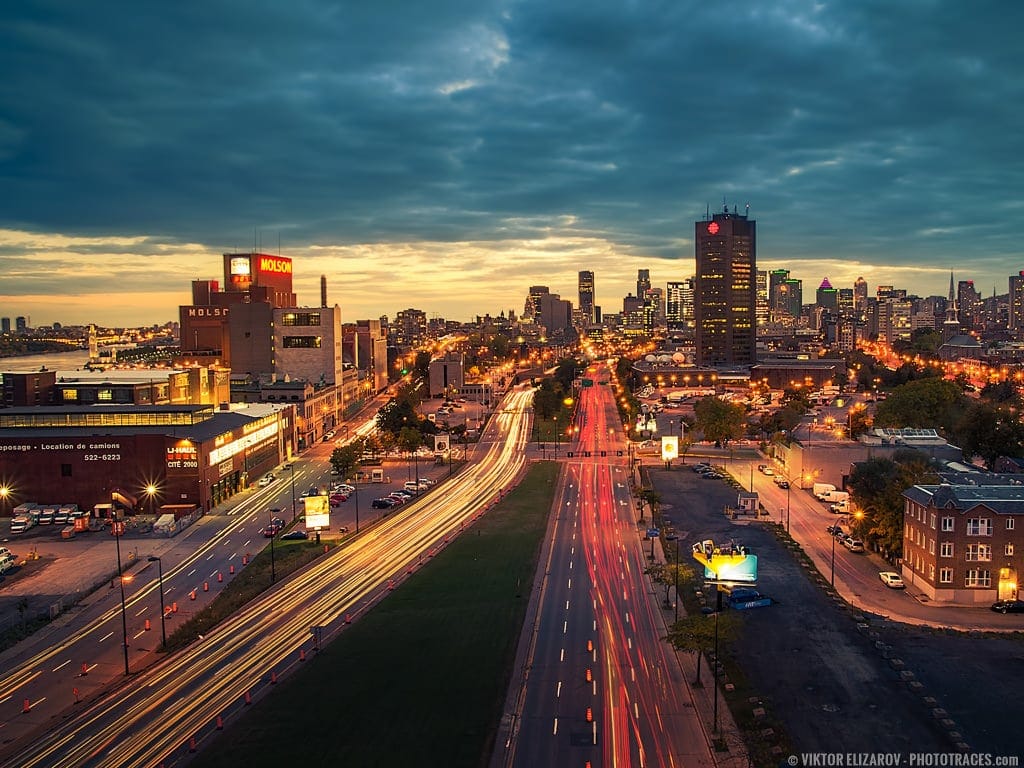
Slower shutter speeds tend to produce motion blur. This is achieved by keeping a major part of the subject, or at least some part of subject, still while the moving parts are naturally blurred in motion. This technique is common in shooting light trails and creative dance movements. Star trail photography is based on the motion blur of the stars and their movement.
Shooting landscapes that feature water also involves blurring the motion to make the water appear silky smooth. Many photographers do this when shooting waterfalls to imitate the style used in paintings.
When using extended exposure times, this is commonly known as long exposure photography. Star trails, nightscapes, and Milky Way photography are grouped in this category. Typically, the shutter speed is very slow, which makes it impossible to shoot without a sturdy support like a tripod.

Setting the Shutter Speed – Two Major Modes
Shutter priority mode lets you set the shutter speed while the camera automatically sets the aperture based on the light conditions, metering mode, exposure compensation, and locked-in ISO settings. In manual mode, all the settings are completely manual including the shutter speed and aperture; metering only offers a guideline for the correct exposure.
Where Can You Find the Shutter Speed?
The shutter speed can be found on the bottom left of the viewfinder screen or on the top of the camera’s LCD panel (not all cameras have this feature). Also, you can find the settings displayed on the camera’s rear LCD screen. Shutter speed is usually denoted as a number instead of fractions. For example, 1/125 is denoted as 125, and 1 second is denoted as 1. However, this convention has changed in a few recent camera models.
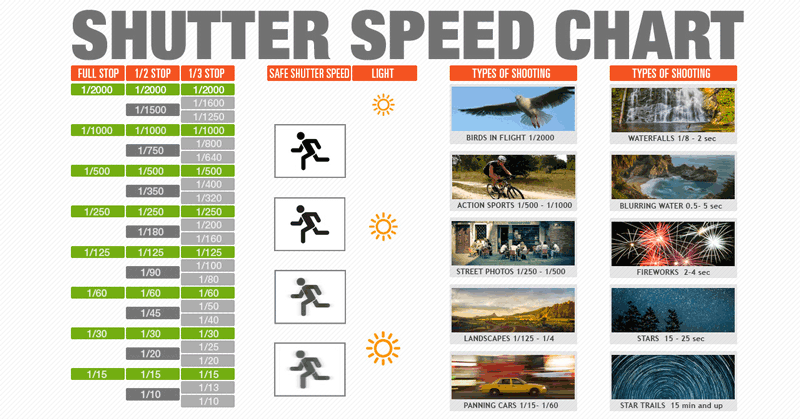
Shutter Speed Chart Infographic
When we discuss the Shutter Speed and its place in photography the principal thing that rings a bell is its link to Exposure. The Shutter speed is the primary element of Exposure Triangle (Aperture, ISO, Shutter Speed) and it assists photographers to get well-exposed photographs.
But my opinion is that to comprehend and to master Shutter Speed for taking the correctly exposed photographs is the simplest part of the equation. The more interesting but at the same time more complicated part is to master how to use Shutter Speed as the artistic tool in our photography.
By modifying Shutter Speed’s values, we can produce some astonishing artistic effects, even some that do not exist in reality (long exposure photography).
The sole purpose of the Shutter Speed Chart cheat sheet Infographic is to visualize the various aspects of Shutter Speed to aid photographers and artists to adopt it as the primary artistic tool.
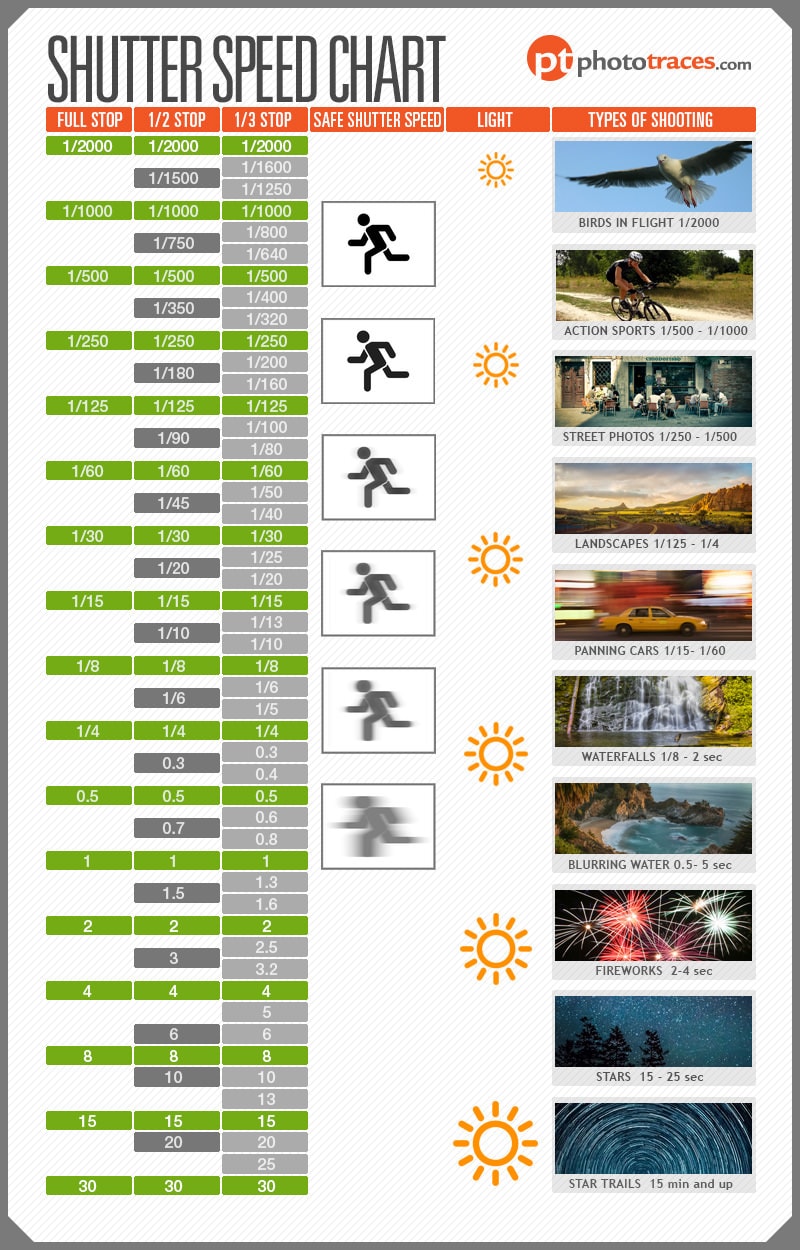
Full Stop, 1/2 Stop, 1/3 Stop
We all know that together with the Aperture and ISO the Shutter Speed controls the exposure.
And for a long time, it was a pretty simple and straightforward equation, by changing the shutter speed from 1/200s to 1/100s we double the amount of light (1 stop) that reaches the film or sensor. You keep shutter open twice longer you get twice the amount of light.
But with the introduction of digital cameras, we are not restricted to changing the shutter speed by one stop only. Some cameras allow us to change the shutter speed by half (1/2 stop) and some cameras by third (1/3 stop).
The shutter speed chart helps us to do exposure estimations and calculations easier.
Safe Shutter Speed
When you have moving objects in your composition it is paramount to use the right shutter speed in order to get sharp photos. The Safe Shutter Speed illustration let us visualize that by using the shutter speed slower than 1/100s we enter the potentially unsafe area with the regards to sharp photos goal.
Light
This is a simple illustration of correlation between shutter speed values and the amount the light reacheth the camera sensor. Faster shutter speed equals less light and longer speed results in more light.
Shutter Speed Chart and Types of Shooting
This is what I call a Shutter Speed Cheat Sheet that helps photographers to use a shutter speed as a creative tool.
Birds in Flight 1/2000
When wildlife photographers track and photograph a bird in flight it requires an extreme shutter speed of 1/2000s to get the bird perfectly sharp. The variation of this technique is to reduce the shutter speed to 1/400s will result in a sharp body of the bird but blurry wings. This is a more creative approach to wildlife photography.
Action Sports 1/500s – 1/1000s
You probably do not need an extreme shutter speed when photographing a golfer putting on the green but any sports that involve fast movements and actions will need special attention to shutter speed value. Photographing professional football game or your kids playing soccer will require shutter speed between 1/500s and 1/1000 to freeze the action and to get sharp photos.
Street Photography 1/250 – 1/500
In general, when photographing the streets the scene is in constant movement. You have people walking towards you or crossing the street, cars moving and stopping, the proper shutter speed is paramount not only for getting the right exposure but also for avoiding blurry or soft images.
Landscapes 1/125 -1/4
It is hard to pinpoint the shutter speed range for the landscapes because the techniques and the setting you use will vary depending on if you shoot hand-held or on a tripod. The slower shutter speed of 1/8 or 1/4 is totally acceptable when using a tripod but if you shoot hand-held you need to reduce the value to get sharp photos.
Related: Sunset Photography Fundamentals and Actionable Tips
Panning Cars 1/15 – 1/60
The panning is one of the most interesting creative technique that involves the shutter speed. By using a longer shutter speed (1/15 -1/60) and tracking the moving object (car) when the shutter is open let us create the effect when the main object is in focus and the environment around it is blurred.
Waterfalls or Fast Running Water 1/8 – 2sec
Here we are entering a more creative approach to photography in general and shutter speed in particular. By photographing a fast running water with the longer shutter speed allows us to create the visual effect which does not exist in real life. It is like creating a special effect in movies. You open up the shutter speed for a longer period of time and let moving water to create motion blur effect.
Blurring Water 0.5 – 5 sec
Blurring the water is the foundation of landscape photography. Nothing makes the landscapes and seascapes dreamy and fascination like long exposure effect in the water. When photographing ocean, sea, lakes, and rivers where movement in the water is not too fast or when you shoot from a greater distance, you need a slower shutter speed value compared to shooting the waterfalls to get this silky and smooth effect in the water.
Fireworks 2-4 sec
It is not easy to photograph fireworks. You are shooting at night with bright lights popping up randomly everywhere. The logic here is to open the shutter speed long enough to capture the entire lifespan of the shoot. You use faster shutter speed and you will get a tiny unimpressive light in the vastness of the dark sky and if you use too long value you will achieve the overexposed, blurry and unnatural effect. I find that the speed of 3-4sec works the best.
Stars (Astrophotography) 15-25 sec
Shooting the stars or astrophotography allows us to capture something that is not visible by naked eye. By opening the shutter speed for a long period of time helps us to amplify the dim lights of the stars.
Here you need to strike the right balance. If you use a fast shutter speed the stars will be tiny and dim but if you use speed longer than 30sec you get a strat trail effect created by the constant movement of the earth. So the shutter value between 15 and 25 sec will produce sharp and bright stars.
Star Trails 15 min and up
This technique enables us to take advantage of steadily spinning earth around its axis. If you open the shutter speed long enough you can capture the trailing effect of the stars. The traditional technique requires the shutter speed value of 15 minutes and longer. But with the digital workflow you can simulate the same trailing effect by taking series of photos, let say 120 of them, with 30 sec exposure and blend them together in Photoshop or another editing program. You will be able to create the effect of 60 min exposure.
Conclusion
Aperture helps us control the depth of field, while the shutter speed lets us control the flow of the image. Whether you want to freeze the motion, use creative blur, or stack star trails, the shutter speed gives wings to your creativity. Timing is also of great importance because pressing the shutter button at the right time with the correct settings can produce incredibly stunning results.