
If you’re looking to understand Lightroom soft proofing, then you’ve come to the right place.
In this article, I’m going to cover the ins-and-outs of soft proofing in Lightroom–so that by the time you’ve finished, you’ll know:
- What soft proofing is
- How to work with the Lightroom soft proofing panel
- How to use soft proofing for stunning results when printing

So if you’re ready to discover everything you need to know about soft proofing, then let’s get started.
What Is Color Proofing in Digital Imaging?
Proofing is all about checking the accuracy and quality of a piece–before creating the final result.
In digital imaging, color proofing specifically involves checking the colors of a print before you spend on printing.
Why is this necessary?
Read also: How to Move Lightroom to a New Computer
Because different papers and printers give different looks to your photos–so, if you’re not careful, you’ll end up with a print that doesn’t match your monitor and is no longer up to your standards.
For instance, one printer and paper combination may slightly desaturate your print; another might decrease contrast, another might be unable to render dark tones without clipping, etc.
See also: Matte vs Glossy Photos
But instead of just hitting the Print button and hoping that everything turns out okay, photographers rely on the proofing process. This allows for a color check prior to printing, say, a 20 x 30 canvas print for your wall.
Make sense?
Soft Proofing vs Hard Proofing
In digital imaging, there are two types of proofs:
Soft proofs and hard proofs.
The distinction is simple:
Hard proofs are physical. You can hold them in your hands, and use them to know how your final copies will turn out (if left unadjusted). For instance, if you plan on ordering 100 wall-sized prints from a printing company, the company will offer you a few small hard proofs, which you can use to correct errors.
Whereas soft proofs are digital; they’re meant to mimic the results you’d get from a hard proof, but on a monitor. In photography, they’re a great method of determining how your print will turn out, without requiring the time or (sometimes) money needed to make a hard proof.
What is Soft Proofing in Lightroom?
Lightroom soft proofing is the method of virtually reviewing how a print will look, prior to actually printing. With Lightroom’s soft proofing option, you can quickly detect any unexpected differences in color or tones, then make the necessary changes to achieve the print you envisioned.
What’s especially impressive about Lightroom’s soft-proofing panel is you can simulate a wide variety of paper and print combinations; that way, you can accurately soft-proof your prints for a range of possible situations.
Read also: Top Lightroom Keyboard Shortcuts
Also useful is the ability to see the proof side-by-side with the original, so you can make changes on the spot.
Lightroom Soft Proofing: A Step-By-Step Workflow
Soft proofing in Lightroom is simple.
And in this section, I’m going to take you through the soft-proofing steps, so that you can quickly soft proof photos whenever you need.
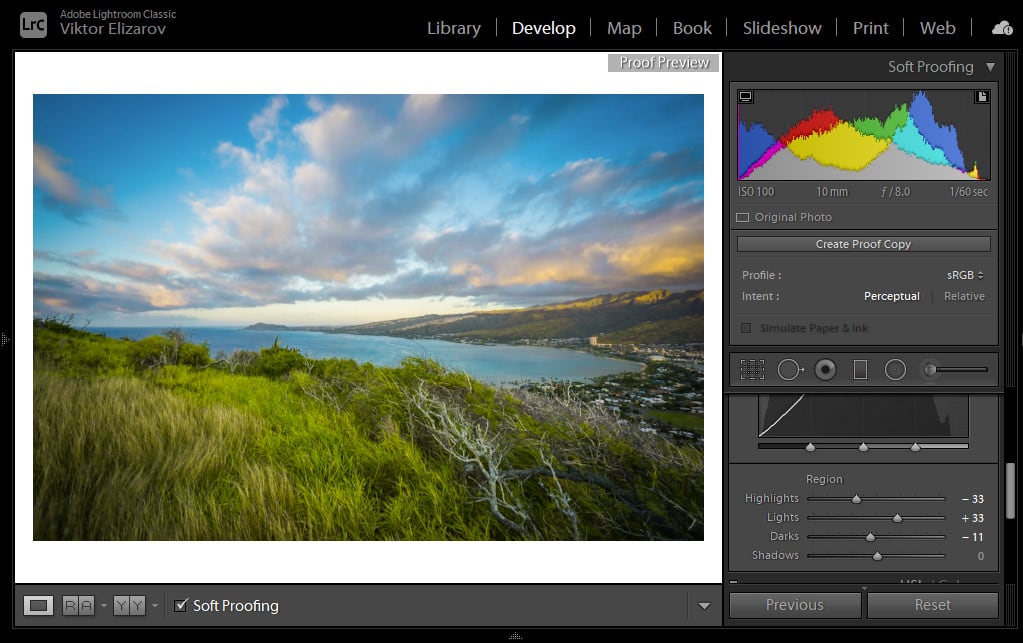
1. Activate Soft Proofing
First, you need to activate the Lightroom soft-proofing option.
To do this, simply tap ‘S’ on your keyboard. Make sure you are in the Develop Module.
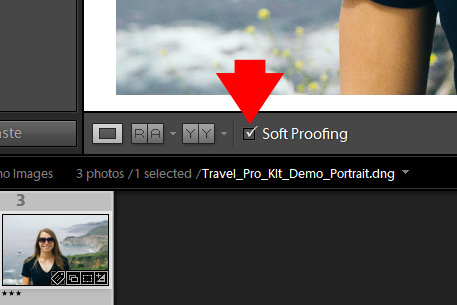
Alternatively, you can check the Soft Proofing checkbox at the bottom of the image:
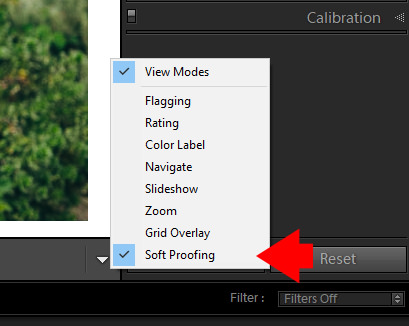
Note that if you don’t see the soft-proofing checkbox, it needs to be revealed. Click the fly-out menu icon in the bottom right corner of the image view, then tap Soft Proofing.
2. Create a Virtual Copy
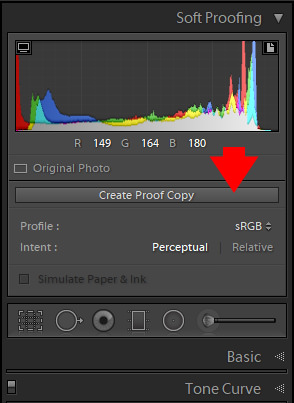
The next step is to create a virtual copy of your image; to do this, simply click on the Create Proof Copy button in the Soft Proofing panel.
(A virtual copy is a completely identical version of your photo–one that’s stored separately in the Lightroom environment, but doesn’t actually get duplicated on your hard drive.)
3. Select the Profile That Matches the Printer and Paper You Will Use
This is an extremely important step–and, if skipped, you’ll end up with an inaccurate proof.
As mentioned above, different printers and paper create different results, so you must ensure you select the proper printer/paper combination before moving forward with the proofing process.
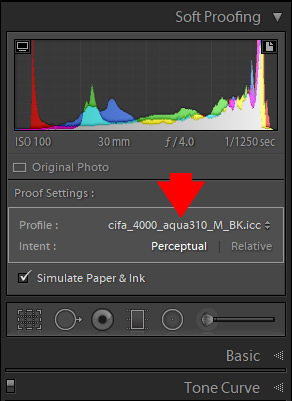
In my case, I have ICC Profile for Epson Stylus Pro 4000 printer and Aquarell Rag 310g/m2 Matte Black paper.
If you can’t find your printer/paper combination in Lightroom, look online; many companies include downloadable profiles that you can access. Canson Infinity website is a good place to start.
4. Select Your Intent
The intent tells Lightroom how to adjust your print in response to color problems. It’s a complex topic, so I just recommend you select the Perceptual option; this is generally the better way to go.

If you want to learn more about the topic, check in-depth article here.
5. Check the Simulate Paper & Ink Checkbox
The Simulate Paper & Ink checkbox ensures that the soft proof mimics the effect of the paper and ink on your file.
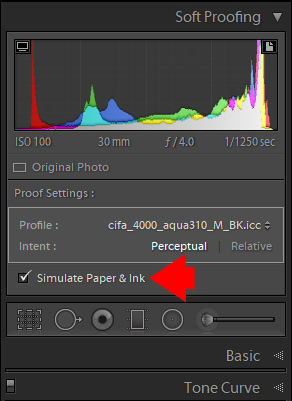
So make sure that it gets checked; otherwise, you’ll end up with an inaccurate proof.
6. Enter the Before & After Mode By Clicking the ‘YY’ Button
Next to the soft-proofing button, you can find the different view options. This includes a Before/After view, which you can activate by tapping the ‘YY’ button:

Note that this will allow you to compare the soft proof to the “master” photo. When you make adjustments in the rest of the Develop module panels, they will only be reflected in the right (proof preview) window, and not in the left (master) window.
This is useful for the next step:
7. Adjust the Virtual Copy
Now it’s time to make your proof preview match the original photo. Once you’ve finished this step, then you’ll have a file that can be printed with good results.
See also: How to Soften Skin in Lightroom
So carefully compare the ‘master’ image to its ‘proof preview, then make adjustments to the proof until it looks identical to the master photo.
8. Turn Off Soft Proofing in Lightroom
And that’s it! You’re done!
To exit the Soft Proofing panel, simply tap ‘S’ on your keyboard, or uncheck the Soft Proofing checkbox.
Soft Proofing for Digital Publishing
One last thing:
While soft proofing is primarily used by photographers looking to print their images, you can also use it for an alternative purpose:
To ensure your images look great when posting them on the internet.
You see, photographers generally use Lightroom with a dark gray background; this brings out the darker parts of your photos and makes them look bright in comparison.
Read also: Best Lightroom Export Settings
A consequence of this is that images often look dark when displayed on the web, where the white background is predominant.
So, to prevent this issue, quickly hit the Soft Proofing shortcut (‘S’). Since soft-proofing always uses a white background, you can quickly check how your image will look on the internet; if it looks too dark, make sure to brighten it up slightly before exporting!
Lightroom Soft Proofing: Conclusion
Now that you’ve finished this article, you should know all about Lightroom soft proofing.
And you’ll be able to get the best possible prints, right from the get-go!
For more Lightroom related articles and tutorials check dedicated Lightroom Tutorial Page.