
If you’re looking to understand how to use Lightroom Range Mask, then you’ve come to the right place.
When Adobe dropped a bombshell a couple of years ago by killing a stand-alone Lightroom 6, renaming Lightroom CC to Lightroom Classic and releasing a brand-new cloud base Lightroom CC, it evoked a very strong reaction from the photography community. The reaction was raging from the anger to confusion and doubt.
The occasional Lightroom users were angry because they did not see the need for the Creative Cloud subscription because they used Lightroom a few times a year only and never opened Photoshop in their lives.
The beginners were completely confused because they had no idea what version of Lightroom they needed.
Related: Free Lightroom Tutorials for Beginners
The professional photographers started to have doubts about the future of Lightroom Classic, the primary tool to run their businesses.
Behind this commotion and confusion, the announcement of a new feature in Lightroom Classic was almost missed.
Introduction of the Lightroom Range Mask
With the release of Lightroom Classic Adobe, besides addressing the performance issue of the program, introduced a new feature: the Range Mask.
I was the happiest person when I heard about the feature because I’ve been waiting for something like this for years.
Let me explain.
I consider the HSL panel to be one of the most valuable tools for my photography. The tool allows me to target specific colors in my photographs.
For example, if I want to adjust the sky area of the photo I only target blue hues in the HSL panel. I can sift the color to another hue, I can increase its saturation or make it darker. The same logic applies when I need to target vegetation in my landscapes. I adjust green hues in HSL panel only.

What I was missing the ability to use HSL functionality when using the Graduate Filter, the Adjustment Brash, and the Radial Filter. Somehow it felt if Adobe simply forgot to add HSL panel to those tools.
With every new update I expected for this feature to be added but it never happened.
Finally, Adobe announced something different, the Range Mask. What is even more exciting is that that Adobe created something more innovative and powerful than simple HSL panel.
The Range Mask allows us to create sophisticated masks based not only on color but luminosity as well.
I love it.
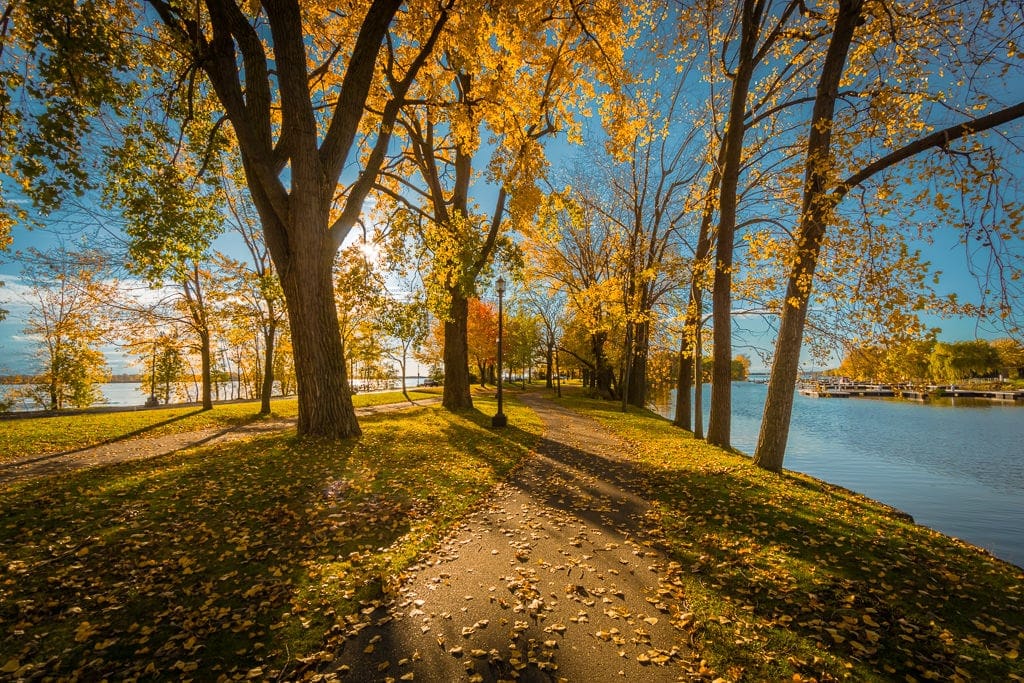
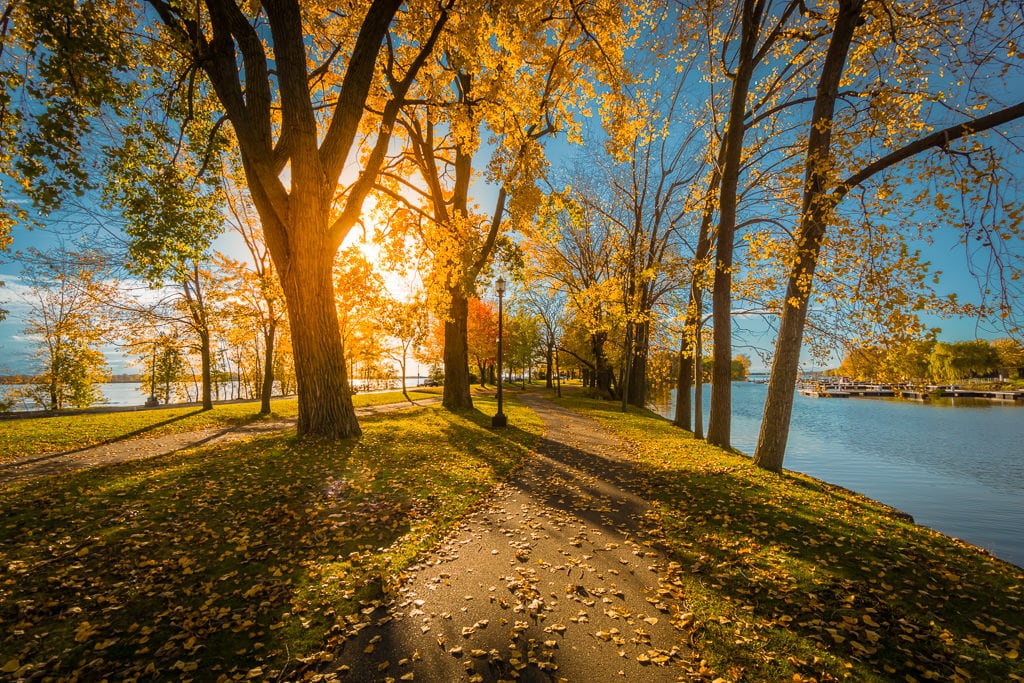
To better explain the power of Range Mask I prepared for you a demonstration. I went to the park on a sunny day with the goal to produce the right photo for this tutorial.
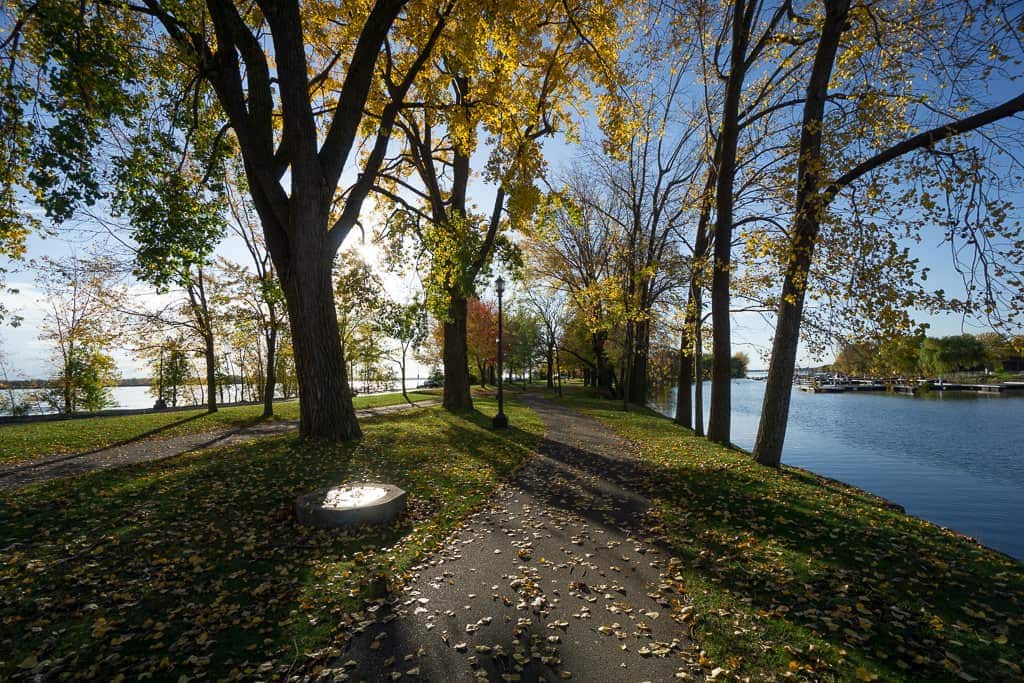
I intentionally was shooting directly into the sun through the trees to make sure I can take advantage of the complex masking abilities of the Range Mask.
See also: How to Batch Edit in Lightroom
I thought the selected photo would be a perfect demo material.
Editing Step 1
I start the editing with my standard Lightroom Rapid Editing approach. First, I use the Autumn preset from Fall Colors Collection, and later, I use TOOLKIT to open up the shadows and to boost the contrast.
The Lightroom Editing Formula: Autumn (9, 17, 32)
I also masked the manhole cover using the Spot Removal tool.
At this point, it took me, 2 min at most.

Editing Step 2
Next, I want to boost the blue color in the area of the sky.
Before the Range Mask functionality was introduced, the only way I could affect the area of the sky was the HSL panel. But the latitude at which I can alter the blues is very limited.
I can boost the blues at the low degree only because when I make the sky darker, the white fringing is starting to appear between the sky and the tree leaves. Since the HSL panel does not have feather functionality, I can not create a seamless transition there.
The second issue with HSL panel is I only can effectively target top area of the sky and since there is not enough color information closer to the horizontal area I am out of luck.
Related: Best Lightroom Export Settings
The only way for me to target sky area with the precision was to jump to Photoshop and create luminosity mask for the area of the sky. It means leaving nondestructive RAW editing environment.
With the new Range Mask, it can be done in Lightroom easily.
First, I create new the Graduated Filter and with the following settings:
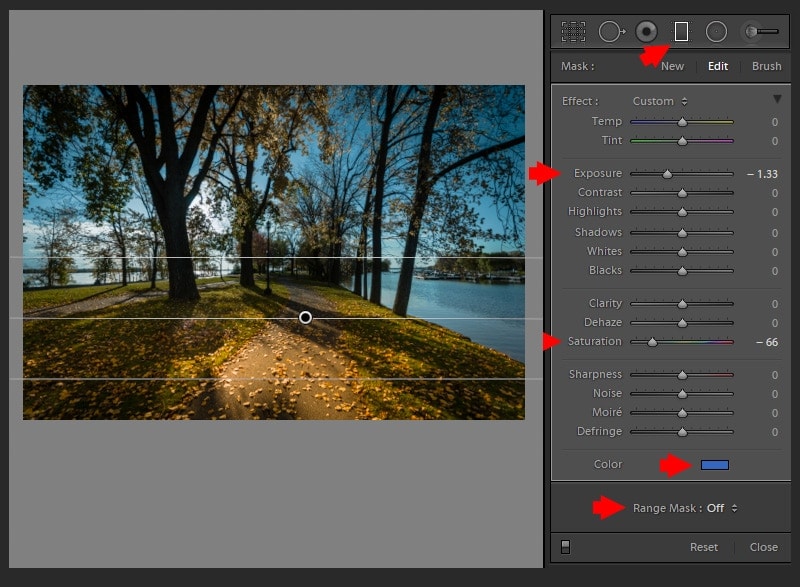
The filter effect is applied to the entire image, and it looks awful.
Next, I activate the Range Mask by selecting the Color option.
Now, I use Color Picker to sample color from different areas of the sky, making sure to select the entire range of blue color. Use Shift keyboard key to select multiple points.
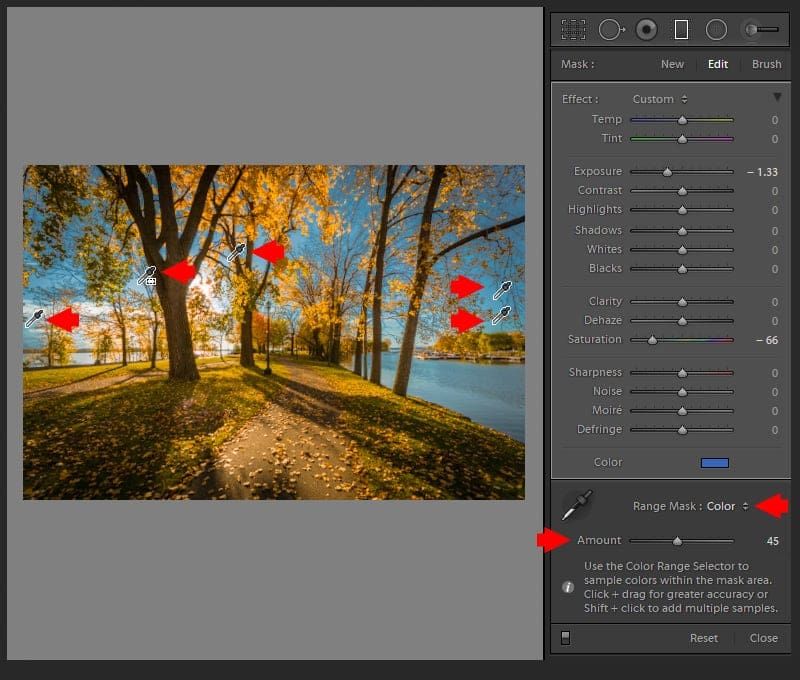
The Amount slider allows us to adjust the blending with the more precision.
If you press the Alt key and drag the slider, you can see the actual mask the tool created and the area of the image the Graduated Filter is affecting.
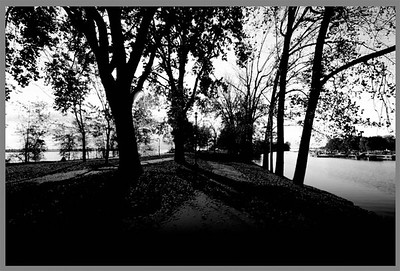
Reminder: white area of the mask REVEALs and black area CONCELs.
Editing Step 3
In the following step I want to emphasize the area of the sun because when I applied the Graduate Filter, the yellow and orange highlights were neutralized.
I am going use the Radial Filter with the following settings. It looks much better.
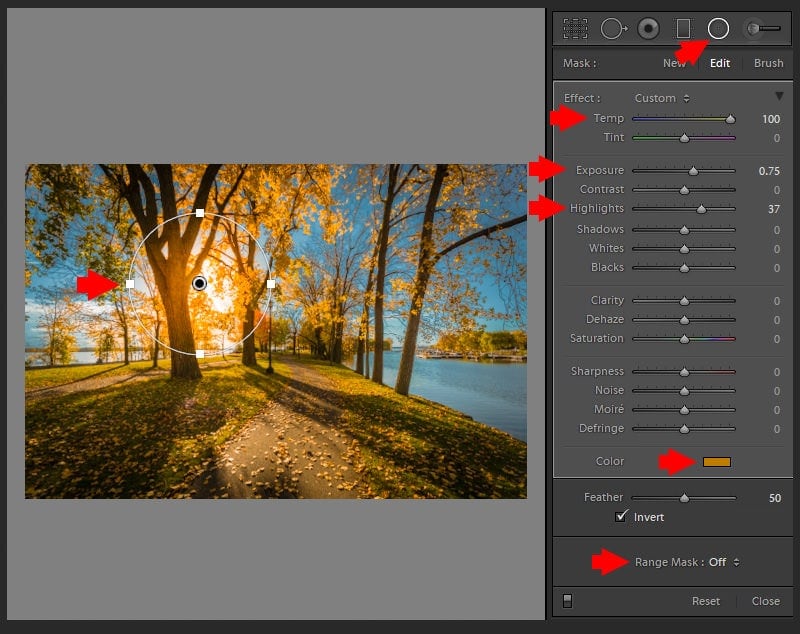
But I have a problem here. The effect of the filter affects the trees as well making the entire scene unrealistic because the trees are supposed to be in the shadows.
I can fix it with ease using the Range Mask.
This time I am going to use the Luminance option to activate it.
Related: My Top 15 Lightroom Workflow Tips
The Luminance options look different compared to Color. Here I need to specify the tonal range I want to affect. Since I want to affect only the bright areas and leave dark areas unaffected, I move left slider, which corresponds to darker tones, to the right.

You can use Smoothness Slider to adjust the blending level.

Once again, if you press the ALT key and start moving the Smoothness slider, you can see the actual mask the tool created.
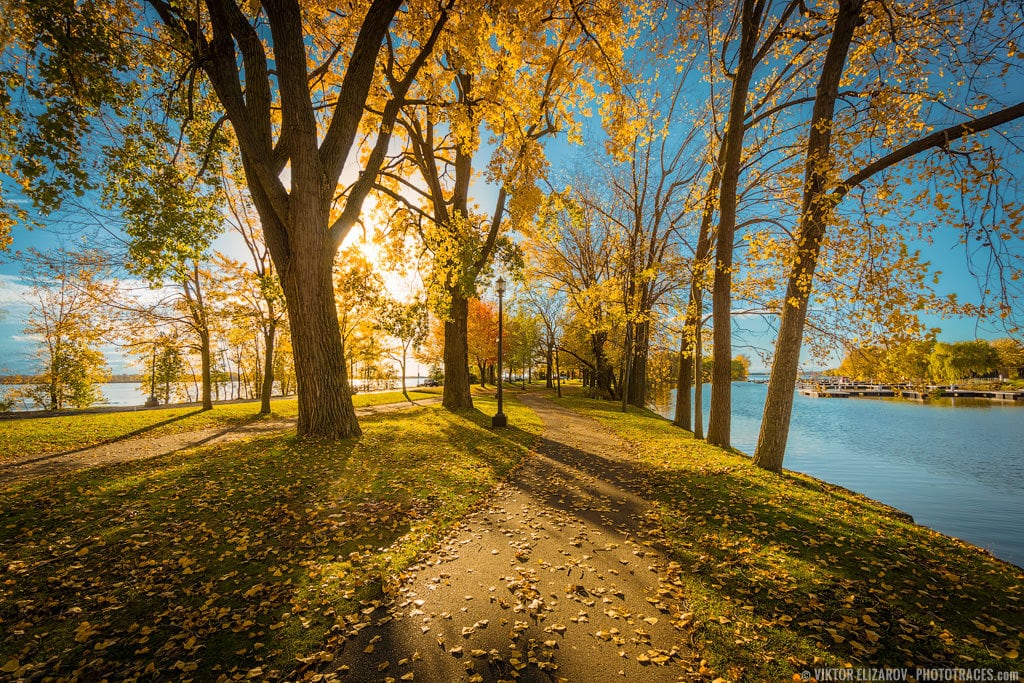
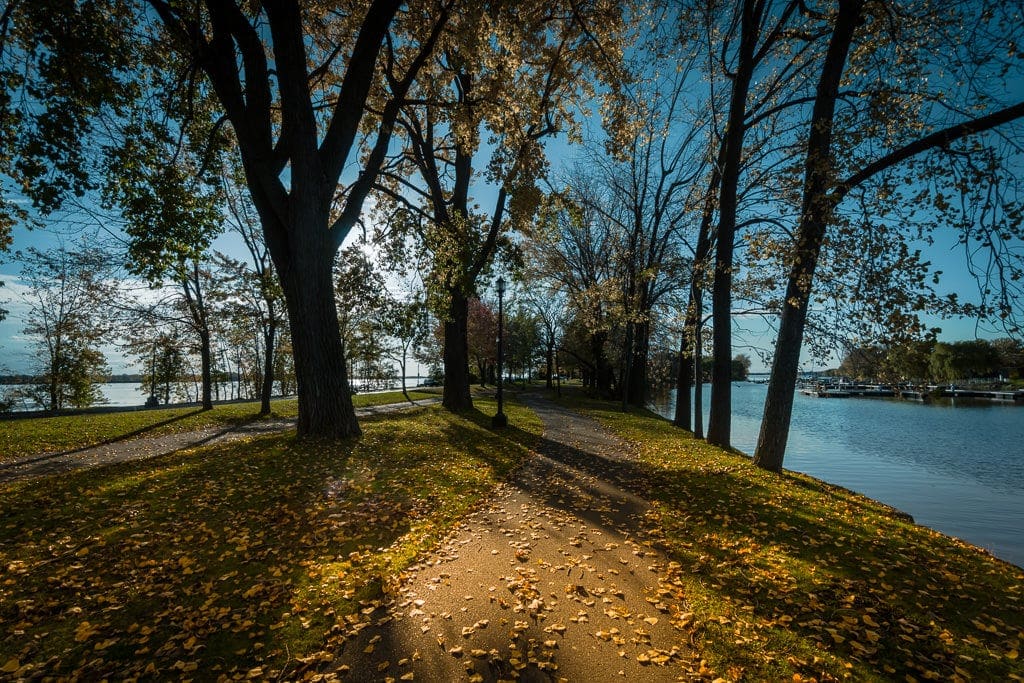
Before & After Transformation
Conclusion
The Range Mask functionality in Lightroom is another step that boosts selective editing capability of the program. It helps us to create sophisticated masking that further and further blurs the difference between Lightroom and Photoshop, allowing photographers to stay longer in a nondestructive RAW editing environment.