How to zoom in Lightroom is the last thing we worry about when we start using the program. We treat it as a trivial and self-evident process.
But, if you evaluate your Lightroom editing workflow, you realize it is an intricate multistep process interrupted by an endless number of zooms in and out.

Also, the unique modular structure of Lightroom adds another level of complexity. Sometimes, it feels that each Lightroom module is a stand-alone application with its unique tools, shortcuts and functionalities.
I believe that if you learn how to purposefully use the zoom functionality in different areas of Lightroom that you can save time and improve your editing by making it more fluid and less interrupted.
In this article, I illustrate how I use the zoom functionality of Lightroom throughout my editing process from start to finish.
Trust me, it’s more complicated and sophisticated than you think.
How to Zoom In Lightroom: Basic Zoom Controls
The easiest way to zoom in Lightroom is merely by clicking anywhere in the selected photo in a single image (loop) view. Doing this causes it to zoom into a previously used (default) zoom magnification level. Clicking a second time anywhere in the image zooms out and takes you back to the original view.
You can change the default magnification levels but this is a more advanced feature that you will learn more about in this article.
How to Zoom In Import Module
Few photographers use the zoom functionality in the Import Module, including me.
The idea of evaluating the photo before bringing it into the Lightroom catalog with the option to discard it if necessary is a very compelling proposition.
But, the issue is that before a photo is imported to Lightroom, there is not a high-quality preview available and the only option for evaluation is to embed a low-resolution JPEG inside a RAW image.
Related: How to Create and Use Import Presets
Occasionally, when I am back from a day or half-day trip with only a handful of photos, I might use the Import Module to identify and discard unwanted shots.
The Way I use Zoom in Import Module
My favorite way of zooming in and out in the Import Module is to use the shortcuts:
Ctrl +/- on a PC (plus/minus) or Cmd +/- on a Mac (plus/minus)to go through 8 zoom levels.
More Options
Ultimately, you can use the Zoom slider on the right side of the toolbar below the photo.

How to Zoom In Library Module
The primary function of the Library Module of Lightroom in my workflow is to identify the photos I might consider for developing and publishing (the keepers). This process is also known as culling.
My culling process consists of two stages.
First, I go through all the newly imported photos one by one with a single purpose—to identify all the inadequate shots, the ones that can never be used, and flag them as rejects.
For example: out of focus or blurry shots, or accidental shots of my boots.
Second, I go through my photos again with the goal of pinpointing the best shots I consider for developing and ultimately publishing. I flag these as keepers.
Lightroom’s zoom functionality is an essential part of the culling process since I zoom in on different areas of the photo before making my decision as to whether the selected photo is a reject or a keeper.
Related: How to Undo in Lightroom
I start culling by hitting the TAB key to hide both the left and right panels. Since I do not need any tools during the culling process, I like to keep my workspace uncluttered.
The Way I use Zoom in Library Module
I go through photos in a single (Loop) image view one by one using the arrow key. When I am not entirely sure if the selected picture is a keeper or not, I hit the “F” keyboard shortcut that tells Lightroom to take over the entire screen and display the photo in “full screen.” When I hit “F” a second time, it takes me back to the single image (Loop) view.
At this point in my culling process, I am typically ready to make my decision. But, if I still need more data, I use a more selective evaluation.
Related: Lightroom Organization Tips in Library Module
I hold the SPACEBAR down and use the Hand Tool to pan around the image to evaluate the various areas of the photo. The Hand Tool only appears when the spacebar is down.
In most cases, I examine if I nailed the focus and if the right areas of the photo are perfectly sharp. When I am finished examining, I release the SPACEBAR and am back where I started.
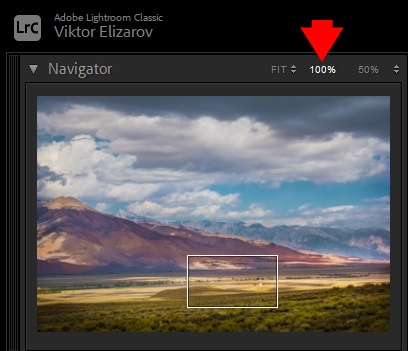
Here is a small, but critical detail. When you hit the SPACEBAR, it goes to the previously used zoom level. When evaluating images, I want to always use the 100% magnification and, to ensure 100% is the default value, I must click the 100% icon in the Navigator Panel.
More Options
By hitting the keyboard shortcut “Z” once, it takes you to the previously used zoom level. By hitting “Z” a second time, it brings you back to the original zoom state.
Use the shortcuts Ctrl +/- on a PC (plus/minus) or Cmd +/- on a Mac to go through all 12 existing magnification levels.
Box Zoom
Box Zoom is a relatively new feature that was introduced in Lightroom 10 in 2020. It allows you to zoom into a specific area. Press down the Control key on Windows or Command key on Mac and drag the box with your mouse around a specific area. Box Zoon works in both Library and Develop modules.
How to Zoom In Develop Module
When I switch to the Develop Module of Lightroom, this means that I have a particular image that I want to work on. It also means that I no longer need the navigational menus.
I start my develop workflow by hitting the F5 and F6 keys to hide the top and bottom filmstrip panels. I want to maximize my workspace and have direct access to the presets on the left panel and the editing sliders on the right panel.
The Way I Use Zoom in Develop Module
I most often use basic zoom controls in the Develop Module.
I magnify the specific area I am planning to edit by clicking on the image. This takes me to the 100% zoom level. I use the Hand Tool to pan around as necessary. Depending on the photo, I use various selective editing tools like the Adjustment Brush, Radial Filter, Spot Removal and so on. When I am finished, I click anywhere in the image to return to the original size.
On rare occasions, when I need to zoom beyond 100%, I use the Navigator Panel to select the magnification level needed.
Related: How to Use Masking in Lightroom
The second zoom control I use in the Develop Module is the “F” shortcut. Once again, this takes the photo into full-screen mode and allows me to better examine my editing progress.
Box Zoom
Box Zoom is a relatively new feature that was introduced in Lightroom 10 in 2020. It allows you to zoom into a specific area. Press down the Control key on Windows or Command key on Mac and drag the box with your mouse around a specific area. Box Zoon works in both Library and Develop modules.
Scrubby Zoom
If Box Zoom feature works in both Library and Develop modules, Scrubby Zoom works in the Develop module only. It is new advanced feature that requires GPU acceleration to be turned on.
Press down the Shift key and by dragging the mouse to the right or left you can increase or reduce the magnification levels.
How to Zoom In Map Module
Since my Fujifilm camera does not have GPS tagging functionality, I use the Map Module to manually geo tag my photos. Before uploading the photos to SmugMug, I make sure every photo has GPS coordinates embedded into the metadata.
Using Zoom in Map Module
There are two zoom controls I use a lot that are unique to the Map Module.
First, I use the mouse wheel to zoom in and out the same way the wheel works in the web version of Google Maps. I love this feature and wish it was implemented into both the Library and Develop Modules.
Second, by pressing the Alt (Win) or Option (Mac) key down and dragging the rectangular area on the map, I can zoom in to a specific area. Priceless.
You can also double-click to zoom in, but to zoom out, you must use the zoom controls or the mouse wheel.
Advanced Controls of the Navigator Menu
The Navigator Panel offers a variety of controls and options for zoom functionality in Lightroom.
Setting the Active Zoom Levels
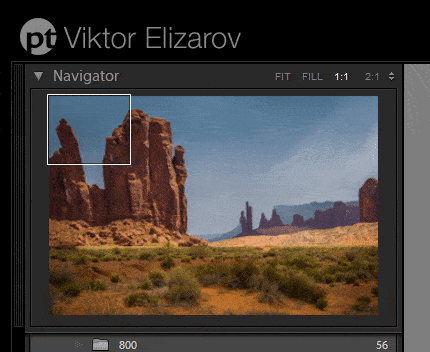
At the top of the Navigator Panel, you will find 3 icons that represent the active zoom levels. One of the zoom options is constant (100%) and the last is selectable.

I always set the selectable option to 200%. This means I always have 3 options (Fit, 100%, and 200%) available to me with one click only
Related: Adobe Lightroom Workflow Tips for Beginners
Optionally, you can use Ctrl +/- on a PC (plus minus) or Cmd Alt +/- on a Mac to go through all 12 of the predefined zoom levels.
Fit vs Fill Zoom Levels
The “Fit” magnification option is obvious and uncomplicated. Lightroom automatically selects the magnification level to fit the entire image inside the available working area.

The “Fill” option is more confusing and less apparent. Lightroom selects the magnification level to fit the shortest side of the image, making sure the entire working area is filled.
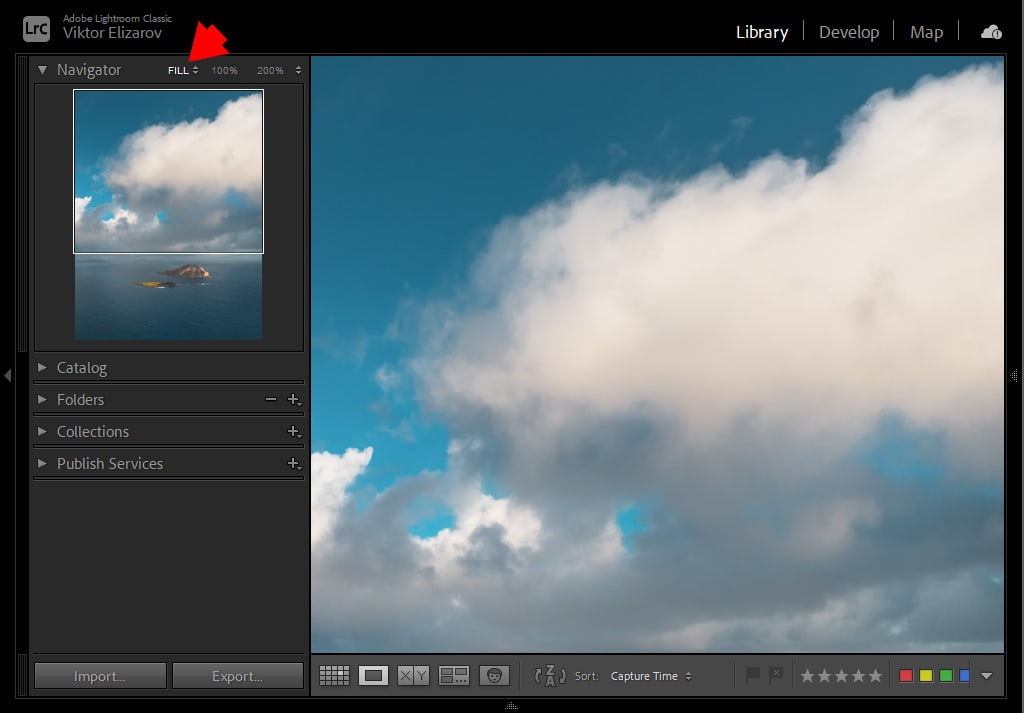
I do not find the “Fill” option to be very useful for my workflow and wish there was an option to hide it.
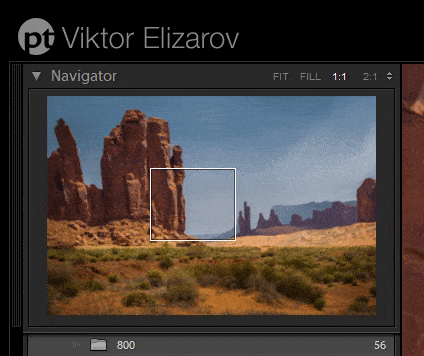
Exploring the Image using Navigation Panel
When you edit a high pixel count image and use the 100% zoom magnification, it is easy to get lost and not know what part of the image you are exploring.
This is when the Navigator Panel can help. After zooming in, you can drag the white rectangle inside the Navigator Panel to move around the image.
Advanced Evaluation
When I work on a portfolio piece, I want to make sure that every area and pixel of my final photo is processed correctly—that I removed all the artifacts caused by sensor dust and did not miss any noisy spots during noise reduction. The process can be time-consuming when dealing with high-resolution images.
This is when I use one of my favorite features in the Navigator Panel.
I click the 100% zoom option. I hit the “Home” key, which tells Lightroom to place the white rectangle in the top left corner of the Navigator Panel.
Next, I start hitting the “Page Down” key and Lightroom methodically goes from one area to another without missing even one pixel of the photo until it reaches the bottom right corner. This helps me assess the entire image in a very short time.