
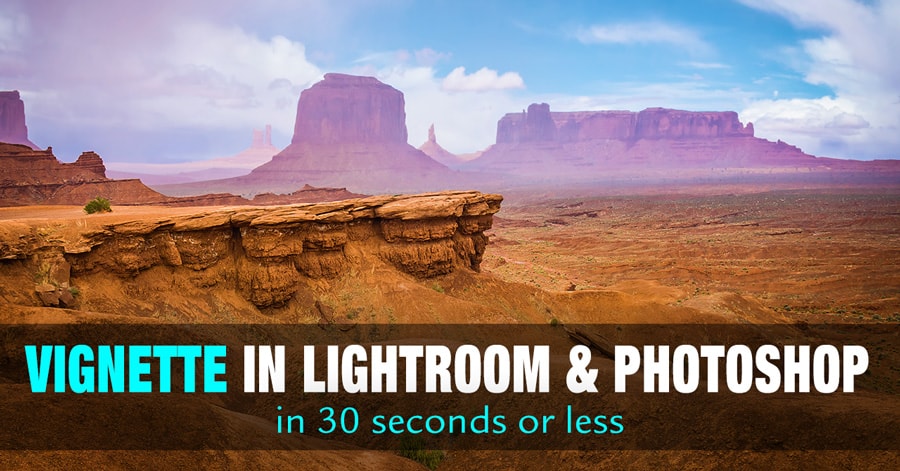
If you’re looking to learn how to add a vignette in Photoshop and Lightroom in no time, then you’ve come to the right place.
In this article, I’m going to cover everything you need to know about vignette–so that by the time you’ve finished, you’ll know:
- What vignette is
- Difference between Optical and Creative vignette
- How to add a vignette in Photoshop
- How to add a vignette in Lightroom
What is Vignetting?
In optics and photography, vignetting is the difference in brightness between the center and the edges of the image.
In plain English, vignetting means that the further we move from the center of the image, the darker it becomes.
There are two types of vignetting.
One is unintentional and is generated by photography equipment. We do not have much control over this type of vignetting since it occurs when we take the photo.
Another type of vignetting is the one we deliberately create in post-processing. This serves as a creative tool in producing photographs.
Unintentional Optical Vignetting
Lens design is the primary cause of optical vignetting. It is present in every lens model but at different degrees. In some lenses, vignetting can be very prominent and, in others, it can be hardly noticeable.
The same lens produces different levels of vignetting depending on the user settings. For example, optical vignetting is more prominent when shooting at wider apertures.
Over the last 10 years or so, optical vignetting in photography has become less of an issue.
First, lens design is constantly improving, and, as a result, vignetting becomes less prominent.
Second, it is much easier to digitally correct the vignetting effect in post-processing. Since all lens manufacturers know exactly how their lenses behave in regard to vignetting, they provide lens profiles for every lens model. The removal of unwanted vignetting then becomes a one-click process in Lightroom and Photoshop.


Some manufacturers like Fujifilm take it even further by embedding the lens profile into every RAW image at the time of the shooting. The correction is then automatically applied when you import photos into Lightroom.

Vignetting as a Creative Tool
Over the years, photographers have learned how to purposefully use vignetting and have made it an essential tool in achieving interesting and meaningful compositions.
When you identify the focal point of the composition, you might use different techniques to emphasize it. For example, you might use the rule of thirds to strategically position your point of interest to make it more visible. You might also use the leading lines technique to lead the viewer’s attention to one specific object.
Vignetting helps us to direct the viewer’s attention by using different levels of brightness. By making the edges of the image darker, we immediately draw more attention to the center of the composition and deemphasize the periphery.
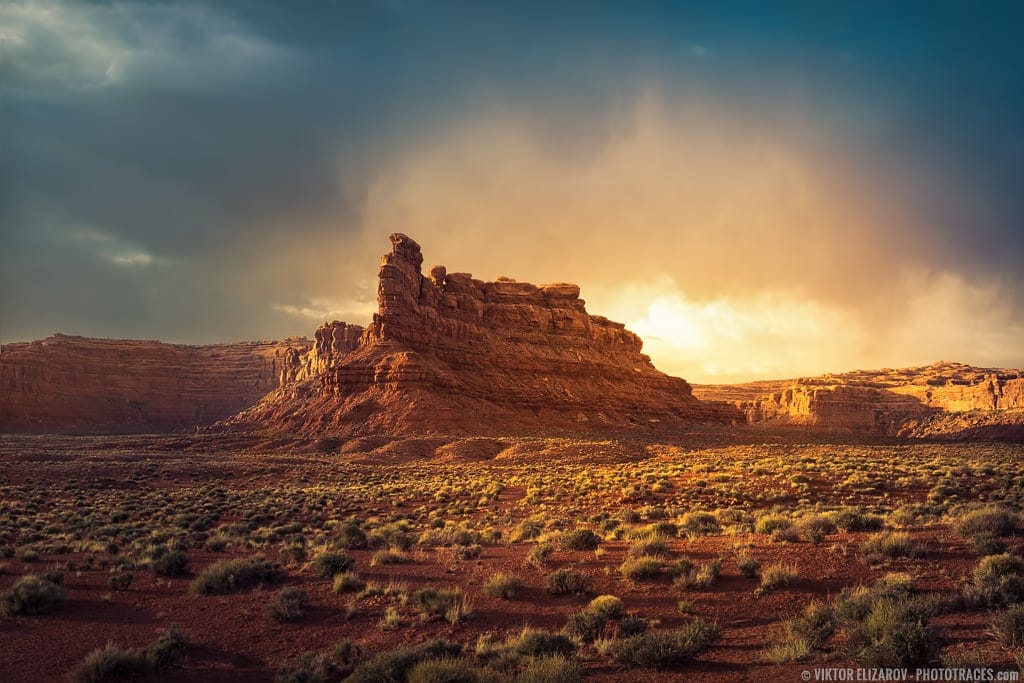
I used quite a strong vignette to draw attention to the focal point of the composition.
Each photographer approaches vignetting differently. Some photographers do not use it at all and others use it aggressively. The way we use vignetting becomes part of our personal style in photography.
Related: Still Looking for Lightroom Alternative? I can Help
In my case, I use vignetting in 90% of my photos. But, I address vignetting differently in my landscapes and in my portraits. In landscapes, I use mild vignetting that is unnoticeable to the untrained eye and works mostly on the subconscious level. In portraits, I use vignetting much more aggressively to draw as much attention as possible to the main subject.
See also: How to Smooth Skin in Lightroom
Here is an example of how vignetting affects the composition and the viewer’s perception.
I took the featured photo in the Canadian province of New Brunswick during my trip to Grand Manan Island.
The focal point of the composition is the lighthouse on top of the cliff.
Here is how the photo looks without any vignetting:
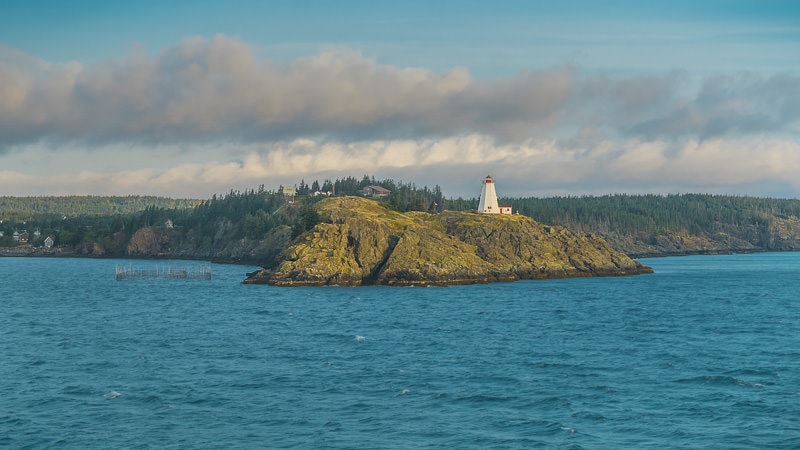
The second version is the final iteration of the photo, the one I added to my portfolio. Here, I applied a very mild vignette. Even though it is not very noticeable, it is present. When you compare it with the original version, it becomes apparent.

The last version demonstrates how a photo looks with very strong vignetting applied.

Now, I want to show you the practical applications of vignetting and how I use it in my photography.
3 Ways to Add Vignetting to a Photograph
Lightroom Rapid Editing Toolkit
For those who adopted the Lightroom Rapid Editing workflow, the process of adding vignetting to any photograph is a single-step process.
Related: Download my Free Travel Presets for Lightroom
Since vignetting is something I use with every photograph I edit, I added four vignetting adjustments to the TOOLKIT.
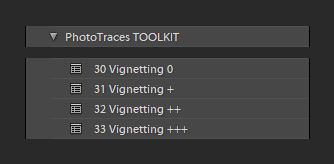
The adjustments gradually increase and go from Vignetting 0 to Vignetting +++.
How to Add a Vignette in Lightroom Manually
In my editing workflow, the TOOLKIT adjustments are all I need 80% to 90% of the time. In the event I need more control and precision, I jump to the Effect Panel of the Lightroom Develop Module.
You have plenty of options to control the vignetting effect in the Effect Panel and can tailor it to your specific needs.

In my photography, I use the Amount and Midpoint sliders the most often.
First, I set the desired vignetting strength using the Amount slider. Next, I use the Midpoint slider to adjust how tight it is to the principal object of the composition.
How to Add a Vignette in Photoshop
I always try to do as much as my editing as possible in Lightroom’s nondestructive RAW environment. But, in the event I need more power and precision, I jump from Lightroom to Photoshop to finish the editing process.
For example, the Spot Removal tool in Lightroom is a bit limited for masking and removing complex objects. When I need to remove electric wires and power poles or unwanted people, I need the power of the Stamp Tool in Photoshop.
Related: How to Apply Saturation and Vibrance in Lightroom
In these cases, I add vignetting in Photoshop. Don’t be scared—it is a straightforward process without any complexities.
Let’s see how to add a vignette in Photoshop

Step 1
Select the Elliptical Marquee Tool (M) from the Toolbar.

Step 2
Drag the mouse from the top left corner to the bottom right corner to create an elliptical selection.

Step 3
Create the Levels Adjustment Layer by clicking the adjustment icon at the bottom of the Layer Pallet and select the Levels option.

Step 4
In the Levels Properties panel, drag the middle slider to the right until you reach a value of 0.70.


Step 5
Click the Mask icon to switch from Levels Properties to Masks Properties.

Step 6
Click the Invert option to invert the mask.


Step 7
Set the Feather value to 333px. The Feather value will vary depending on the dimension of your image. A Feather value of 333px works best for 24Mpix images.


Step 8
Finally, use the Opacity slider in the Layer Palette to adjust the strength of the vignette to the desired result.


You are finished!
Wrapping it up
Vignetting is a very simple technique in photography and, in most cases, is unnoticeable to the general public. But, it plays an important role in producing photographs with a stronger impact and emphasis. Learn to make a habit to play with the vignetting settings at the end of the editing process to add a final touch to your photographs.