
If you want to learn how to copy and paste edits in Lightroom, you’ve come to the right place. Because copying and pasting edits is the easiest way to process a large volume of photos, especially if they were taken in similar conditions.

Lightroom offers multiple options for copying and pasting editing adjustments from one photo to another. Still, the simplest and the most effective way of doing it is to use keyboard shortcuts.
To copy and paste edits in Lightroom:
- Select a photo with applied edits in Develop Module.
- Use the keyboard shortcut ‘Ctrl + C’ (‘Command +C’) to activate the copy settings panel.
- Choose the ‘Select All’ option and press the ‘Copy’ button.
- Select the unedited photo and use the ‘Ctrl+V’ to paste editing adjustments.
The above technique works exceptionally well when you need to edit a group of photos taken in a controlled environment, such as portrait studio photography or product photography. As a norm, you use identical camera settings when lighting conditions are not changing.
But suppose you are a landscape or travel photographer who deals with sunsets and sunrises where lighting conditions change constantly. In that case, you need to modify the “copy and paste edits” technique slightly.
Let me show you how I use the technique in my Lightroom processing workflow.
How to Copy and Paste Edits in Lightroom
When I come home from the road trip, let’s say from Utah, I have multiple groups of photos taken in various locations. For example, big batches of images from Zion, Bryce Canyon, and Grand Canyon.
As a rule, I will process them separately as 3 individual sets. I aim to achieve a distinctive editing look for each location, but I want to keep a consistent visual style for each set.
Bryce Canyon has predominant orange hues, Zion has plenty of vegetation, and Grand Canyon has almost no greenery. As a result, each location requires slightly different processing.
After importing new images to Lightroom, I concentrate on processing one location at a time.
Let’s say I start with photos taken in Zion.
First, I select the photo which best represents Zion. It is a judgment call; I do not have specific rules here. Most often, I choose the image I like and enjoy editing.

Since I use the “Exposure to the Right” shooting technique to set the exposure, most of my photos are slightly overexposed. It requires that I start my editing process by adjusting the exposure. I need to bring it down.
Next, I go through the different collections of the presets, trying to pinpoint the look I like.
Finally, I fine-tune the image using the TOOLKIT adjustment presets. The TOOLKIT comes with each preset collection I develop.
If you prefer a fully manual method without presets, use the right panel editing sliders to achieve the desired look. But, I find that presets-based workflow is much more efficient. It allows me to go through different creative looks in minutes.
When I am happy with the final look, it is time for “copy and paste editing.”
In the Develop Module, at the bottom left corner, locate the ‘Copy’ button and hit it.
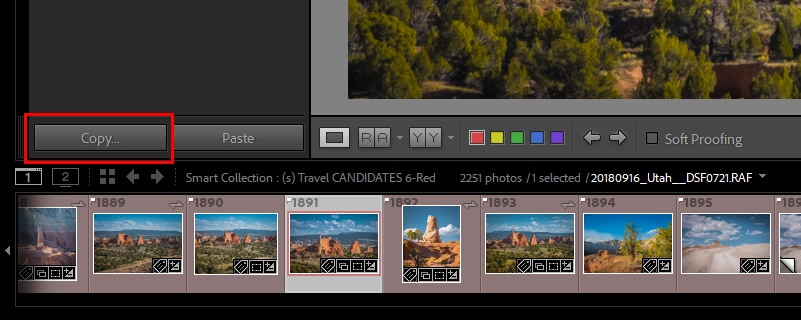
The ‘Copy Setting’ window will pop up.
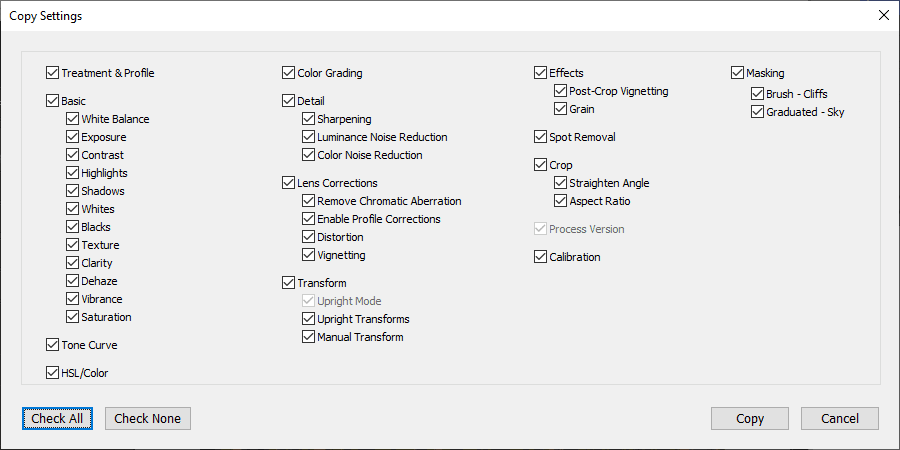
Inside, you will find all the editing adjustments available for copying.
Important. The Copy Editing Settings window is organized in distinctive groups which correspond to the main editing panels of Lightroom.
For example, the Basic group of the ‘Copy Settings’ window reflects the adjustment sliders of the Basic Panel.

- You have options to check or uncheck individual adjustments, such as Exposure or Contrast.
- Also, you can select entire groups by checking the group name.
- Ultimately, you can select or unselect every adjustment by clicking the ‘Check All’ or ‘Check None’ buttons.
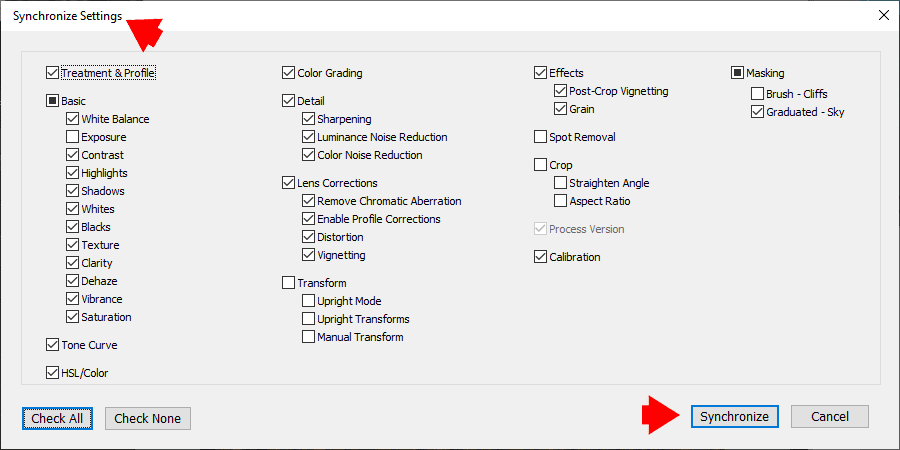
But before copying editing settings, you need to uncheck the adjustments that will be unique for every photo in the group.
You start by clicking the ‘Check All’ button to select everything.
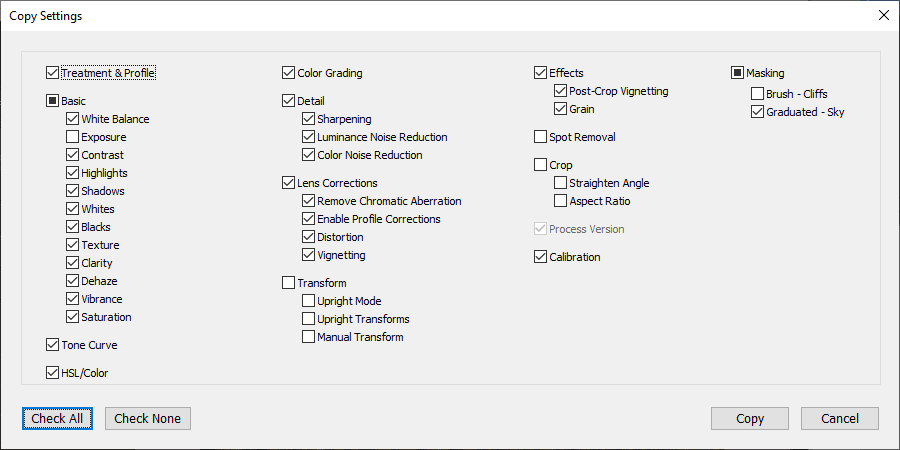
Next, you need to uncheck the following adjustments:
- Exposure – for each photo, you will need to adjust the exposure individually.
- Entire Transform Group – it is almost impossible to have a batch of photos that requires identical adjustments when you need to straighten the photo (horizon or verticals)
- Spot Removal – even if you have dust on your sensor, it will appear in different places depending on zoom levels.
- Crop Group – cropping is always unique. Even the aspect ratio will be different for some images.
- Masking – is a bit different. If you use masking as a graduated filter to darken the sky, you can keep it checked. But, if you have unique objects isolated in your photo, you need to keep them unchecked.
Below is the screenshot of the ‘Copy Setting’ window I often use when employing the “copy and paste editing.”
Now you are ready to hit the ‘Copy’ button.
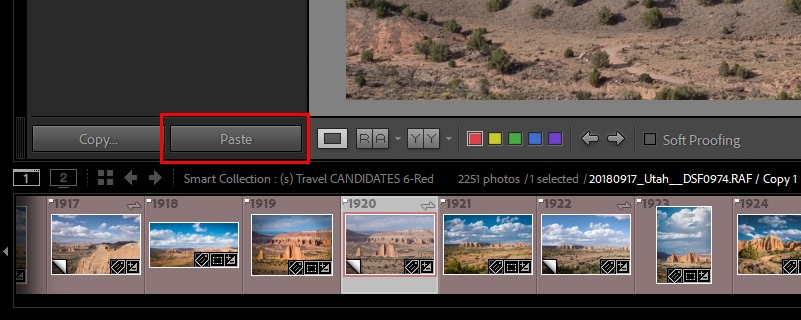
The last step is the ‘Paste’ which is the most uncomplicated and straightforward.
You select an unedited photo in the filmstrip of the Develop Module and hit the ‘Paste’ button next to the ‘Copy’ button in the bottom left corner.
Copy and Paste Edits Keyboard Shortcuts in Lightroom
If you are a shortcut person, you have an option to use the keyboard shortcuts instead of the buttons when using the ‘copy and paste edits’ method.
Related: Top Lightroom Keyboard Shortcuts
It is easy to memorize the copy and paste shortcuts in Lightroom because they are identical to thousands of applications, including Photoshop and MS Word.
Use the ‘Ctrl+C’ (‘Command+C’) shortcut when you are ready to copy the group of setting from the edited photo.
It will activate the ‘Copy Settings’ window.
Select the group of adjustments you want to copy from one photo to another and press the ‘Copy’ button.
To paste settings to another photo, use the keyboard shortcut ‘Ctrl+V’ (‘Command +V’).
How to Copy and Paste Settings to Multiple Photos in Lightroom
To copy and paste settings to multiple photos in Lightroom, you need to use the Synchronization technique.
Finish editing any given photo in the Develop Module, press the ‘Ctrl’ (‘Command’) keyboard key and select multiple images in the filmstrip. Finally, press the ‘Sync…’ button at the bottom right corner to synchronize the editing setting across selected photos.

The ‘Sync’ technique is the variation of ‘copy and paste edits,’ but you synchronize the settings across multiple images instead of coping editings from one photo to another.
After you select multiple photos and hit the ‘Sync…’ button, you will be presented with the ‘Synchronize Settings‘ window, which is identical to the ‘Copy Settings’ window of the ‘copy and pastes edits’ method.
The thought process of what setting to check or uncheck is identical to the previous method. You only check the common adjustments among the group of processed photos.
I find that the ‘Sync…’ method is more flexible and better suited to my editing workflow.
I used it much more often compared to the ‘copy and paste edits’
How to Copy and Paste Settings to Multiple Photos in Library Module
You can’t use the ‘copy and paste edits’ technique in Library Module by keyboard shortcuts, buttons, or menu commands.
But the synchronization method is available in Library Module. The only caveat is, for some inexplicable reason, you have to use the ‘Sync Settings’ button and not the ‘Sync.’ The ‘Sync’ button is reserved for batch editing on photos metadata.

The rest works the same as in the Develop Module.
How to Copy and Paste Edits in Lightroom: Final Thoughts
The ‘copy and paste edits’ is a cornerstone of batch processing in Lightroom. Understanding how to use it effectively will help you to speed up and streamline your Lightroom editing workflow.
In my case, I often use the ‘Sync…’ method when I need to synchronize multiple edits among a group of photos.
I find the ‘copy and paste edits’ most valuable when I need to paste only one or two settings from one photo to another. For example, when I see an exciting split toning treatment on one photo, I copy the ‘Color Grading’ adjustment only and paste it to another image without affecting anything except the Color Grading. The rest of the editing adjustments stay intact.